1/15th Ton Jack Screw
thingiverse
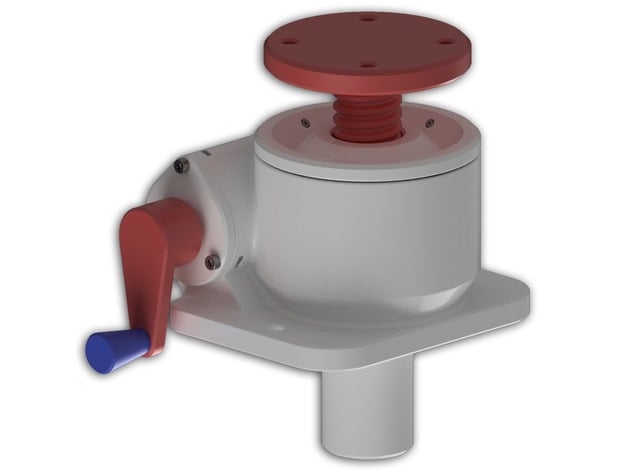
Needle Roller Worm Gear Jack Screw A DC motor driven version of this jack screw can be found here:http://www.thingiverse.com/thing:2219156 Description: Identical design as an actual jack screw used in industry down to the bearings, gearing, and how the preload is adjusted. Some changes were made to the housing and gears so that it can be printed without supports. Every part is 3D printable with the exception of the needle roller bearings which I used dowel pins for. Specifications: Worm Reduction: 30:1, 3/8” hex output shaft, anti-rotation keyway, 2” total travel, 1” dia. lead screw, M6 base mounting holes, M5 nut traps in tooling plate, Load rating: 150lbs Max. Working load should be less. Thread Pitch Options: Single Start: 1”-5 , Lead = .2” / with worm reduction per rev = .0067” Double Start: 1”-2, Lead = .5” / with worm reduction per rev = .0167” Quadruple Start: 1”-1, Lead = 1” / with worm reduction per rev = .0333” Required hardware: 1/8" DIA. X 3/8" LG. DOWEL PIN – 24X (FOR DRIVE SHAFT BEARINGS) 3/16" DIA. X 1/2" LG. DOWEL PIN – 12X (FOR DRIVE SHAFT BEARINGS) M3 X .5 - 10MM LG. SET SCREW (or SHCS) – 4X M3 X .5 HEX NUT – 10X M3 X .5 SOCKET HEAD CAP SCREW 10MM LG. – 6X M5 x 0.8 HEX NUT (for mounting to the tooling plate) Required prints for compete assembly: (See Assembly.pdf) Jack Screw Housing Housing Cap Worm Gear (Optional Starts) Lifting Screw (Optional Starts) Drive Gear Drive Bearing Cap (2X) Drive Bearing Shim Small Roller Cage (2X) Large Roller Cage (2X) Crank Handle Handle Swivel Dust Cover Bearing Shim ( print at assembly) Riser Base (optional) Printing notes: Before printing select desired thread pitch for your application; single, double, or quadruple. (Detailed above) Make sure the screw pitch matches the nut pitch. No supports are required for any of the parts. I printed the drive shaft on a raft to keep it stable since it will need to be printed vertical. Assembly Instructions: Set a bearing cap face up on the table and insert the smaller roller cage and fill it with 1/8” dowel pins(6x), see picture "ASSY-1". Carefully install the long end of the drive shaft into the cap. Keep pressure between the cap and the shaft to keep the rollers from falling out. Install the drive shaft and cap into the housing. Install M3 nuts(3X) into the traps and bolt the bearing cap into the housing with the M3 x 10mm lg. SHCS. Put the other small roller cage in the other bearing cap and fill it with rollers(6x) just like the first cap. Carefully install the bearing cap into the housing. Put the nuts into the traps and loosely tighten the screws. Remember to keep pressure on the hex shaft while doing so to keep the rollers from falling out. Spin the shaft and adjust the tightness of the screws so you get the correct amount of preload on the bearings. Measure the space between the cap and the housing, it should be .075”. If so, print the shim. If not, adjust the thickness of the shim by the z-offset in your slicer to achieve the required thickness. Take the bearing cap back off and install the shim onto the cap and reinstall the cap onto the housing. Now with the fasteners tightened the drive shaft should spin freely. Put a large roller cage in the housing and fill with 3/16” dowel pins(12X), see picture "ASSY-9". Next install the worm gear, then the second cage, and the remaining 3/16” dowel pins. Put four M3 nuts and set screws in the four nut traps on the housing cap and thread the cap into the housing Note: Socket head cap screws can be substituted for the setscrews as it will make it a lot easier to install. The head on the cap screw will keep the nuts from falling out of the traps. Set the tightness of the cap so you get the proper amount of preload on the bearings. The drive shaft should spin freely but not be to sloppy when you have the correct amount of preload on the rollers. Once set properly tighten the set screws to keep the cap in position. Install the swivel on the handle and the handle on the jack screw. Insert the lifting screw into the cap and turn the handle to tread it into the worm gear. Thread the dust cover into the back of the housing. Finished! General notes: ● Because the small build area on my printer I was limited to only 2” of travel. I could also only put a shaft extension off one side of the jack screw. With an extension on both sides it would be possible to link several jacks together. If you would like a screw with more travel or double shaft extension, let me know. ● It would be advisable to use Lithium grease on both the gears, threads, and the bearings. Print Settings Printer: Monoprice Select Mini Rafts: No Supports: No Notes: I would use a raft to stabilize the drive shaft when printing, but other then that no supports or rafts required.
With this file you will be able to print 1/15th Ton Jack Screw with your 3D printer. Click on the button and save the file on your computer to work, edit or customize your design. You can also find more 3D designs for printers on 1/15th Ton Jack Screw.