1:500 Scale Titanic Sinking Hull v6
thingiverse
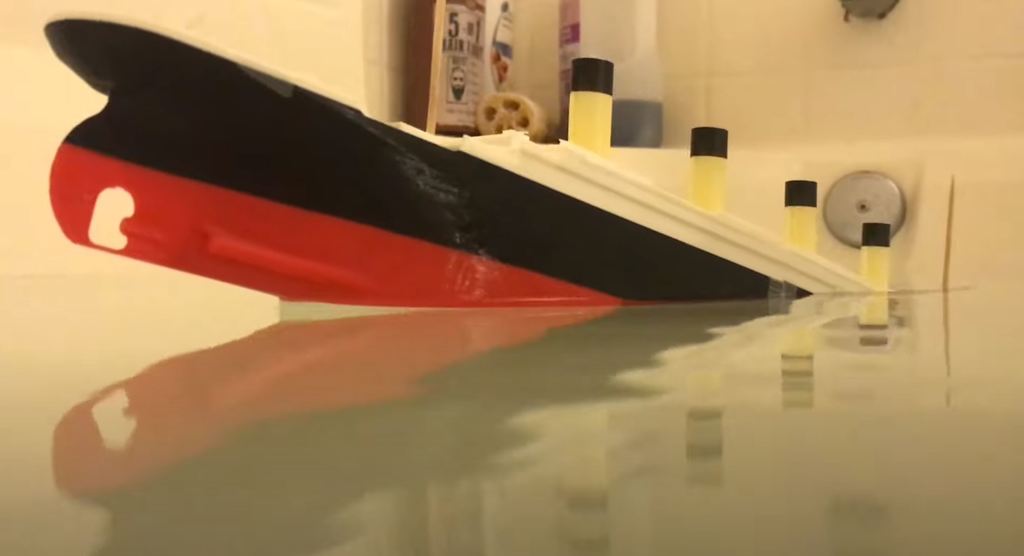
https://youtu.be/mcP6Whzzy8s https://youtube.com/playlist?list=PLgBe_yUTtb-MtcXCTxv-__ONrKyp5N0Rq NOTE: I spent a lot of time working on this model years ago and encountered a lot of printing issues with this. While its certainly likely that it was just due to my printer screwing up and not the model being unprintable... Print at your own discretion. I have uploaded this due to many requests. I modeled this at 1:1000 scale, you will need to scale up the parts by a factor of 2 for this to print correctly at 1:500 scale. The hull gauge is at the correct scale, the funnel gauge needs to be scaled up. Materials needed: - RED, BLACK, WHITE, & YELLOW/GOLD PLA filament. - Fishing weights... approximately 3/16" diameter and 1/4" long. - BBQ Skewers... approximately 3/32" diameter and cut to a length of 50mm or 31/16". - Patience... To get the colors I have included color gauges for the hulls and funnels, pause the print when the gauge tells you to or add pauses in the printer settings if you have that capability. To use the included gauge, it includes two step-downs per pause, the first step down is a 10 layer warning. Pause the print after the 2nd layer on the model after the 2nd step down. Printing Settings I attempted: Bow & Stern: - 0.4mm Nozzle w/ PLA - 0.2mm Layer Height - Zero Infill - 2 Shells Begin Printing in RED, first pause should be at layer height 51 or actual height 10.2mm, insert the fishing weights into their cubbies. The 2nd pause is at layer height 105, or actual height 21.0mm, change filament color to BLACK. The 3rd pause is at layer height 223 or actual height 44.6mm, change filament color to WHITE. Funnels: - 0.4mm Nozzle w/ PLA - 0.2mm Layer Height - Zero Infill - 1 Shell Begin printing with funnel upside-down, Start with BLACK, pause print after the first layer after the gauge stepdown, then change filament to YELLOW/GOLD. To make this model float properly it is recommended to cut out the sections in the well decks with a hot-knife, as well as the sections between the hulls (above the water line). This allows you to add ballast in the form of glue, or small fishing weights, to fine tune how much the model displaces until it looks to be about right. To make it sink properly just drill 1/16" holes into the front bow section where the iceberg damage should be. You can tape over the holes to let it float. To keep both sections together... I used Tape in for my model... I originally wanted to use magnets but this didn't quite work out on this model. Feel free to see if you can make it work.
With this file you will be able to print 1:500 Scale Titanic Sinking Hull v6 with your 3D printer. Click on the button and save the file on your computer to work, edit or customize your design. You can also find more 3D designs for printers on 1:500 Scale Titanic Sinking Hull v6 .