1:64 Chryslus Cherry Bomb (Rocket 69)
prusaprinters
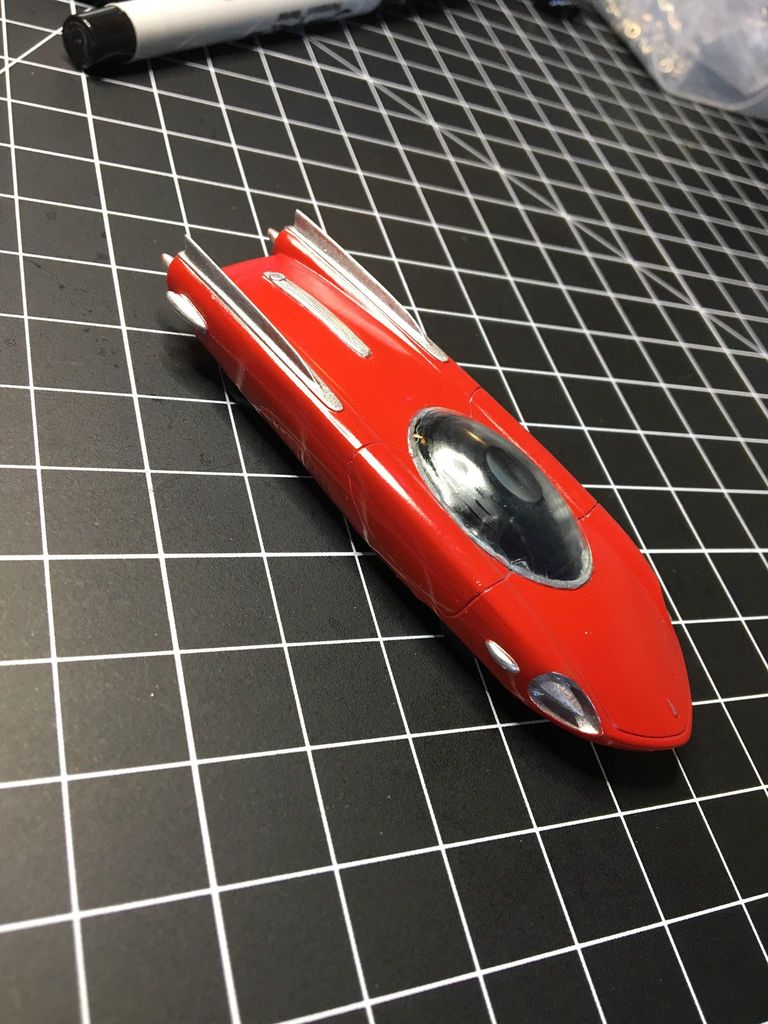
<p>Used the body mesh from FreBvhme's model, and other miscellaneous parts from skipstitch's. Un-Triangulated model for better subdivision, scaled to 1:64 using dimensions found on web (linked and then copied below for posterity.) Modified some other parts for simplicity and scalability. Including .blend if anyone wants to mess with it further. Base/wheels is held to the rest of the model with 2 tiny screws pulled from some disassembled electronics.</p><p>The body is separated into a top and a base with holes for 1mm axles. Hollowing should not be necessary for this on when printing in resin.</p><h3>Print Settings</h3><p><strong>Printer Brand:</strong></p><p>Anycubic</p><p><strong>Printer: </strong></p><p>Photon</p><p><strong>Rafts:</strong></p><p>Yes</p><p><strong>Supports: </strong></p><p>Yes</p><p><strong>Resolution:</strong></p><p>30 micron</p><p><strong>Infill: </strong></p><p>nope</p><p><strong>Filament:</strong> Siraya dlp resin Blu (translucent)</p><p><br> </p><p><strong>Notes:</strong></p><p>Originally remixed from Thingiverse thing:</p><p> <a href="https://www.thingiverse.com/thing:2755994">https://www.thingiverse.com/thing:2755994</a></p><p>Printed with the car body bottom against the build plate with heavy supports on the inside and around edges, and medium supports for the underhanging parts of the car body.</p><p>The base was printed 90 degrees to the build plate with heavy supports on the bottom edge.</p><p>The dome/windscreen was printed bottom to the build plate, with medium supports all the way around the outside and absolutely none inside. This might yield better results as resin pooled in the top part of it, affecting visibility afterwards.</p><h3>Post-Printing</h3><p>Washed in Isopropyl alchohol and UV cured.</p><p>Body:</p><p>Prior to curing chased (redrilled) the holes in the base mounts with a small drill bit and a pin vise, taking care not to drill through the top of the car. Small screws seem to be able to thread themselves nicely even after curing. "Wet Filed" with some cheap Harbor Freight diamond mini files (keep the model and files wet and wash off filings in a bowl of warm soapy water.) went over sections as good as possible using 2000 grit sandpaper to remove layer lines, rinsed and then painted. Tamiya undercoat and Tamiya Italian Red spray cans, followed by chrome paint and clear coat. Interior painted by hand with a tiny paintbrush.</p><p>Base:</p><p>Filed off support marks and chased out the holes (redrilled them) with a pin vise and ~1.16mm drill (no idea what it was supposed to be, found it laying around in rotary tool accessories.)</p><p>Dome:</p><p>Cured with supports still attached. Gently filed off support marks around edge after curing, used 2000 grit sandpaper to gently sand the inside and outside surfaces. Dipped in "Mop & Glow" acrylic floor polish 3x, resending with 2000 grit in between each time until translucent after drying. I've seen recommendations for "Pledge" brand floor polish as well as a product called Gauzy, however I've never tried these myself.</p><p>Assembly:</p><p>Parts were fitted together, painted and then the dome was glued to the top with a thin bead of super glue spread with the edge of a toothpick. The bottom screws into the top.</p><h3>Misc:</h3><p>Wheels used for reference:</p><p>https://smile.amazon.com/gp/product/B07S37VZ2R/</p><p>It should also be possible to use some of the 1:64 scale wheels/HO scale wheels from thingiverse with appropriate wire for axles.</p><p>Dimensions I used for scale taken from <a href="https://www.gtplanet.net/forum/threads/chryslus-rocket-69-2069.346951/">https://www.gtplanet.net/forum/threads/chryslus-rocket-69-2069.346951/</a></p><p>1:1 DIMENSIONS</p><p>• Weight: 2190.8 kg (4830 lbs)</p><p>• Length: 6000 mm (236.2 inches)</p><p>• Width: 1990 mm (78.3 inches)</p><p>• Height: 1180 mm (46.4 inches)</p><p>• Wheelbase: 2870 mm (113.0 inches)</p><p>Things I wish I'd done differently:</p><p>I wish I'd chromed parts and painted the interior after clearcloating. I used Tamiya TS-13 over the body after painting and it seemed to knock the shine right down on the chrome :-(. For reference, I took a Molotow chrome pen, blotted out the chrome "ink" onto the bottom of a small plastic cup/palette and painted the parts with a detail brush, using hobby masking tape on the rear parts where there were straight-ish lines to protect the bodywork.</p><p>I wish I'd used a matched drill/tap set and matching screws for this. 2mm or 2/56 for imperial ppl seem to be the popular sizes for Matchbox/HotWheels restorers/customizers. The screws I wound up using I believe came from disassembled hard drives and were used to hold the platters on.</p><p>In the future will look into using bevel functions to produce door and hood/trunk lines. These were necessarily exaggerated so that they would show up in the final print, however this was done somewhat crudely.</p><p> </p><p> </p><p> </p><p>Category: Hobby</p>
With this file you will be able to print 1:64 Chryslus Cherry Bomb (Rocket 69) with your 3D printer. Click on the button and save the file on your computer to work, edit or customize your design. You can also find more 3D designs for printers on 1:64 Chryslus Cherry Bomb (Rocket 69).