1 Part Mold Making with Draft Angles
thingiverse
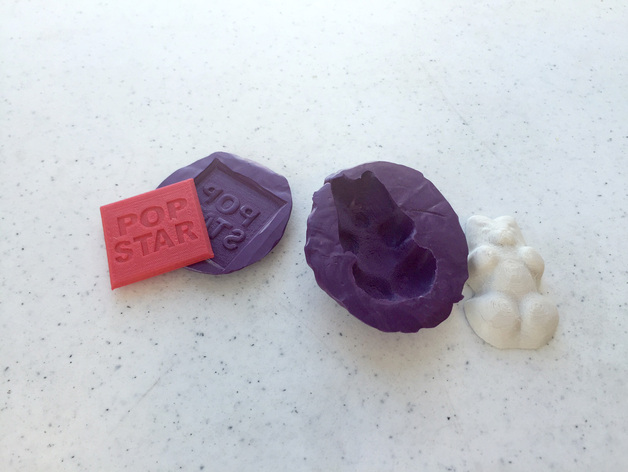
This lesson plan covers creating a food-safe, 1-part mold for gummy, hard, or icy candies from a 3D design. Designing this Mold I used any 3D modeling program to create the model with the following features: making it flat on one side, keeping it small so each student gets a mold, using a "drafting angle," and ensuring no overhangs as they won't be able to remove the 3D print from the silicon putty. I used Sculptris for the gummy bear and TinkerCad for the text. For extra difficulty, design a 2-part mold. Modeling a Gummy Bear in TinkerCad Flattening a Sculptris-made Gummy Bear in TinkerCad Overview and Background Project: 1 Part Mold Making with Draft Angles Students will learn what molds are used for today and how to identify an object that was made with a mold. They'll enter into a 3D design program and make an object that they'll cast into a tasty treat. The design process will focus on making draft angles to get the optimum casting experience. A Draft Angle is the amount of taper for molded or cast parts perpendicular to the parting line. This means that the cast will release from the mold without tearing or lost information. It's a fun challenge to design objects with a draft in programs that don't have a specific tool that makes drafts. Key Idea: Students will know and use a variety of visual arts materials, techniques, and processes. They'll know about resources and opportunities for participation in visual arts in the community (exhibitions, libraries, museums, galleries) and use appropriate materials (art reproductions, slides, print materials, electronic media). They'll be aware of vocational options available in the visual arts. Lesson Plan and Activity Step 1: Introduction Bring in a few objects that are made from molds. Most plastic pieces are made with molds. Most bottles are also made with molds. Share the Mold Making Uses + Terminology.pdf Step 2a: Design Show shapes with draft angles in TinkerCad Paraboloid Cones Pyramid Shape directory For extra difficulty, design a 2-part mold and use classic mold making techniques. If you haven't made a 2-part mold or used classic mold making techniques, try it out yourself before teaching. This is a good walkthrough for classic mold making. Materials 1 computer per student 3D design program of choice installed or available Easy mold putty (or silicone molding materials) Food materials of your choice (ie. gummy, chocolate, ice) References Teaching Mold Making Uses + Draft Angle Draft Angle Recipe guidance How to make Gummy Bears How to make chocolate easter bunnies Hard candy recipe Project: 1 Part Mold Making with Draft Angles Students will learn what molds are used for today and how to identify an object that was made with a mold. They'll enter into a 3D design program and make an object that they'll cast into a tasty treat. The design process will focus on making draft angles to get the optimum casting experience. A Draft Angle is the amount of taper for molded or cast parts perpendicular to the parting line. This means that the cast will release from the mold without tearing or lost information. It's a fun challenge to design objects with a draft in programs that don't have a specific tool that makes drafts. Objectives Students should learn: Basic design rules for mold making Basic mold making process Some applications for molds Audience 3rd to 6th graders or older for extra difficulty components Example of flashing on an injection molded part Example of a seam left over from blow casting References Teaching Mold Making Uses + Draft Angle Draft Angle Recipe guidance How to make Gummy Bears How to make chocolate easter bunnies Hard candy recipe Handouts & Assets Mold Making Uses & Terminology.pdf
With this file you will be able to print 1 Part Mold Making with Draft Angles with your 3D printer. Click on the button and save the file on your computer to work, edit or customize your design. You can also find more 3D designs for printers on 1 Part Mold Making with Draft Angles.