100mm extrusion calibration for FlashForge Creator Pro
thingiverse
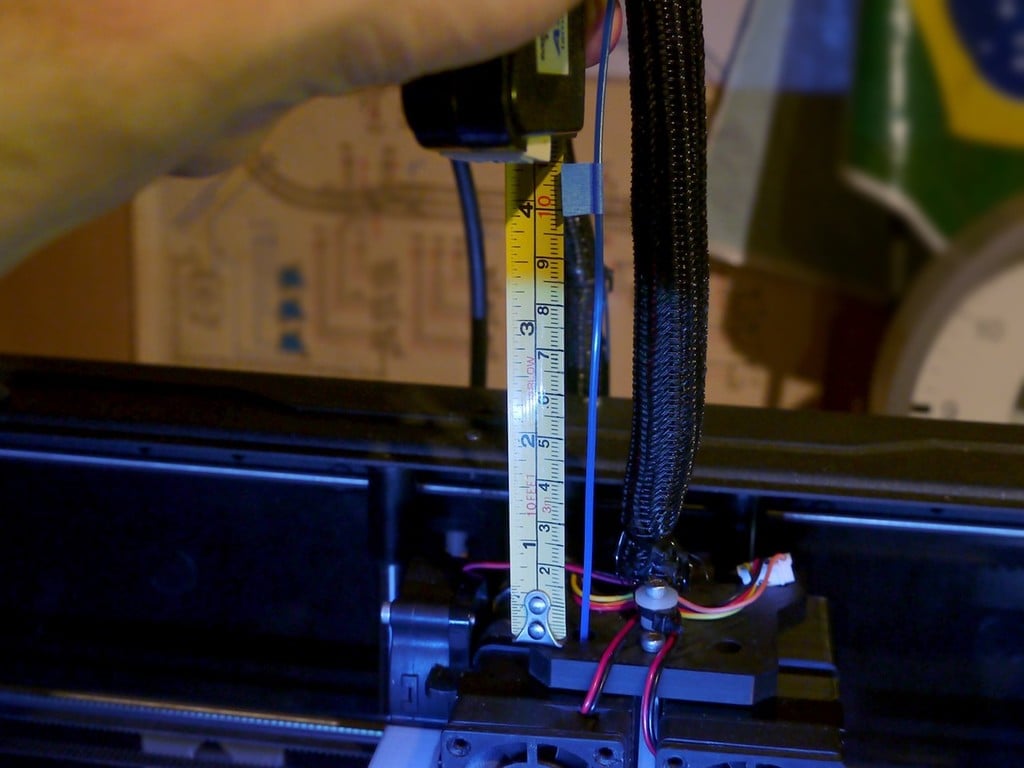
These are ready-to-use X3G files for the FlashForge Creator Pro and similar printers, to perform the [calibration procedure as explained on the MatterHackers site](http://www.matterhackers.com/articles/how-to-calibrate-your-extruder). The files will instruct the printer to extrude exactly 100 mm of filament. Ideally this will result in exactly 100 mm of filament going into the extruder, but in practice it will usually be less, possibly a bit more. To compensate for this during actual printing, an *extrusion multiplier* must be applied. **How to use** Do not simply load the filament of which you want to measure the extrusion multiplier. Instead, cut a strand off the spool. To allow doing the test twice as recommended, take a strand at least 260 mm long. Load this strand into the extruder without the guide tube such that it simply sticks out from the top of the extruder carriage (as shown in the photo). You must now have at least 200 mm of filament sticking out from the top of the carriage, preferably slightly more. You don't need to push the filament as deep as it can go, it suffices that it is inside the hot-end tube. Next, hold the strand vertically and either mark a reference point on it, or just take the end of the strand as the reference point. Measure the distance between the top of the carriage and this reference point. This distance must be at least 100 mm (preferably a bit more). Keep the filament straight while measuring, but be careful not to stretch elastic filaments to avoid an incorrect measurement. Write down this distance. There are two sets of files, regular and slow. The regular ones are suitable for the more common materials like PLA, ABS, or PETG. The slow ones are recommended for TPU or other soft filaments. Now pick the x3g file from for the appropriate set and desired extruder (left or right) and temperature, and ‘print’ it. The temperature is not crucial, pick a temperature close to the one you'll be using for printing with this filament. The LCD display will prompt to press OK when the extruder is at temperature. From then on, it takes less than 2 minutes to complete for the regular speed files, about 4 minutes for the slow files. When it has finished, again measure the distance between the top of the carriage and your reference point (or end of the strand). Subtract this new distance from the one you measured before. The extrusion multiplier is this difference (in millimeters) divided by 100. For instance, if you initially marked 110 mm and the final distance is 17 mm, the printer consumed 110 - 17 = 93 mm. This means your extrusion multiplier should be 100/93 = 1.0753. Other example: the initial length of filament sticking out above the carriage was 120 mm and the final length is 17 mm. The extrusion multiplier should therefore be: 100 / (120 - 17) = 100/103 = 0.9709. (This is an unlikely scenario because most manufacturers will tune the extruder steps such that the hardest filaments will have an EM of 1.00.) For PLA and ABS, the extrusion multiplier should be very close to 1.00. For PETG it can be slightly higher, like 1.03. The softer the filament, the higher the multiplier should be (see explanation below). A flexible filament like NinjaFlex should yield a multiplier around 1.10. Anything far above that, is probably an indication that something went wrong, probably the extruder skipping due to too low temperature or too fast extrusion. **Remarks** You should do the test at least **twice** with the same filament to check consistency of the result (this is why you should start with a strand of at least 260mm). If the results of the two tests deviate a lot, it may be an indication that something went wrong. If a third test yields yet another different result, repeat the test with the ‘slow’ files. If you still get wildly varying results with the slow files, check extrusion temperature and ensure your extruder gears aren't clogged with remains of filament. If you need test files with an even slower extrusion rate than the ones I provide, just ask. In theory the test must be repeated for every different filament, but you can probably safely assume that different colors of the same material from the same brand will yield the same results. Mind that you cannot re-print the test files with your calculated multiplier. This would require making new X3G files, and it would be pretty pointless anyway if you correctly measured and calculated everything. It is not essential to get the extrusion multiplier correct to umpteen digits after the decimal point. In fact, from this test I found out that I had been under- or over-extruding certain filaments for a long time, yet my prints were accurate and reliable. In the end, use the multiplier that provides the best results in practice, not in theory. This method will only compensate for the difference in expected versus actual extruded length. As explained below, it does not compensate for incorrect filament diameter because that is not the purpose of the extrusion multiplier. Last but not least, do not keep extruding until the strand of filament disappears into the extruder and it runs out of material. Unless you're lucky and can push the strand down the tube with another strand, the only way to get out of this situation is to disassemble the extruder down to the hot-end, not my idea of fun. **Note about used material estimates** Some slicing programs, like Slic3r and PrusaSlicer at the time of this writing, will include the extrusion multiplier in their estimates of used material for a print. **This is wrong.** From the explanation below, it should be obvious that the only purpose of the EM is to correct for a mismatch between the length of filament the printer is expected to consume, and what it actually consumes. Once the multiplier is correctly configured, the printer will extrude exactly the length and weight of filament that can be calculated from the filament diameter and density, and nothing more. Please vote or comment on [Slic3r issue #4087](https://github.com/slic3r/Slic3r/issues/4087) to ask to fix this bug, and file a bug for other slicing programs if you notice they make this same mistake. If for some reason you want to deliberately over- or under-extrude, do not fiddle with the extrusion multiplier. Instead, respectively lower or raise the filament diameter in your slicing program.
With this file you will be able to print 100mm extrusion calibration for FlashForge Creator Pro with your 3D printer. Click on the button and save the file on your computer to work, edit or customize your design. You can also find more 3D designs for printers on 100mm extrusion calibration for FlashForge Creator Pro.