100x100x100 Calibration
prusaprinters
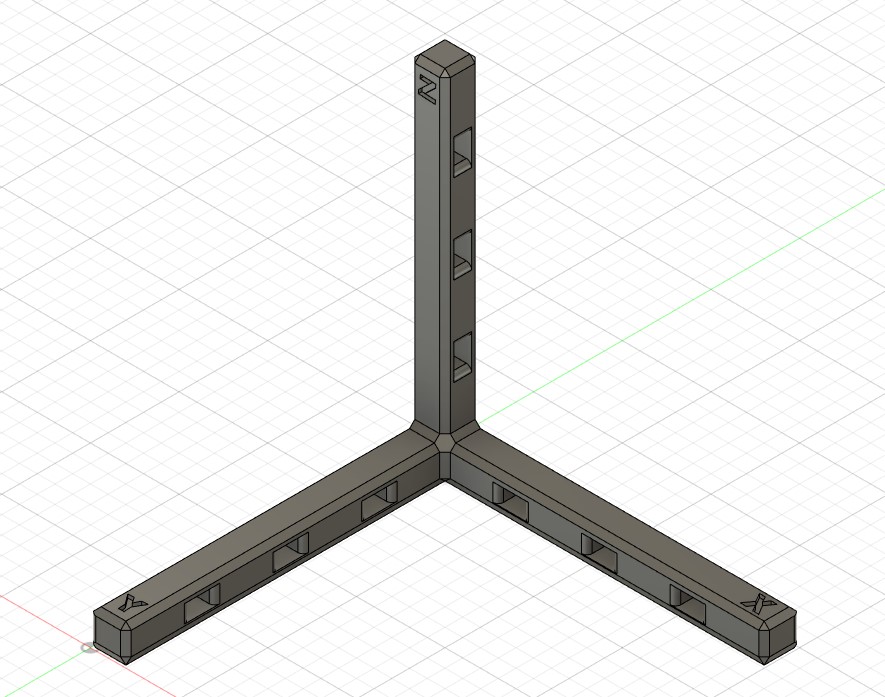
<p>I needed a new calibration print to dial in my stepper motor to achieve great dimensional accuracy at a larger scale than just a simple 20x20x20 cube. Was looking and found this from <a href="https://www.thingiverse.com/thing:5020524/comments">Collect3D </a>on thingiverse. Remixed it to have larger measurement holes and recessed the labels.</p><p> </p><h3>STL's</h3><p>There are two .stl's below. One that is modeled after <a href="https://www.thingiverse.com/thing:5020524/comments">Collect3D </a>and the other I designed. The one I designed is meant to be placed in the center of the print bed.</p><p> </p><h3>Acquiring a Measurement</h3><p><strong>100mCalibrationV1:</strong></p><p>Start all measurements where all axis intersect. From there measure out to each of the holes. Each hole is placed 25mm apart. Intervals at 25mm, 50mm, and 75mm. See example below on how to measure to the 25mm on the Y axis.</p><figure class="image image_resized" style="width:75%;"><img src="https://media.printables.com/media/prints/239603/rich_content/967063b2-04ac-412f-a054-6d31d91407fd/image.png#%7B%22uuid%22%3A%22ae0ea968-f27a-42df-b6bc-38834ad2c4b1%22%2C%22w%22%3A971%2C%22h%22%3A504%7D"></figure><p><strong>100mCalibrationV2:</strong></p><p>For X/Y:</p><p>Start at the label end, then measure outward to each hole.</p><p>See example below on how to measure the Y axis at 40mm.</p><p><img class="image_resized" style="width:75%;" src="https://media.printables.com/media/prints/239603/rich_content/02d3a30d-4fe0-4982-a58c-9c063c762922/image.png#%7B%22uuid%22%3A%2278d76d49-667e-4239-bf86-b14133d9519e%22%2C%22w%22%3A919%2C%22h%22%3A441%7D"></p><p>For Z:</p><p>Start at the bottom of the print, measure upwards towards the top.</p><p>Each measurement hole is place 20mm apart (20mm,40mm,60mm,80mm).</p><p>See example below on how to measure the Z axis at 60mm.</p><figure class="image image_resized" style="width:75%;"><img src="https://media.printables.com/media/prints/239603/rich_content/da8d3a61-d8e1-436e-9270-c41af5a723cd/image.png#%7B%22uuid%22%3A%22803c8df6-6f37-4512-9993-d9200eba9f40%22%2C%22w%22%3A700%2C%22h%22%3A779%7D"></figure><p> </p><h3><strong>Print instructions</strong></h3><p><strong>Printer:</strong> Creality Ender 3</p><p><strong>Rafts:</strong> No</p><p><strong>Supports:</strong> No</p><p><strong>Resolution:</strong> 0.28mm layer, 0.4mm nozzle, 0.45mm line width</p><p><strong>Infill:</strong> 15% Gyroid (PrusaSlicer)</p><p> </p><h3>NOTES:</h3><p>I'm touching up the .f3d file for <strong>100mCalibrationV1</strong> to be fully parameterized. You will be able to adjust it to any size (40-200mm+) for X,Y,Z axis's and it will add measurement holes at specific intervals. After that, I will do the same for <strong>100mCalibrationV2.</strong></p>
With this file you will be able to print 100x100x100 Calibration with your 3D printer. Click on the button and save the file on your computer to work, edit or customize your design. You can also find more 3D designs for printers on 100x100x100 Calibration.