10inch 1U Raspberry Pi with SSD 2.5" rack mount (3 raspberry pi modules and 3 SSD)
prusaprinters
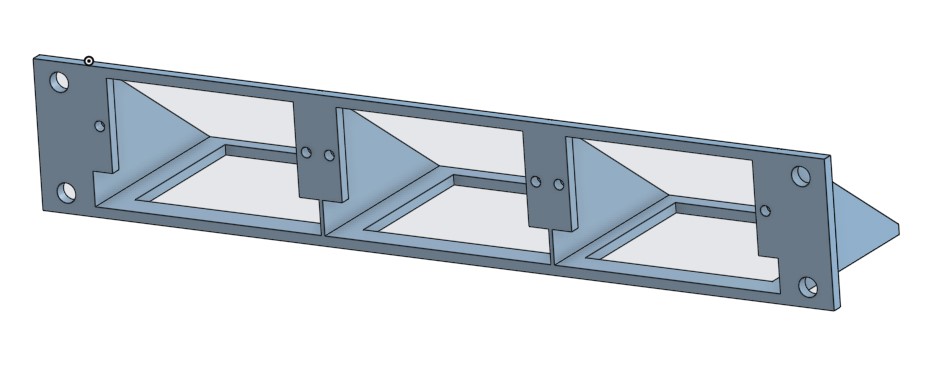
<p>Simple and helpful 1U Raspberry Pi with SSD 2.5" rackmount for 10inch network cabinets. It supports 3 Raspberry Pis.</p><p>How to print:</p><ul><li>Print with <strong>0.30mm layer height</strong> and <strong>70% gyroid infill.</strong></li><li>Make sure your print is in <strong>PETG</strong>, <strong>ASA</strong>, or heat-tolerated filaments. <i><strong>SSDs can get quite warm, and PLA is not a suitable filament in this case.</strong></i></li><li>Support required: Only for the openings; use the print-on-support feature of Prusa Slicer to only print support for openings and use snug. (just take a look at my codes and do like them)</li><li>Print the 1U rack-mount base on the diagonal of your print bed, just like the photo below</li></ul><figure class="image image_resized" style="width:39.66%;"><img src="https://media.printables.com/media/prints/301275/rich_content/5e1eae82-fe41-4501-b51b-13e951e66c4e/image.png#%7B%22uuid%22%3A%223bbd394e-4f49-4695-9c73-77dcba6f5dd1%22%2C%22w%22%3A849%2C%22h%22%3A521%7D"></figure><p>How to assemble and required hardware:</p><ul><li>To attach SSDs to the Rpi module, you need M3x3 or four bolts (4 for each SSD)</li><li>To attach the Rpi module to the base, you need two M3x8</li></ul><p><strong>Step 1:</strong></p><p>Place the Rpi module on the top of your SSD and fix it to the SSD</p><figure class="image image_resized" style="width:56.55%;"><img src="https://media.printables.com/media/prints/301275/rich_content/150c1a8e-4fb8-461a-b2f9-166d605edf42/image.png#%7B%22uuid%22%3A%22dedcbb79-e038-4676-bce0-6ce7105b8fbc%22%2C%22w%22%3A1183%2C%22h%22%3A693%7D"></figure><p><strong>Step 2:</strong></p><p>Place raspberry pi on the specific area and fix it with the 3d printed pins. (in the example below, I could only attach three pins because of the POE hat)</p><figure class="image image_resized" style="width:55.56%;"><img src="https://media.printables.com/media/prints/301275/rich_content/fbee462a-c090-4e43-aa21-adbcb80eca26/image.png#%7B%22uuid%22%3A%22014936d0-77aa-4357-81ef-89c556d4e973%22%2C%22w%22%3A945%2C%22h%22%3A771%7D"></figure><p> </p><p><strong>Step 3:</strong></p><ul><li>Insert two M3x8 or M3x10 in the Rpi module</li></ul><figure class="image image_resized" style="width:32.46%;"><img src="https://media.printables.com/media/prints/301275/rich_content/9de93452-2dd1-46f5-bee4-d775005e90eb/image.png#%7B%22uuid%22%3A%22f6bd5fc6-76de-4de6-94f8-9453454bcf00%22%2C%22w%22%3A709%2C%22h%22%3A787%7D"></figure><ul><li>Insert the Rpi module (Rpi attached, SSD attached) into the space you like and tighten the bolts.</li></ul><figure class="image image_resized" style="width:65.35%;"><img src="https://media.printables.com/media/prints/301275/rich_content/590e0efe-81d5-42b6-a10f-24da6a29abee/image.png#%7B%22uuid%22%3A%2219a66a90-3b03-4234-bb2a-c9a5f24ffe24%22%2C%22w%22%3A958%2C%22h%22%3A469%7D"></figure><figure class="image image_resized" style="width:64.1%;"><img src="https://media.printables.com/media/prints/301275/rich_content/d8f69be6-e02c-4193-9abc-6f9187c9e4a4/image.png#%7B%22uuid%22%3A%2284043839-272d-4445-886f-e6f403143d15%22%2C%22w%22%3A793%2C%22h%22%3A745%7D"></figure>
With this file you will be able to print 10inch 1U Raspberry Pi with SSD 2.5" rack mount (3 raspberry pi modules and 3 SSD) with your 3D printer. Click on the button and save the file on your computer to work, edit or customize your design. You can also find more 3D designs for printers on 10inch 1U Raspberry Pi with SSD 2.5" rack mount (3 raspberry pi modules and 3 SSD).