120-to-127 Film Slitter
thingiverse
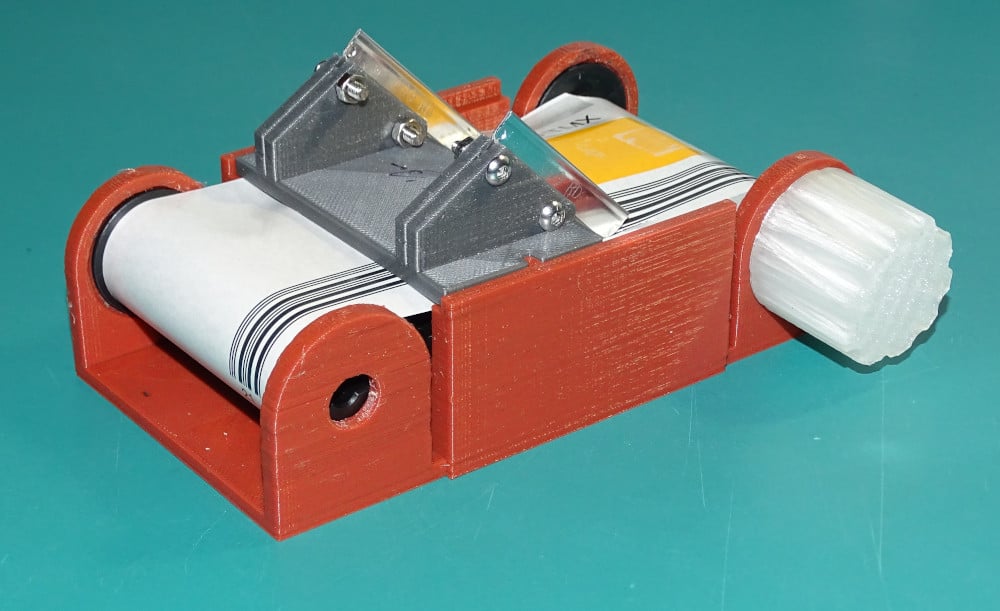
120-to-127 Film Slitter ======================= This design is part of a film slitter, to re-spool 120-format film for use in 127-format cameras. It must be used *in complete darkness* -- a film changing bag, photographic darkroom, or other room that can be made *completely* dark. What You'll Need ---------------- You will need: * Most or all of the `.stl` files provided * Something to smooth the top of the hump in the slitter's base (see below). * One to three *single-edge* razor blades * Two to six M3 screws (8mm will do in a pinch, but 10-12mm is better) * Two to six 3mm nuts * A roll of 120-format film * An empty 120-format take-up spool * An empty 127-format take-up spool (plus a second for your camera) * Scissors The `.stl` files provided in this project are: * `film-slitter-base.stl` -- This object holds one roll of 120-format film and one 120-format take-up spool. * `film-slitter-blade-holder-dual.stl` and `film-slitter-blade-holder-single.stl` -- These objects hold two or one single-edge razor blades, respectively. Use the single-blade design to cut your film into one 46mm and one 16mm strip, and the dual-blade design to cut it into one 46mm and two circa-8mm strips. The implications of each choice are described later. * `film-slitter-cover` -- This is a simplified version of the base, designed to hold the blade holder when it's not in use, for safety. * `film-slitter-knob` -- Use this to wind the film through the slitter. I strongly recommend printing two knobs, both so you have a backup and so you can use one on each spool, in case you encounter unexpected resistance. *BE CAREFUL OF THE RAZOR BLADE(S) IN THE DARK!* Preparing This Tool ------------------- You must first decide where you want to slit your film. You have three choices, which have implications for the placement of the frame numbers on the backing paper relative to the red windows on the backs of most 127 cameras: * Down the middle -- The `film-slitter-blade-holder-dual.stl` part uses two razor blades to cut a 46mm strip out of the middle of a 120 roll of film, with two 8mm strips of waste film on each side. This makes the 120 roll's 6x6 numbers visible in the windows of cameras that put the windows in the center of their film paths, like the Yashica 44 series; and 6x9 numbers should be visible in the windows of cameras that put their windows near the tops of their backs (for cameras that move the film horizontally from left to right, as viewed from the back). This isn't optimal, but by advancing in an alternating way between numbers and the first/largest of the dots between numbers, you can get good frame spacing. * Top cut -- The `film-slider-blade-holder-single.stl` file uses one blade to cut the film into 46mm and 16mm segments, with the resulting 46mm/127 roll cut from the top of the 120 roll, viewed as if from the back of a 120-format camera that moves its film from left to right in that orientation. A middle-mounted window, as on a Yashica 44-series camera, will catch just the edge of 6x6 numbers -- not enough to be useful, in my experience. A window near the top of a horizontal-transport camera is likely to get a clear view of the 6x9 numbers, as with the down-the-middle approach. * Bottom cut -- By reversing `film-slitter-blade-holder-single.stl` in your slicer, you can cut the 46mm strip from the bottom of the 120 roll. A mid-mounted window is likely to catch about half of the 6x6 numbers, and a top-mounted one might catch part of the 6x9 numbers. If the film is re-spooled a second time, so that it's run backwards through the camera, a top-mounted window will likely show the 6x4.5 numbers; but they'll count down, rather than up. Note that the numbering implications just outlined are irrelevant if you plan to slit the film, separate it from the cut 120 backing paper, and re-attach it to genuine re-used 127 backing paper. Which method works best for you depends on your camera(s). The down-the-middle approach will remove all manufacturer edge markings from the resulting 127 roll, but one or another set of edge markings will remain when using the bottom- or top-cut method. These two methods also leave a 16mm strip, which you might be able to use in a subminiature camera. The width of the 127 film cut by the down-the-middle method may be a little more consistent. Once the main blade holder is printed, you can attach one or two razor blades to it using screws and nuts. The design isn't safe to use with dual-edged razor blades, so be sure to buy single-edge blades. The gap through which the blade must pass is quite narrow, so if you have first-layer problems, you may need to cut through it with a knife -- or better, adjust your slicer settings or first-layer baby step to fix the problem. The film's emulsion side passes quite close to the hump in the base, and may touch it from time to time. It may therefore cause scratches if used without any additional protection. I've tried both felt and plastic from a photographic paper's protective bag, and found that the latter works better to protect against scratches. Whatever you use, secure it with tape or glue. Using the Slitter ----------------- Slitter use is fairly simple: 1. Collect everything: the slitter, 120 film, 127 spool, and a pair of scissors. You'll also need a small rubber band, some tape, or a film clip to secure your new 127 roll when you're done, and ideally a small light-tight box or bag to hold the film. Take all these things into a darkroom or put them in a changing bag. Don't turn out the lights just yet, though. 2. Load film into the base, as shown in the photos. Note that the base isn't quite symmetrical front-to-back; it includes alignment tabs that are closer to the spool holder for the film source than to the take-up spool. Advance the film as little as possible -- just enough to be sure it's secure and to put some tension across the film. I find that it's often necessary to secure the start of the backing paper to the take-up spool with tape. 3. Place the blade holder across the top of the slitter base, aligned with the tabs. When the blade holder is pushed down, the razor blade(s) should pierce the backing paper. Be sure the blade holder is fully seated in the base. 4. Turn out the lights or close up the changing bag. 5. With one hand keeping the slitter in place, use the other to wind the film. You'll feel the tension increase when the film reaches the blade(s), then decrease again when the film ends. You'll hear the slitter cutting through the backing paper and film, until the end. I've occasionally found the need to periodically wind the origin spool toward the end of the roll, in addition to the take-up spool. 6. Carefully set aside the blade holder, somewhere you won't accidentally hit it and cut yourself. 7. Remove the slit 120 spool from the base. 8. I find that it's helpful to remove the 8mm or 16mm ends at this point, lest they get tangled up when re-spooling the roll; but if you want to use that film in a subminiature camera, you'll need to decide how to unspool both film types. 9. Using the scissors, carefully re-cut the end of the 46mm portion of the backing paper so that the end will fit into the slot in the 127 spool's core. It's often necessary to cut about 5-10cm off the end of the backing paper to help it all fit on the 127 spool. 10. Attach the 46mm portion of the backing paper to the 127 spool's core. 11. Begin winding the 127 spool. 12. After a few turns, the loose end of the film will come up. Be sure to wind it onto the spool with the backing paper; don't leave it to curl up independently. It's easy to miss the film end. If you do, unwind the 127 spool a bit to fix the issue. 13. Continue winding the film. Wind it as tightly as you can. You may notice a bulge form between the film and the backing paper, then shrink as you near the start of the roll. 14. When you reach the point that the film ends, evaluate the bulge between the film and backing paper. You may have to carefully detach the film from the backing paper (they're affixed by tape) and re-attach the two so that there's no gap between them. When doing this, be careful to not let the film unwind from the 127 spool. (A 127-format film clip may help.) 15. Continue rolling the backing paper. You'll eventually hit the point where the razor blade(s) cut into the paper; your two or three stips will merge into one. 16. At this point, I recommend cutting the backing paper, sacrificing the start of the backing paper. 17. Re-cut the backing paper so that its end will fit into a take-up spool in your camera. 18. Secure the new roll with tape, a rubber band, or a film clip. It will have a strong tendency to unspool unless it's secured. 19. Place the film in a light-tight box or bag. 20. Turn on the lights or open the changing bag. While winding the film onto the new spool, be careful to keep it tight; if your grip slips, the roll will unspool and you'll have to redo it. It's your choice what to do with the 16mm or two 8mm strips. Personally, I don't shoot any submini cameras, so I discard these strips; but you might try to keep them, if you use a submini camera. 120 film is about 20mm longer than 127 film, and 120 film backing paper has more space at the front and end, too. Thus, a re-spooled roll like this is longer than a standard 127 roll, enabling you to get more exposures on the roll. This extra length can be a problem for handling, though, since it might slightly exceed the diameter of the film spool's ends, resulting in fogging at the edges of the roll. Some 127 cameras have very tight film compartments, too, so a roll re-spooled in this way might not fit. Some 127 cameras have mechanical frame counters with double exposure interlocks that prevent shooting more than twelve 4x4 exposures (or equivalent for other frame sizes). If you have any of these problems, you can cut off a bit of extra backing paper and/or film while re-spooling. Fogging can also result if the film is slit too narrowly. I find that my rolls' film width varies by under 1mm, and usually under 0.5mm. If you find that yours is cutting film that's too wide or too narrow, you can adjust the design and re-print it, as described later, in "Modifying the Design." As noted earlier, for some frame-counting purposes, it may be desirable to run the film backwards. To do this, you'll need to re-spool the film a second time, after loading it on its first 127 roll. When doing this, it's best to remove the tape from the front of the roll, and it's necessary to tape down the end of the roll (which becomes the new front). When re-spooling film, some people prefer to transfer their new film onto genuine 127 film backing paper. Doing so eliminates frame counting headaches, but it's an extra step when rolling the film. To do this, you'll need to wind and slit the film as in steps #1-7; then wind up the newly-cut 46mm strip of film into the genuine 127 backing paper. I've seen online tutorials about how to do this, but I don't have references handy. The process involves careful measurements and marking the film's start and end points on the 127 backing paper in a tactile way so you can find those critical points in the dark. Using Your Film --------------- Because of the imprecision and other possibilities of light leaks, I recommend loading and unloading your camera in light that's as dim as possible. Also, keep in mind that the film will have a strong tendency to unspool. The glued paper strip that manufacturers provide with their 120 film to help secure the roll might or might not survive the re-spooling process, so it's best to be prepared with tape, a rubber band, or a film clip wherever you plan to unload your film; and be very careful when loading and unloading the camera to be sure the film doesn't unspool. You should be able to get sixteen 4x4 frames on a roll of re-spooled film; however, counting frames may be a challenge, depending on your camera and how you cut and re-spooled the film. See the earlier section, "Preparing This Tool," for notes on this issue. Of course, if you cut down the film length to reduce fogging around the edges or to fit a camera with a tight film compartment, you'll get fewer frames. If you use the full length of the 120 film, you'll need to use developing reels that can accommodate this length. This shouldn't be a problem with adjustable plastic reels, which are meant to handle much longer 35mm rolls of film; however, stainless steel reels might not support such long rolls. In principle, if the film width varies much from the 46mm optimum, you might have problems loading your film onto reels. I've never had this problem, though. If you send your film out for processing, be sure to check with the processor to be sure they can handle the extra-long rolls. Modifying the Design -------------------- I designed this tool using OpenSCAD; the source file is `film-slitter.scad`. You can modify it yourself to suit your needs. The options you're most likely to want to change are: * The `make` variables -- `makeBase`, `makeSlitter`, and so on cause the named components to be built when set to `1`. * `makeDual` -- Set this to `1` to make the dual blade holder, or `0` to make the single-blade variant. (The base supports both variants, including the flipped single-blade form.) * `makeWiderSingle` -- This variable is an adjustment value to make the target film wider (set to positive values) or narrower (set to negative values) when printing the single-blade holder. For whatever reason, I've found that I need to apply a value of about `0.3` to get film width of 46mm using the single-blade model. * `makeWiderDual` -- This variable is just like the preceding one, but for the dual-blade variant. I find that a value of `-0.3` works well. The last two variables affect the blade holder, base, and cover; but the slits in the base and cover models are wide enough that you won't need to re-print them if you make a small enough change in the blade positions on the holder. The single-blade model can be reversed in most slicer programs to cut from one side or the other of the 120 film, as described earlier, in "Preparing This Tool." The OpenSCAD source file therefore lacks any provision to make this adjustment.
With this file you will be able to print 120-to-127 Film Slitter with your 3D printer. Click on the button and save the file on your computer to work, edit or customize your design. You can also find more 3D designs for printers on 120-to-127 Film Slitter.