120mm & 140mm Fan Fume Extractor - Large Scoop
prusaprinters
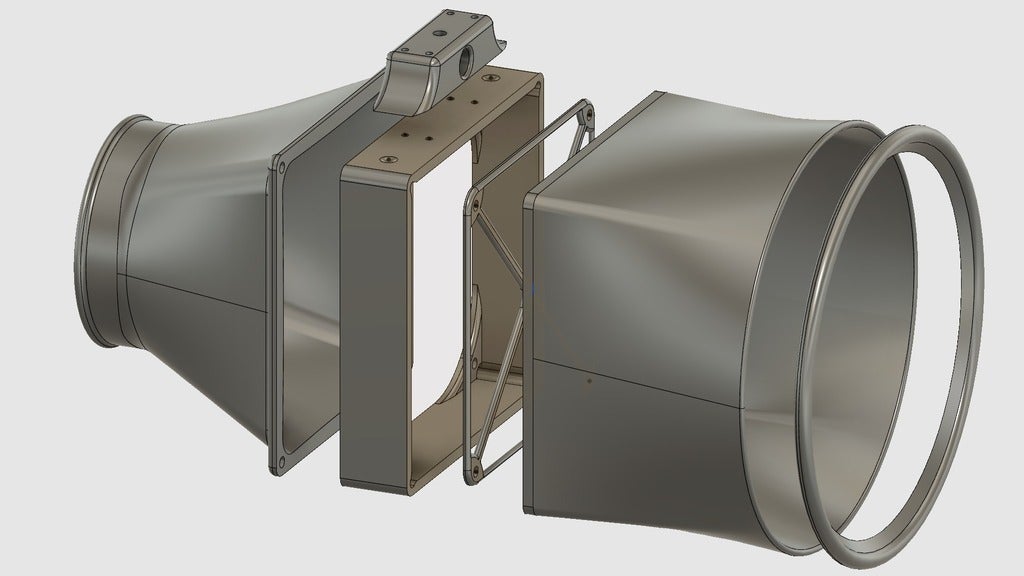
<p>After years of trying to avoid solder fumes I found it time to design and print my own extractor arrangement.</p><p>Initially the idea was to produce a desktop located unit, but due to space restrictions and consequent positioning issues, I decided on a swivel arm mounted method. This enables the use of an exit hose which helps avoid redistributing toxic fumes and particulates around one's room void by capturing them with filters along the airflow route.</p><p>OK, so this one uses either a 120mm or 140mm diameter fan onto which are attached an entry scoop and a rear exit funnel with a lip to avoid the extraction hose from working loose & slipping off. (It will of course use either a wire tie or hose clamp to secure the 100mm diameter hose in place.)<br/>If however your setup does generate a serious amount of fumes, then you may want to use a fan delivering at least 40 CF/min airflow - just check the outside dimensions before buying, otherwise you may have to modify the fan collar aperture the old fasion way with a file!</p><p>The scoop at 3mm thick is about 193mm in diameter on the front end.</p><p>If a larger fan blade diameter is desired, it is possible to take this up to 140mm, in which case it is only the interior void of the fan collar and filter guard which need redesigning, as there is still an extra 10mm clearance to play with on each side in the existing 120mm version. (<a href="https://www.ebay.co.uk/itm/Arctic-F14-140mm-Case-Fan-Low-Noise/252831090575?epid=2256130955&hash=item3adde8478f:m:mM1VDy-h1k_zvEP0aqdlUlQ">https://www.ebay.co.uk/itm/Arctic-F14-140mm-Case-Fan-Low-Noise/252831090575?epid=2256130955&hash=item3adde8478f:m:mM1VDy-h1k\_zvEP0aqdlUlQ</a>)<br/>This expansion would enable e.g. the use of an Arctic F14 Pro Low Noise PWM unit with a 12V PWM motor controller, enabling a whopping rated 74CFM airflow - if you needed it of course! The resulting thinner fan collar (5mm thick) will then likely need printing at 25% or more to maintain strength integrity.<br/>140mm fan collar and filter guard .STL files are now added.</p><p>The mounting lug which attaches to the desktop swivel arm is best printed in high density for strength. It has 4x holes for M3 machine screws, the heads of which are inserted into counterbored holes on the inside of the fan collar.</p><p>The mounting lug attaches to the swivel arm with a nyloc nut & bolt through either axis of the counterbored holes in the lug.</p><p>There is also a future plan to incorporate a circular string of LEDs onto a separate ring which will in turn fit onto the inside front edge of the scoop (.STL files to follow). However, the aim was to get this iteration published in the meantime so it will probably be developed as an add-on unit.</p><p>This future addition will thus enable illumination of the job in hand, be it soldering, 3D printing or anything else requiring fume extraction.</p><p>UPDATE 27/07/2021: Although the LED mod is still to be completed, there is now an additional exit funnel with a longer rear shaft (uploaded here), to accommodate the collar for it at <a href="https://www.thingiverse.com/thing:4916934">https://www.thingiverse.com/thing:4916934</a>. </p><p>The.f3d file for the collar is available there as well, for those who'd like to tinker with & modify it to suit.</p><h3>Print Settings</h3><p><strong>Printer Brand:</strong></p><p>Prusa</p><p> </p><p><strong>Printer: </strong></p><p>i3 MK3</p><p><strong>Rafts:</strong></p><p> </p><p>Doesn't Matter</p><p> </p><p><strong>Supports: </strong></p><p>Doesn't Matter</p><p><strong>Resolution:</strong></p><p> </p><p>0.2 and 0.15mm Quality</p><p> </p><p><strong>Infill: </strong></p><p>15% (30% for the mounting lug)</p><p><br/><strong>Filament:</strong><br/>[</p><p> </p><h3>Generic PLA ](http://www.amazon.com/s?url=search-alias&field-keywords=Generic+PLA&tag=thingiverse09-20) Any colour to suit. <br/> </h3><p><strong>Notes: </strong></p><p>This is a large one, so be prepared for a long wait - especially with the scoop and exit funnels!</p><h3>Post-Printing</h3><p><strong>There is ALWAYS a way...</strong></p><p> </p><p>The fan used in the design is a 120mm HXS Model C12025B found on eBay: <a href="https://www.ebay.co.uk/itm/120mm-Fans-4-LED-LED-Blue-Computer-Case-Cooling-C3G6/183805349736">https://www.ebay.co.uk/itm/120mm-Fans-4-LED-LED-Blue-Computer-Case-Cooling-C3G6/183805349736</a>. (9 blades are more efficient than the usual 7.)</p><p>A suitable fan speed controller which I shall be incorporating into the 140mm version of the collar: <a href="https://www.ebay.co.uk/itm/163679894095">https://www.ebay.co.uk/itm/163679894095</a>, rated at 5Amps which is over 2x the rated current needed for the 140mm fan itself. The small size (25x30x25mm) however, means it can be easily incorporated into the design for the fan collar without much fuss while the extra functionality of the whole unit is greatly enhanced.</p><p> </p><p>In my setup the fan doesn't need the mounting screws as it fits the aperture quite snugly, but if you need extra clearance for the fan depth to e.g. fit a thicker filter, then just increase the Z height by 4-5% or so in your slicer program.</p><p>By not using all the fan mounting screws, it is also possible to lead the wires through one of the holes of the fan-mounted label side inwards towards the exit side and thread it up through one of the holes in the top of the fan collar either side of the mounting lug.</p><p>When tidying up the print of the lug, there may well be a certain amount of filing needed on the tapered ends, especially if using brims.</p><p>When fixing the front scoop onto the fan collar, it's best to use M4 x45mm machine screws and nyloc nuts & washers.</p><p>The holes in the scoop will hold M5 screws with the heads at the extract end, but you'll likely have to glue the nut-end threads in place, rather than using actual nuts - or you can reverse the direction of the screws (180Deg) and shave/ grind off part of their heads to create a right angle which fits flush in the inside corners, to enable the screws to sit straight in the holes they go through.</p><p>Another method which I've applied successfully is M5 flanged rivnuts which have part of the flange cut off using side cutters - just enough to enable flush corner-mounting of the rivnut thread on the 4 corners inside the base of the scoop. The rivnuts can then be glued in place.</p><p>Alternatively, a solidifying paste/ putty etc. which will retain the shape of a screw thread and allow the screw itself to be removed, would be useful if the intent is to upgrade later to a larger fan size as detailed above - just apply a very thin film of oil or grease on the threads before setting to enable easy removal of these screws later.<br/>(The 1mm play is there to enable ease of fitting M4 screws.)</p><p>For the LED mounting ring, there may be a certain amount of shaving off of the inner edge of the ring needed, to fit it smoothly over the mouth of the scoop. This is left to the maker to finalise, as sometimes folks may want or need to use differing materials for the scoop and the LED ring, which themselves have differing shrinkage rates upon cooling after printing.</p><p>As it's still a large work in progress, I'm still working on it myself, so there is plenty of leeway for adaptation and who knows - there'll no doubt be someone out there who'll probably find a better way than myself to incorporate any number of different LED types which are appropriate for the job!</p><p>Anyway, have fun in the meantime!</p><p> </p><p> </p><p> </p><p>Category: Electronics</p>
With this file you will be able to print 120mm & 140mm Fan Fume Extractor - Large Scoop with your 3D printer. Click on the button and save the file on your computer to work, edit or customize your design. You can also find more 3D designs for printers on 120mm & 140mm Fan Fume Extractor - Large Scoop.