12G Alarm
thingiverse
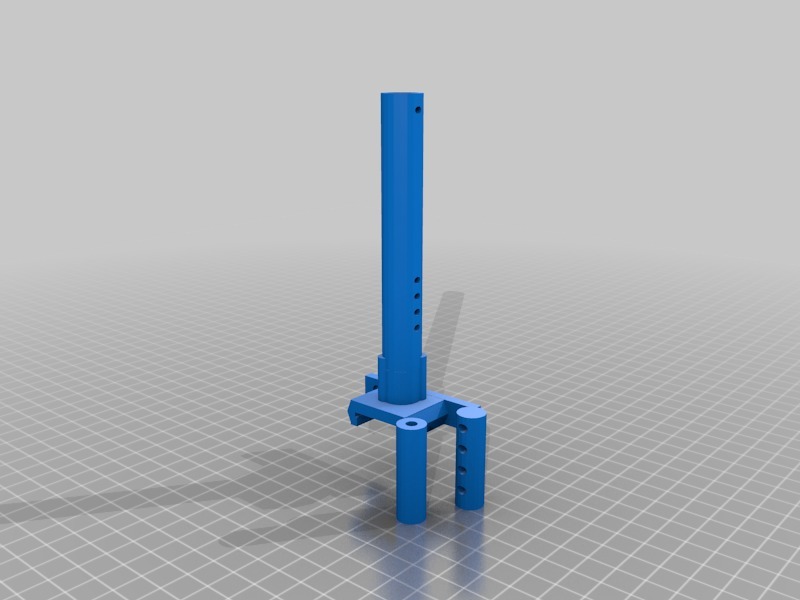
I wanted to make my own version of a 12G Alarm as I had a package stolen off my porch this Christmas so I came up with this one. In addition to the three components shown you will need a suitable spring, a couple of split pins, a roofing nail and a bolt that fits the bolt carrier. Author takes no liability for any and all usage. Here's how it works - Mount the main assembly on a board or suitable location - Drop a 27mm roofing nail (1.25 inches) into the main tube. Make sure it threads into the recessed section and pokes through to the bottom. - Using a bolt that fits the hole in the bolt carrier (the piece with the hole on the one end) screw in a bolt so that it forms a hammer end. The head must enter the main tube. - Insert a split pin into one of the lower holes (the different holes give you different compression options. - Drop in the bolt carrier. it should not be resting on the split pin, bolt head towards the roofing nail. - Drop in a spring: mine is 35mm uncompressed and with a diameter of 10 mm. - Insert the compression pin (the one with the holes on the side) and push down compressing the spring. - When you have a hole aligned and the spring compressed, insert a second split pin. - Tie a string to the lower split pin and affix the other end to a post, object or bait box. - Insert a 12G Blank (NO PELLETS !!!) into the base plate. The pin should now be resting on the primer and you are ready. When the string is pulled, the lower pin is removed and the bolt carrier is propelled towards the roofing nail by the expanding spring. If your spring is decent, there should be sufficient force to drive the roofing nail into the primer and set off the PELLET-LESS shell and hopefully teach any would-be thieves a lesson.
With this file you will be able to print 12G Alarm with your 3D printer. Click on the button and save the file on your computer to work, edit or customize your design. You can also find more 3D designs for printers on 12G Alarm.