1610 CNC 55mm Spindle Mount
thingiverse
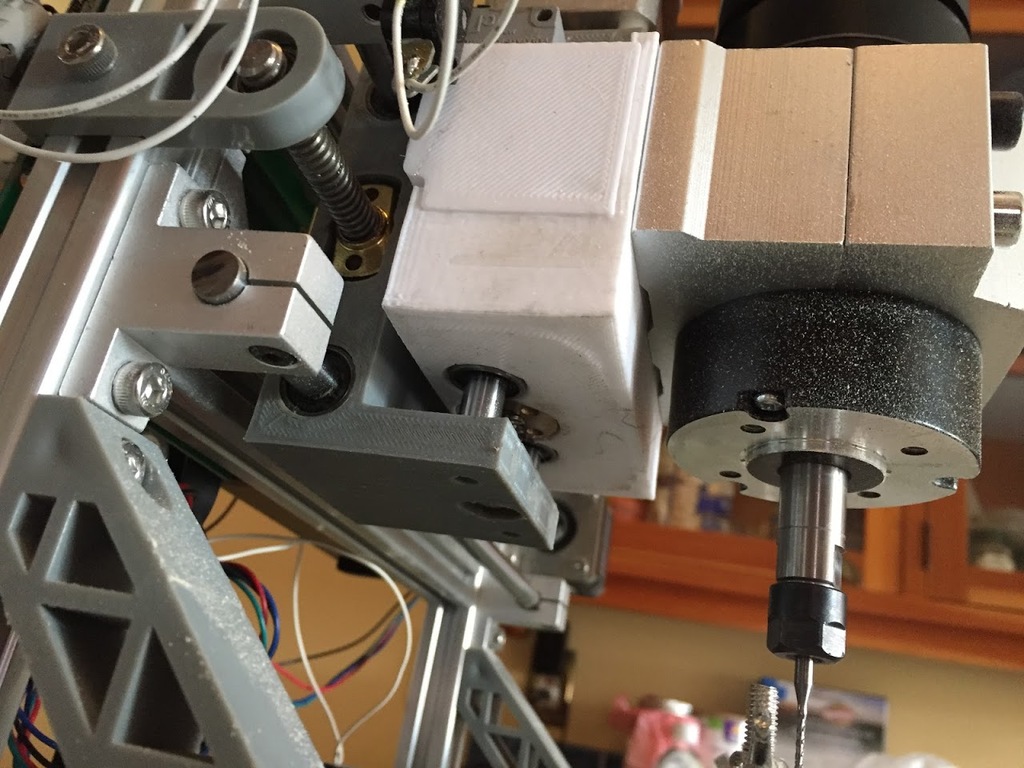
It doesn't take much to outgrow the stock 775 motor that most 1610 CNC machines come with. Using this adapter you can move past the stock motor's limitations by mounting common 55mm diameter spindles. There are two versions of this part herein: * Standard version: Requires a minimal sacrifice of build area (the spindle itself is a little larger than the original; so some sacrifice is unavoidable). * `main.stl` * `support_left.stl` * `support_right.stl` * `CNC_Spindle_Bracket_Adapter_v13.f3d` (source file) * High-strength version: Trades an additional 10mm of X-axis build area for extra rigidity. * `main_highStrength.stl` * `support_left_highStrength.stl` * `support_right_highStrength.stl` * `CNC_Spindle_Bracket_Adapter_v14.f3d` (source file) I'd recommend using the high-strength version above because it offers a little more rigidity, and printing using a high-rigidity filament like Carbon Fiber-infused PLA. This design requires just a few extra parts that are not easily removable from your existing spindle mount: * The mounting block your spindle likely came with. * M6 screws (and locking bolts for those screws) that are long enough to reach through your mounting block and the printed mount. * Four LM8SUU bearings. * One T8 lead screw nut set having a lead matching the lead screw your Z axis currently uses. My 1610 CNC uses a 4mm lead screw; screws of that lead may be somewhat difficult to find given that 8mm is far more common. * Some epoxy for permanently attaching the aforementioned lead screw nut to the printed part. If you look very carefully, you'll notice that there's an inset on the bottom that it will fit snugly within. * *Ideally* a plastic welding chemical that is compatible with the plastic you're printing using for attaching the side supports. The side supports exist as a separate part to make it possible for this to be assembled (while you're attaching this to your CNC, there are screws you will need to reach for the Z-axis's stepper motor that will be extremely difficult to reach once the supports are attached). I've printed one instance of this using PETG and Weld-on #3, but also later had good results using Carbon Fiber PLA and superglue when printing the 'high-strength' part versions. Other adhesives might suffice (for plastic-plastic bonds, superglue will probably offer better results than epoxy), but you will have much better Z axis rigidity if you use an appropriate plastic welding chemical. I used this for mounting the spindle from [this 400W CNC DC Air Cooled NVBDL+ 12000RPM Brushless Spindle Motor Kit on Amazon (ASIN: B074FVKRZM)](https://www.amazon.com/dp/B074FVKRZM). If you need to attach a mounting block that uses screws larger than M6 arranged in a 70x20mm square, you may need to alter the design slightly, but the source files are attached. Good luck! #### Changelog * 25 Nov 2018: Added new high-strength models and parts for allowing you to sacrifice about 10mm of X axis mobility for increased rigidity. * 7 May 2018: Design updated to use slightly smaller holes for bearing installation. Changed parts list to indicate the need for LM8SUU bearings instead of LM8UU bearings (thanks [@WhiteHare](https://www.thingiverse.com/WhiteHare) for noticing those errors).
With this file you will be able to print 1610 CNC 55mm Spindle Mount with your 3D printer. Click on the button and save the file on your computer to work, edit or customize your design. You can also find more 3D designs for printers on 1610 CNC 55mm Spindle Mount.