18\20cm Motorized Turntable
prusaprinters
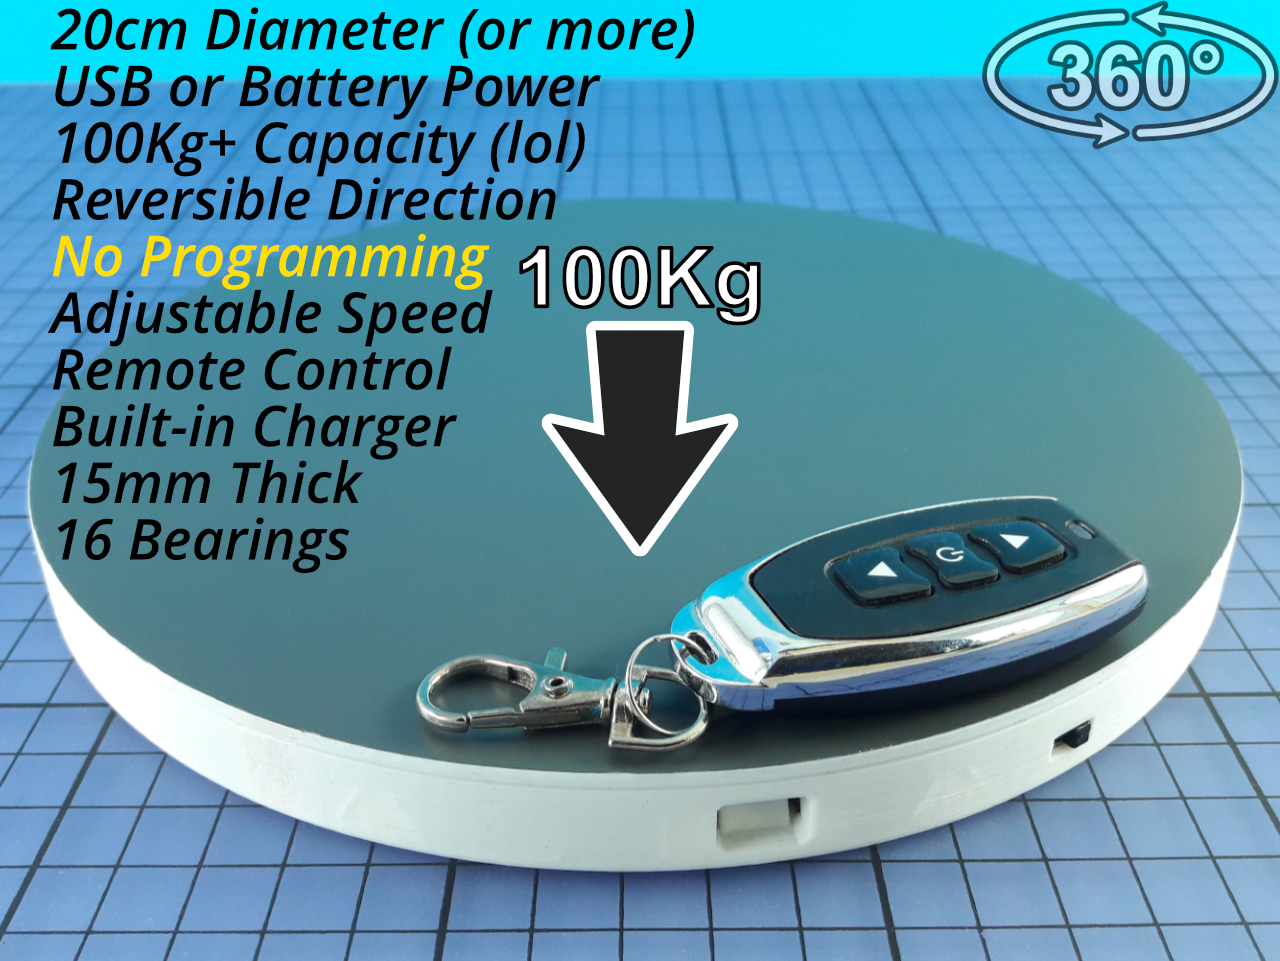
<p><strong>Features:</strong></p><ul><li>No programming or uploading anything, just connecting wires.</li><li>16 bearings (13 on 18cm version).</li><li>Remote controlled.</li><li>On\off switch (on remote and table).</li><li>Reversible direction (with remote).</li><li>Adjustable speed (on USB board).</li><li>Battery and USB powered.</li><li>Capable of rotating over 100kg (although not recommended).</li><li>Low profile (15mm) (20mm on 18cm version).</li><li>Voltmeter (to see motor or battery voltage).</li><li>Bracket for mounting even larger top plates.</li><li>Eyeballgear™ (actual spur gear on 18cm version).</li><li>Motor speed controller on 18cm version.</li></ul><p><strong>Note:</strong> This turntable is not intended for permanently displaying something. The motor used in this is brushed, which is not intended for continuous use. It's also pretty noisy.</p><p><strong>Note:</strong> You do not need all the electronic parts to make it usable (or any for that matter, if you want all manual). You only need the USB board and the motor to make it run.</p><p>This was specifically made for making interactive 360 photos of 3D printed objects quickly, using video (takes about 10min), but it can also be used for making animated gif's, rotating objects for videos, or spray-painting something.</p><p><a href="http://fixthephoto.com/360-product-photography-guide.html">I'm talking about photos like this (link).</a></p><p>If you like the idea of interactive 360 photos, then please ask the developers to implement support for this. I think it would give users a better impression of the models they are viewing, then flat images can provide. 360 hosting services are either too expensive or too limited when free (like 500Mb storage, and traffic restrictions). It would be nice if support for this was added directly on Prusaprinters, so we don't have to rely on these third-party services.</p><p>I asked Prusa support about this in February, and they are considering adding it to "the list". I will explain how quick interactive 360's are made, if support for this is added. In the meantime, the non-interactive GIF/APNG/WebP formats can be used. <a href="https://ezgif.com/help/alternative-animated-image-formats">This link explains the difference.</a></p><p><strong>---------------------------------------------------------------------------------------------------------</strong></p><p><strong>Changelog:</strong></p><p>01.Nov.21</p><p>v.1</p><p>(20cm model has not changed. I just added version numbers).</p><p>A second turntable has been added. It was made to be printable on the mini so this one is a little different then the first.</p><ul><li>It's 18cm in diameter and 20mm thick.</li><li>It has 13 633zz bearings.</li><li>It needs 3x15mm rods for all the bearings.</li><li>It has space for a motor speed controller.</li><li>It uses proper spur gears on the top plate.</li><li>It needs a motor with an angled gearbox.</li><li>It's not as strong as the larger one.</li><li>It uses a larger switch.</li><li>Remote can be stored on the inside.</li><li>I probably forgot something.</li></ul><p>The biggest difference is that it's not as strong as the larger one since a lot of torque is lost in the angled gearbox, but for rotating prints it doesn't matter. The main benefit of it is that it uses proper spur gears so it's far less likely to skip. It also has a space for a motor speed controller so the speed is much easier to adjust. You can still use the remote system like the larger one instead though. Combining the remote motor controller and the motor speed controller is not recommended. The speed controller needs 4.5v minimum.</p><p>The printed gear for the motor can be custom if you want to make one. The motor can slide out to fit larger gears. Wouldn't recommend it though (bigger gear would be less torque, and the hole is more likely to strip).</p><ul><li>The gearing is 15:1</li><li>Top gear is 190d 120t 20a 1.5m if that's useful.</li></ul><p>All parts are printed solid at 0.2mm layers.</p><p>All components should be easy to get for it. The motor controller can be found by searching eBay for “motor speed controller 4.5”</p><p>The switch is a very common rocker type.</p><figure class="table"><table><tbody><tr><td><figure class="image"><img src="https://media.prusaprinters.org/media/prints/20627/rich_content/0c824bee-d9b0-4e2a-9367-0eba514b3166/vivaldi_3sfuuqznxc.png#%7B%22uuid%22%3A%228db68373-beee-4d98-8c80-43022c126007%22%2C%22w%22%3A555%2C%22h%22%3A554%7D"></figure></td><td><figure class="image"><img src="https://media.prusaprinters.org/media/prints/20627/rich_content/b88d192f-a68d-412a-87ee-fce477bef1c9/vivaldi_35wd7ixmkn.png#%7B%22uuid%22%3A%228eb6351b-8306-4769-b9a9-dee3e72e2c71%22%2C%22w%22%3A766%2C%22h%22%3A512%7D"></figure></td></tr></tbody></table></figure><p> </p><p><strong>---------------------------------------------------------------------------------------------------------</strong></p><p><strong>A few examples of what's possible:</strong></p><p>These are not interactive images but just some basic animated gif's. The quality would be higher if they where interactive. You would be able to control them (rotate, zoom and pan). These gif's are about 10mb in size. You can also use the apng format, which is higher quality, but they would easily be triple the size.</p><p>You cannot upload animations on Prusaprinters (at least not yet). The animations will break. You will have to link to them from somewhere else, like a cloud storage site.</p><ul><li>gif's are now possible, but only to 8MB</li></ul><p>I don't want to pack this page full of 360's, so if you want more examples, there are more on my model page.</p><p>If you don't see any animations here, then something broke. These are hosted externally.</p><p>Ryobi to Makita Adapter:</p><p><img src="https://lh3.googleusercontent.com/pr30Dtt1jUCNw8OVfQcW3MqAluNlmVLFCnguzgB2IVOO6_QjCPpg3YcVmdwytD86j8Zd2T2vpqf8Xya7dxNOhT1aMi7rn51XONKm3U1YBLpJ6oNQUGUsIYgoDUISZyOLC4BaRDv4kQAWVghMxAzbYwp4eBLmDnbm1CyP5h0Mci8b5LjeFgC3hBj8DZoVXUYcxJ3N6cifEifLh2iEuPgtBZYIC0Q5cE0njjs88HmijjMlpTGebSl60kts1uDnU-pp37LvcmOrpUotf6phIi71QFVUcuI_FL_EfwCva6gpoiDrgNjXUQ2z7Q8xziPS_IoAi6yGHPOFDl3tv2vsfxwmz7ecFfMv7ah3wBl0SFrG4S8heQpMOzTptR6URuVhd8EeKIcPE4fDrMssaxuvHv9uekZMjqLPpPcElYR6Rw-bS2VuOEUxhsT4xiWGrkRUGxVO4Z0h894tqOgISHVZG8o8y0CMJBKR-94o9_hTveBMZQcyCGAy0wCoKgdlTs3IreBZptpbl2Psc4FzQVbVxuRTWcFmrOPJL2B7aJO3oPa8i1JDC94txR0vQ5zzFs8tMAc0gCXWPLYY1G0Uq_0f3ljup8BsRtFoHOjzqwVh3uu0MrTnp0QHWRCwxPKU9dRke-gTNqObqjm9LkN1mhE-69kdYOMY6OWjv9JkKUU2RXMtwkIVwRgV807HQgfWHj-SCFsc6fy2=w1531-h839-ft"></p><p>Wire Spool Holder:</p><p><img src="https://lh3.googleusercontent.com/3jJtJTty-v8NeGbRbCJICLpVdC3qN9EbSpYWzqWDi0YDykS21SxekZ8ZP8HNJvano6vchRFz072mbpYokEdnOJlgh8W4wW6FOy1qKStlNqsZc0EwgxslLyOsPQZKHH9atLZYD33EEXqyr6ayqABKZR2o-LN6nJotf-5_qJXTvIJyF5pjCFvN4jliFtssko8hG0JUObfZ2p8JKjvFZG3zimv5bGiofZ7oVoEYldVbEPpBs8wt1mCIK4vgklM-VBUYlHOFhnpG_lFMXsfjQ_GEI0tLxQAN9Bx-7I8rbs09YJ-z_qYLe6QSQL2grGaxIlv6MqI-Jtvr2IiM7ItyrGNkRS8PJTMrg6zE8e9IXqqHjQsFn-oFbGHsahspvB4huCBp1UYPn3bFHDeOhJ_UrPjTTK62djDnWpjwv7sMKi8iCnU4k4bzeVkFxLuCQJlaU3d9NgFkOLpxGuIZNvMRlCK6Rt3doqbBJygejDoWf3Fj2i-ecdIZvViW4sA79jAs5bbmTzY3O_Xn5YO00AX33QeEvNLHFFBbi5KbjlpjI7P1jJDpMz-DDW2nPPyTfawbEd_EylLFL9DNGFO11TYW2wfJlvIfQKbnijxoONAGew_IDBQhwg4nBRC8A-3FLLjkVd4SZr5LUN-UWWWyPzwRDXdcZjBh8XCZbRudbjkfWZwII8tbRT_KAKZlYYRCi2sFobJnPJ2D=w1531-h839-ft"></p><p><br><strong>---------------------------------------------------------------------------------------------------------</strong></p><p>Edit: I guess I should have added some short instructions on how the gif's are made. (Interactive one's are made in very different programs, and they are far from free.. At least the one's I'm aware of).</p><p>Basically, what I do at the moment is the following:</p><ul><li>Make a video of slightly more than a full rotation.</li><li>Load video into <a href="https://www.screentogif.com/">ScreenToGif </a>(Editor) - A free and open source program. (You might need ffmpeg for this)</li><li>Delete extra frames, like the acceleration period in the start of rotation.</li><li>Crop the images.</li><li>Resize the images. The width should be 550 pixels. It will fit well into the text field. Height doesn't really matter. Depends on the object.</li><li>Tweak whatever is necessary, like speed, amount of frames, adding a border, etc.</li><li>Save. I use gif with the gifski encoder.</li><li>Upload it (gif's have a 8MB limit here).</li><li>Done.</li></ul><p>The gifski and ffmpeg add-on can be installed from the extras menu in ScreenToGif.</p><p>If you can't load a video into ScreenToGif, you will need to extract the frames instead. VLC can do this, but it's a bit finicky to set up. It's in: Advanced preferences > Filters > Scene video filter. Then the filter has to be configured, and VLC needs to restart. And you have to remember to turn it off, or it will keep extracting frames on everything.</p><p>You do not need to extract every frame. I've used every 15 or 20 frame.</p><p>There are online gif makers as well, but I pay no attention to those.</p><p><strong>---------------------------------------------------------------------------------------------------------</strong></p><p><strong>Various Notes:</strong></p><p>The maximum load I've put on it is 150kg, but it's not recommended as the bearings will eventually start digging into the plastic.</p><p>All parts are printed completely solid. If using Simplyfy3D, the "include solid diaphragm" on the infill page should be enabled on every layer. For PrusaSlicer I would turn off top layers and put all bottom layers instead. This is to avoid something called infill anchoring, which creates useless zones in the layers that should be solid.</p><p><strong>The base and top should not be removed before they have cooled down, to avoid the surface bending.</strong></p><p>Base can be printed with 0.2 layers. The face gear could be printed with a higher layer count.</p><p>PLA is recommended because of it's quality, stiffness and weight. The face gear needs to be perfect to avoid skipping of the table.</p><p>The gear on the top plate is not actually a proper gear. Fusion360 does not have a face gear generator, so I eyeballed it.. It's not perfect, but it works quite well.</p><ul><li>There are 2 models of the top. 1 is a solid piece, and 1 has 2 rings that are printed separately and inserted into the underside of the top (with smooth side against bearings). These rings will be the surface for the bearings. Printing them with only lots of perimeters will give the bearings a very flat surface to roll on, which may reduce vibrations and skipping. They are glued in place. Can also be replaced if you manage to wear them out. Can also be used to fine-tune the height of the top plate, by scaling the thickness of the rings, which will affect how the gears meet. This model is <strong>experimental.</strong></li></ul><p>If used for heavy very loads, you should put a hard and rigid plate on top, so the load is even on the bearings. And I mean very rigid, like 1" wood rigid. The surface the table is sitting on is also important here, so the bearing holders don't get blown out the back.</p><p>You need a very flat print-bed for this. Otherwise you can get wobble on the table, or skipping gears. It is possible to do sort of a "burn-in" on almost flat top plates. You just load the table with something very heavy and run it for awhile. Somehow the top flattens out when doing this (probably deforms a small amount). Worked for me. No damage.</p><p>The table will generally work better once the gears have worn in a little.</p><p>Adding some matte vinyl on the top is recommended to prevent any weird light interactions with the layer lines when taking photos.</p><p>If the top is printed in white, certain features are going to show through, like the lights (and bearing rings on experimental type). If you want a fully white table, you can print in a dark color and paint it white after. Or use a larger white plate on top, using the bracket. Or put something over the led's</p><p>There is a bracket you can print for attaching to a larger plate that goes on top of the table for rotating bigger items. This bracket has a tiny hole in the center that should line up with the center of the plate you are using. The shape of the bracket ensures that the weight is transferred to the bearings, to support heavy loads.</p><p>The file named "USB Board Bracket" is a small clip that can be used to hold the back of USB board down. It's optional.</p><p>I've considered making a aaa battery version, but it's not worth the space it would take in my opinion. If you don't want to mess with lithium for some reason, you can power it with a USB powerbank, and it would still be mobile.</p><p><strong>---------------------------------------------------------------------------------------------------------</strong></p><h3>What you need:</h3><p><br>Everything in the eBay searches is copied and pasted in. Some are advanced searches, which might look a little strange. They are a massive time saver when used.<br><br><strong>N20 Gear Motor (D shaft)</strong><br>eBay Search: N20 Gear Motor</p><p>The shaft length should be 5mm, but you can buy 10mm and cut it down. Shaft is not hardened, so pretty easy to cut. I'm not sure you can buy 5mm ones. Shorter ones will work, but they don't sit as far in the spur gear.</p><p>This is a very small but strong motor with a gearbox. It comes in multiple voltages and gearbox ratios to suit whatever speed you want. A fast gearbox will be weaker and give you blurrier images for 360 animations, so keep that in mind. The voltage is also important. The boost converter can only increase the voltage it sees on the input, so if you buy a 6v motor and use 5v USB power, you will only get 1v of speed adjustment. A 12v motor will give you a lot more range, but here the motor will be weaker if used at 5V. You have to find a balance that suits your needs. The speed of the gearbox is probably more important than the voltage. I think I'm using a 12v 100rpm motor, running at 4.5-5V. With the gearing of the table it will do 1 round in about 60 seconds. You can also buy the gearboxes separately.</p><p>As stated, these motors are very noisy. I've tried a bunch of other motors, but they are all quite loud.</p><p>I've seen these motors available with rotary encoders too, so if you want more advanced features, it might be possible to use those with a micro-controller. You could make a phone controlled turntable that stopped every 10 degrees and snapped a photo automatically, if you have the skills to do so. That is not something I need, or is currently able to do.</p><p><strong>Lithium Charger\Boost Converter</strong><br>eBay Search: lithium charger boost</p><p>These are 2 in 1 boards. One side has a lithium battery charger, and the other has a boost\step-up converter. The charger side does everything automatically with the battery connected. It charges it up when the USB cable is connected and cuts the power before the voltage goes too low. The boost converter will take the USB or battery voltage and step it up to a higher voltage that you set by turning the tiny potentiometer on the board. These boards have a charge current of 500ma, so a 2000mah battery would charge in about 4 hours. There's not much protection on these boards, so they are probably quite easy to kill. The battery has it's own protections, so that's not a concern.</p><p><strong>Lithium Polymer Battery (Optional)</strong><br>eBay Search: (Lithium Polymer,lipo,li-po) 103450<br>I got mine from seller tesky12</p><p>These are batteries typically used inside products, like phones, so you almost never see them. Only difference from regular lithium batteries is that they come in a polymer bag, not a metal case. These are safe to handle because they have integrated protection boards on them. As long as they are not pierced, they are pretty safe.</p><p>The numbers refer to the dimensions of the battery, so a 103450 is 10x34x50mm. You cannot use a ticker battery, as it will scrape against the top plate. If a hole is made, it will most likely catch fire.</p><p>These batteries may expand over a very long time (years) as gasses develop inside when the chemistry breaks down. You should inspect it from time to time, to see if it changes. If you get a 10mm thick battery, then there is not much it can expand before it hits the top plate. I would probably find a 8mm one, or less, just to be safer.</p><p>The battery should be taped in place with double-sided tape, but with very little tape. If it sticks to hard, then it can delaminate inside, if you pull it out. And don't use hot-glue..</p><p><strong>3x12mm Brass\Steel rods</strong><br>eBay Search: 3mm (rod,rods,shaft,shafts) (steel,brass)</p><p>You can buy long rods that you cut yourself, or buy precut if you can find it. Brass is plenty strong and easier to work with then steel. If you cut them with bolt-cutters, you need to file away the flattened region so you don't blow out the walls of the holders. I suggest you cut them with something else, like a saw, or dremel. The rods snaps in place. All 16 rods are 12mm long</p><p><strong>623 Bearings</strong><br>eBay Search: 623 Bearings</p><p>Not much to say about bearings, they roll stuff. The type doesn't really matter, but shielded could be useful so you don't get trash inside them. You will need 16 of them.</p><p><strong>RF Motor Controller (Optional)</strong><br><a href="https://www.ebay.com/str/anntem">Go to this seller and find the one in my picture (link).</a></p><p>These are what provides the "no programming" part of this design. They are remote controlled motor controllers that are ready to go. You only need to connect the wires. They are only available from one seller (probably makes them) on eBay. They come with various remotes that are already paired with the controller. The remote I recommend is the one pictured. It's well built.</p><ul><li>Seems the eBay store is closed. You can still find the motor controller on Anntem's AliExpress store <a href="http://anntem.aliexpress.com/store/2908027">here.</a></li></ul><p><strong>Voltmeter (Optional)</strong><br>eBay Search: LED Voltmeter 0.28</p><p>Just a basic meter that can be used to show the voltage on the battery or motor. I made connectors that makes it possible to swap between the motor and battery. You only need to see the motor voltage when setting the speed, so you don't kill the motor.</p><p>A fully charged battery will be 4.2v. I don't remember when the charger cuts off, but it's somewhere in the 2.5-3v region. You can just assume the battery is close to dead at 3v and needs charging.</p><p><strong>SS12F44 Slide Switch (Not so Optional)</strong><br>eBay Search: SS12F44 Switch</p><p>A simple slide switch. It's put in series with the battery. If you don't use this, the battery will be drained by the other components over time, so it could be dead when you need it. The switch is accessed from the outside, so you never need to take the top plate off.</p><p><strong>Misc</strong></p><p>24 or 26AWG Silicone wires.</p><p>Dupont connectors are optional. There is a holder for these connectors, but it's not necessary.</p>
With this file you will be able to print 18\20cm Motorized Turntable with your 3D printer. Click on the button and save the file on your computer to work, edit or customize your design. You can also find more 3D designs for printers on 18\20cm Motorized Turntable.