18V Ryobi ONE+ to Makita Battery Adapter v1.5b
prusaprinters
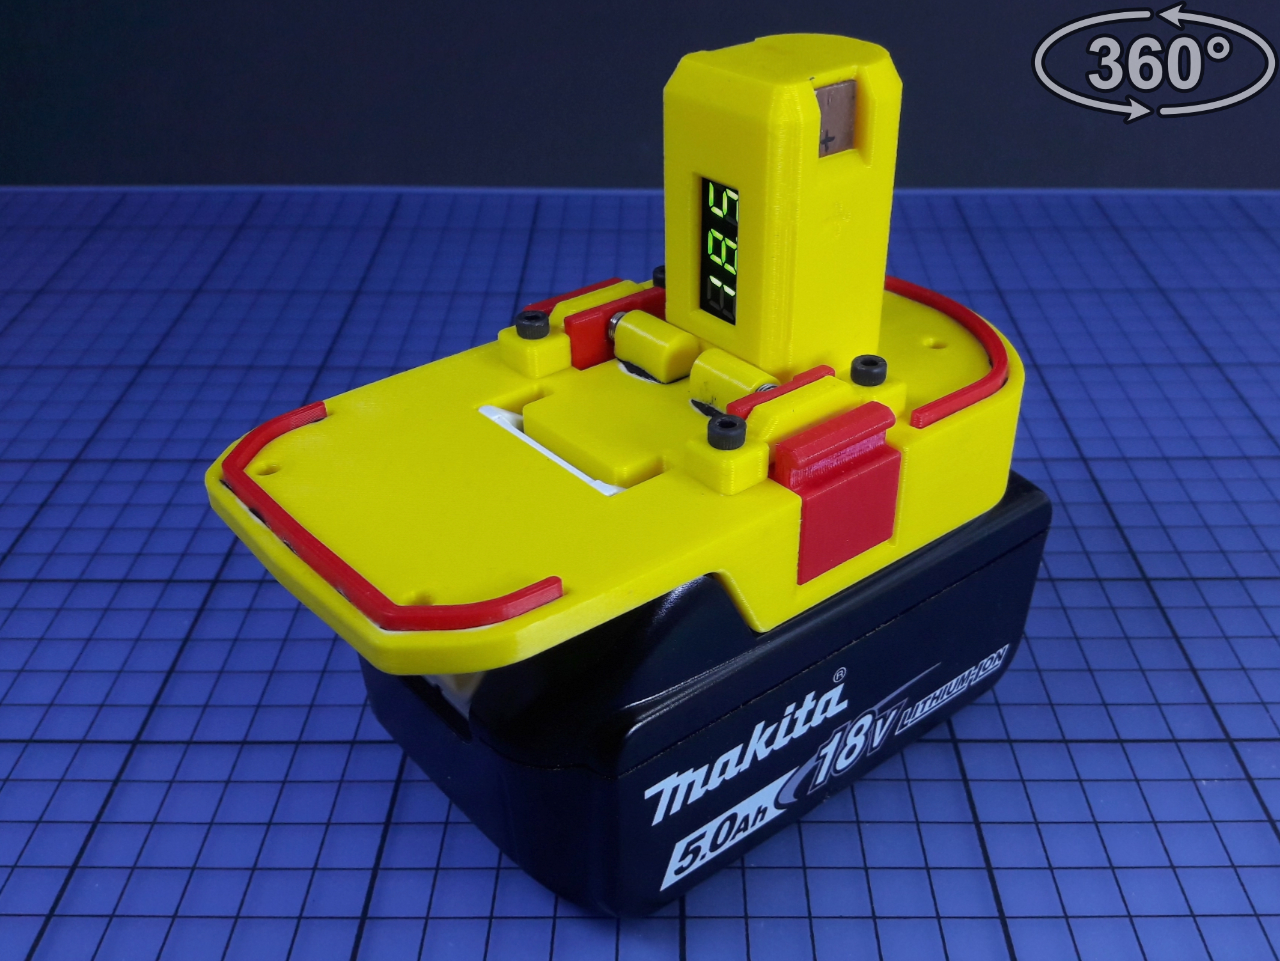
<p><img src="https://lh3.googleusercontent.com/pr30Dtt1jUCNw8OVfQcW3MqAluNlmVLFCnguzgB2IVOO6_QjCPpg3YcVmdwytD86j8Zd2T2vpqf8Xya7dxNOhT1aMi7rn51XONKm3U1YBLpJ6oNQUGUsIYgoDUISZyOLC4BaRDv4kQAWVghMxAzbYwp4eBLmDnbm1CyP5h0Mci8b5LjeFgC3hBj8DZoVXUYcxJ3N6cifEifLh2iEuPgtBZYIC0Q5cE0njjs88HmijjMlpTGebSl60kts1uDnU-pp37LvcmOrpUotf6phIi71QFVUcuI_FL_EfwCva6gpoiDrgNjXUQ2z7Q8xziPS_IoAi6yGHPOFDl3tv2vsfxwmz7ecFfMv7ah3wBl0SFrG4S8heQpMOzTptR6URuVhd8EeKIcPE4fDrMssaxuvHv9uekZMjqLPpPcElYR6Rw-bS2VuOEUxhsT4xiWGrkRUGxVO4Z0h894tqOgISHVZG8o8y0CMJBKR-94o9_hTveBMZQcyCGAy0wCoKgdlTs3IreBZptpbl2Psc4FzQVbVxuRTWcFmrOPJL2B7aJO3oPa8i1JDC94txR0vQ5zzFs8tMAc0gCXWPLYY1G0Uq_0f3ljup8BsRtFoHOjzqwVh3uu0MrTnp0QHWRCwxPKU9dRke-gTNqObqjm9LkN1mhE-69kdYOMY6OWjv9JkKUU2RXMtwkIVwRgV807HQgfWHj-SCFsc6fy2=w1531-h839-ft"></p><p> </p><p>This is a removable adapter that makes it possible to use Makita batteries on Ryobi tools. It is built on my other Makita battery barrel jack adapter.</p><p>This was made because Makita does not make a cordless glue gun, and I have no interest in going into another battery system just for one tool. Ryobi however does make a glue gun, and it's cheap. So there you go, I now have a Rykita glue gun.</p><p>There are multiple versions to choose from. Adapter plate has a version with the voltmeter on the outside, and one with the barrel jack. If you want the voltmeter and the barrel jack, the connector column has a version with the voltmeter in it. It's a little inconvenient to have the voltmeter inside the tool, but it does give you the barrel jack too.</p><p>Keeping an eye on the voltage is important so the battery doesn't get damaged. You should stop using the battery when the voltage gets to 15V (3V per cell)</p><ul><li>Glue gun runs for about 4.5 hours on a 5Ah battery by the way.</li></ul><p><strong>Changelog</strong><br><strong>v1.1</strong></p><ul><li>There are now 2 versions of the adapter plate and connector column with place for a voltmeter.</li><li>Added positive and negative markings to column.</li><li>Added some more space in the column for the wires.</li></ul><p><strong>v1.5b</strong></p><ul><li>Some people seems to have fit problems with the column so I added a version that has a larger offset (0.2-0.6mm) This should hopefully not jam. Needs to be tested by others, as I dont have any issues with mine.</li><li>Added a clean version of the adapter plate. This has no barrel jack or voltmeter.</li></ul><p> </p><h3>Print instructions</h3><p><strong>Safety Issues</strong></p><p>When you make a hybrid tool like this, using adapters, there are risks you should be aware of. The various tool brands have different ways of handling the safety systems that protects the batteries and tools. Some have the protections (like under-voltage, over-temp, over-current) in the battery itself, and some have them in the tools. With adapters, this can result in an unprotected battery being used in an unprotected tool, which can have serious consequences.</p><p>You do not want to mess with these types of batteries if you don't know what you're doing. Using adapters like mine or similar, may in some configurations result in: loosing capacity, explosion, fire, broken tools\batteries, venting toxic fumes, leaking acid and so on. And it will certainly void your warranty. <strong>You make and use these adapters on your own risk.</strong></p><p>As far as Makita batteries go (star and non-star marked). I've been able to discharge them all the way down to 10V (2V per cell) without them cutting off. This is far below usual cutoff voltage, which would be around 15V (3V per cell). <strong>It looks like Makita batteries do NOT have over-discharge protection</strong>, unless it's extremely low (below 2V per cell). At first I thought they had this, but it's actually the glue gun that turns off the power at around 15V.</p><ul><li>Don't ask me about how other brands do the protections. I only have Makita batteries.</li></ul><p>Also, don't try charging a battery through adapters. The chargers communicate with the batteries during charging. They monitor the temperature and make sure the cells inside are balanced, so don't put a Makita battery in a Ryobi charger.</p><p>-</p><p>A few years ago I was messing with an older Makita battery and managed to reverse the polarity. This was with a Makita impact driver. Luckily this tool had a fuse inside which instantly blew when I pressed the trigger. That was a 40 Amp fuse.. That means there was far more than 800 watts going to the tool. This should tell you something about the power in these batteries.</p><p>-</p><p>I also have a minor concern about using copper for the battery terminals. I know that copper forms an oxide layer after a while, and this layer is not conductive? I've read that this layer is so thin that it will probably be rubbed off by simply inserting the battery, and that seems to be happening with my adapters. I have not had any problems with copper so far. You could use some grease to prevent the oxide from forming, or you can use 1mm thick nickel plates instead. You would have to cut the plates into strips yourself. Nickel is harder than copper, so slightly harder to work with. Steel is very hard to solder to, and is not a good conductor. It would work if it's nickel plated though. Aluminum is also bad to solder to apparently, and also forms an oxide layer.</p><h3>Various Notes</h3><p>Parts are printed as pictured.</p><p>You will probably need to file\sand the locking clips a small amount if they do not engage properly. They should be flush with the side of the adapter when locked. It's under the "hook" the trimming will most likely be needed.</p><p>The two locator brackets are there to prevent twisting of the adapter. They are glued in place.</p><p>Screws on the connector column should not be fully tightened. They can be tightened when the adapter is locked in the tool. It helps to center the column in the tool.</p><p>The adapter plate should have supports to get the best surface for the locking clips to slide on. You can see my supports in one of the pictures.</p><p>The spring holders are glued in place. They can be moved to adjust pressure of the springs.</p><p>The top copper strips do not need to be glued, but they should be bent a little so they don't pop out on the top. They are inserted from the bottom.</p><p>Battery connector strips should be soldered before putting them in. Then glued in place. The plastic will melt otherwise.</p><p>There are 4 extra holes on the adapter plate. This is for permanent attachment to a tool, if needed. Holes on tool should be drilled with a 2mm drill bit, then threaded with 3mm taps. The plastic is not very thick.</p><p>Don't over tighten the screws. Plastic threads strip easily.</p><h3>What you need</h3><ul><li>eBay searches are copied and pasted. Some are advanced searches, which look a little weird.</li></ul><p><strong>Copper\Nickel Strips</strong><br>Copper strips can be found in a eBay store called <a href="https://www.ebay.com/usr/copper-solutions">Copper Solutions.</a> You need the 0.95x10mm type.</p><ul><li>Alternatively, you can buy 1mm nickel plates. These will need to be cut into strips. Search eBay for 1mm nickel plates for that. Strips are cut into around 50 and 46mm lengths.</li></ul><p><strong>Barrel Connector (Optional)</strong><br>eBay Search: (Connector,barrel jack) metal female 5.5 (2.5,2.1)<br>Choose the 5.5x2.5 or 5.5x2.1.</p><p>This is to use the tool with external power supplies. Can be used as a power bank when connected only to the battery. Should not be used as input while the battery is installed because the battery will attempt to charge, and that is not good. <strong>It should be output only when battery is installed.</strong></p><p>Connector is rated 5A, so watch the power. Many tools will use far more than that. Glue gun uses 6A peak, but quickly drops down.</p><p><strong>2x 5x20mm Springs</strong><br>eBay Search: 5mm 20mm compression springs</p><p>Should be strong. 0.5mm minimum. These push the locking clips into place. The clips should be flush with the surface if they engage properly.</p><p><strong>Silicone Wire</strong><br>eBay Search: 18AWG+ Silicone wire</p><p>Silicone covered wires is much nicer to work with than PVC. <strong>Many tools will use far more current then a glue gun,</strong> so using much ticker wires would be advisable here. 18AWG would be more suitable for lower power tools, like the glue gun and lights.</p><p><strong>Voltmeter (Optional)</strong><br>eBay Search: voltmeter 28</p><p>A simple 2-wire voltmeter. You need to be careful when soldering the wires to this. They are very close together. If they touch, you will short out the battery.</p><p><strong>Screws</strong><br>4x 10mm M3 screws for the locking clip holders.<br>3x 10-30mm M3 screws for the connector column.<br>Optional 4x 10mm M3 screws for permanent attachment to a tool.</p><p><strong>Glue</strong><br>I'm using reinforced superglue. It has rubber in it.</p>
With this file you will be able to print 18V Ryobi ONE+ to Makita Battery Adapter v1.5b with your 3D printer. Click on the button and save the file on your computer to work, edit or customize your design. You can also find more 3D designs for printers on 18V Ryobi ONE+ to Makita Battery Adapter v1.5b.