1911 LED Grip Griff
thingiverse
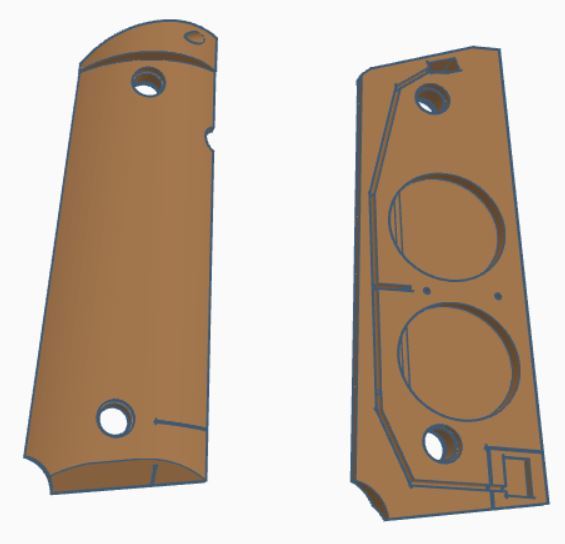
LED Griffe für Colt 1911 und baugleiche egal ob echt, CO2 oder Deko Ich wollte durch 2 größtmögliche Knopfzellen (CR2450) ausreichend Leistung für die LED´s bereitstellen. LIR2450 (Li Ion) sollten noch mehr Leistung für hellere LED´s geben. Die beiden Taster unten am linken und rechten Griff werden durch Anpressdruck des kleinen Fingers betätigt. Den Taster muß man etwas justieren indem man die abgesetzte Tasteraufnahme etwas noch oben biegt so dass der Taster erst bei Druck reagiert und nicht schon wenn man die Griffe festschraubt. Der Druck ist einfach, das verdrahten und Löten erfordert Geduld und können. Im Griff befinden sich Löcher durch die man den Draht schiebt und der Leitungsführung entlang von der LED (3mm, weiß, 30000mcd) zum Taster (5mm) und zu den Knopfzellen erlegt. Ich habe blanken Kupferdraht 0,3mm und isolierten Kupferdraht benutzt. Wenn man es richtig macht kommt der isolierte Draht vom Taster zur LED. Die beiden anderen blanken Drähte von der Knopfzelle + zum Taster und - zur LED dürfen sich nicht berühren. Tesafilm verhindert dass die Drähte wieder herausspringen. Die Abdeckungen für die Knopfzellen sind etwas größer gedruckt und müssen mit der Schere zurechtgeschnitten werden. Befestigt mit Senkkopfschrauben 2,2x4,5. ____________________________________________________________________ LED handles for Colt 1911 and identical whether real, CO2 or decoration I wanted to provide enough power for the LEDs with 2 largest possible button cells (CR2450). 3,3V LIR2450 (Li Ion) 3,6V should give even more power for brighter LEDs. The two buttons at the bottom of the left and right handles are actuated by pressing the little finger. The button has to be adjusted a bit by bending the detached button holder a bit upwards so that the button only reacts when it is pressed and not when the handles are screwed tight. Printing is easy, wiring and soldering requires patience and skill. There are holes in the handle through which the wire is pushed and laid along the line from the LED (3mm, white, 30000mcd) to the button (5mm) and the button cells. I used bare copper wire 0.3mm and insulated copper wire. If you do it right, the insulated wire comes from the button to the LED. The other two bare wires from the button cell + to the button and - to the LED must not touch. Tape prevents the wires from jumping out again. The covers for the button cells are printed a little larger and have to be cut with scissors. Fastened with countersunk screws 2.2x4.5.
With this file you will be able to print 1911 LED Grip Griff with your 3D printer. Click on the button and save the file on your computer to work, edit or customize your design. You can also find more 3D designs for printers on 1911 LED Grip Griff.