1959 Cadillac
thingiverse
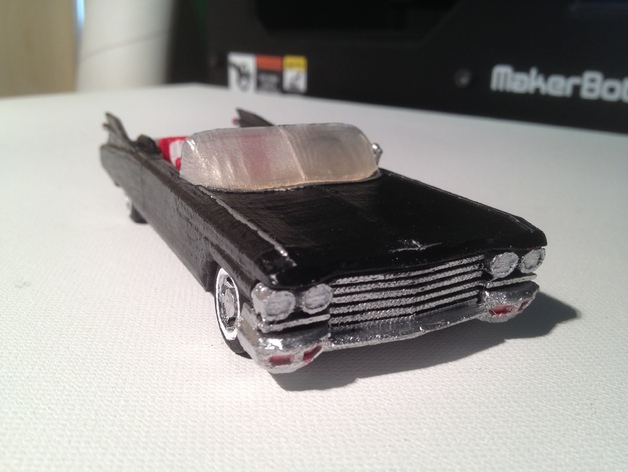
This is a model of the classic 1959 Cadillac convertible. Designed in Blender and printed on a MakerBot Replicator 2 in PLA. There's no dashboard yet... Instructions The model was designed in Blender and then printed on a MakerBot Replicator 2. I used 0.15 mm resolution for everything except the front grill which was done at 0.10 mm. It probably doesn't make much of a difference. I used a scaling factor of %1000 in MakerWare. If you go smaller you may lose detail and some of the parts (such as the side mirror) will be too small to work with. Here's a summary of each part: 1) Front body: Print using rafts and supports and orient the part with the open end on the build plate. (the supports are needed for cavity of the interior). 2) Rear body: Print using rafts and supports with the open end on the build plate. 3) Front bumper: No supports needed. Orient the flat back part on the build plate. 4) Front grill: No supports needed. Orient the back flat part on the build plate. 5) Front seats and rear seats. No supports needed. Orient the bottom of the seat on the build plate. 6) Rear bumper. You will need to use supports for this with the back of the bumper on the build plate. 7) Front and rear wheels: No supports needed. They must be printed lying with the back of the wheel (flat part) on the build plate. Note that the rear wheels are cut in half so they will look like they are under the rear wheel covers when glued on. There is a slight cavity in the front wheel wells where you can place the front wheels and glue them to the supports in the body undercarriage. 8) Steering wheel: One side of the steering wheel is flat. Make sure you put that side on the build plate. The steering wheel fits over the steering column (friction fit). You'll notice that this steering wheel is a little over-sized... 9) Steering column: No supports needed. One end of this column is angled so you can glue it to the interior at the right orientation. Make sure the other end is on the build plate when printing. 10) Side mirror: Again, print so the mirror faced up and the back is on the build plate. You may have to snip a bit of the arm before you glue it to the body. Perhaps later I'll make a slot for it. 11) Windshield: No supports needed. Print with the narrower (flat) edge on the build plate. I switched filaments and used translucent. That should do it for the printing. I strongly recommend painting first before gluing. Sand the front and rear body parts where they join before you glue to make the fit as clean as possible. Using rafts when you print really helps make the join as good as possible. The more time you take on the details (sanding, painting, etc), the better the result!
With this file you will be able to print 1959 Cadillac with your 3D printer. Click on the button and save the file on your computer to work, edit or customize your design. You can also find more 3D designs for printers on 1959 Cadillac.