1966 Batmobile
thingiverse
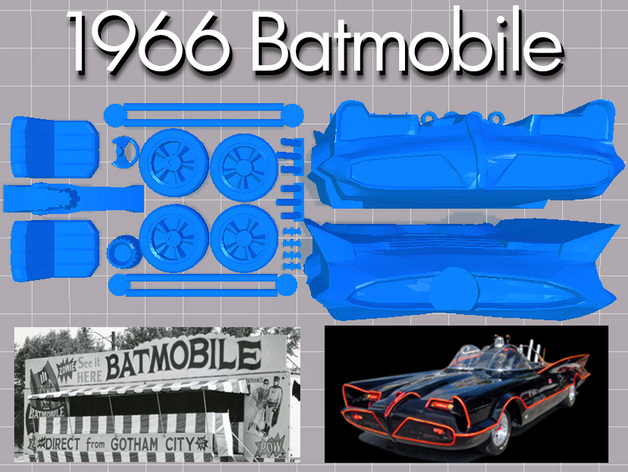
I made the following modifications to larry009's excellent Classic Batmobile model: Smoother body and window surfaces, improved bat images Rotating wheels with axles and optional long axles/spacers Cutouts for bat logos and rocket tubes, hollow rocket tubes Batmobile #1 1955 Lincoln Futura "cutaway" steering wheel Detailed atomic turbine exhaust port and roll-bar pod lights STL file repairs; Reoriented & plated for easier 3D printing Known issue: no bat-chutes! Print Settings Printer Brand: MakerBot Printer: MakerBot Replicator 2 Resolution: .20mm Infill: doesn't matter Notes: IMPORTANT: Print batmobile-body(use raft).stl with raft. I used 0% infill, 3 shells; Print batmobile-no_raft.stl without raft, 2 shells, 10% infill. Neither part requires support. Print the windows in transparent (I used Taulman T-Glase). I used the longer set of axles with spacers for all wheels. If possible, use a heated bed when printing the body halves to minimize warping. See larry009's instructions for more information on painting. Post-Printing Printing, Painting and Detailing Here's how I printed and painted my model: 1) I printed the body and wheels in black PLA. I sliced the model with a 0.10mm layer height, which was a mistake. The model took almost 40 hours to print! I should have used 0.20mm layers. Definitely use raft for the body halves. I didn't and the model was knocked over at hour 36. (Heartbreak!) So there's an extra seam on my model where I printed the last bit and glued it on.Wheels: I brushed silver acrylic onto the rims area and other silver parts. For a better chrome effect, you should use a silver spray paint and then repaint the tires black (or mask them from the spray).Body: I used Polyfilla to fill the seams between the front and back body halves (and my patched bits) and then repainted the body black. (Alternately, use one or more coats of primer first.) 2) Sand, repeat, sand, repeat until smooth. 3) Print or paint the bat logos in red. I printed the crests in red PLA and glued them in place. 4) Attach the wheels. I used the long axles with the spacers. 5) Glue the various parts onto the body: rocket tubes, seats, dashboards, steering wheel, roll bar, etc. 6) Paint the fine details, such as the orange running lights, red and silver flasher, and red pod lights on the roll bar, with a small brush. If you're really going for it, print tiny descriptive tags for every Bat-gizmo in the dashboard area. My model is missing the all-important Emergency Bat Turn lever, Batphone, Bat-fire extinguisher, and Bat-Ray Projector. 7) Use a red Paint Pen to paint the red pinstripes. It works amazingly well, and it's very easy to control the line thickness. I tried to use a brush (as recommended by larry009 on the original model's source page) and believe me, the paint pen is definitely the way to go. I applied three coats. 8) If possible, apply a coat of XTC-3D or glossy Varathane to both sides of the windows before attaching them. If you want your Batmobile to be glossy (as it was during the TV series years, until George Barris inexplicably decided to resurface the iconic vehicle with a flocked finish he called "Bat Fuzz" in the early seventies), apply XTC-3D or Varathane to everything. My sample photos show a model finished in "Bat Fuzz" black. :-) 9) Attach the windows.
With this file you will be able to print 1966 Batmobile with your 3D printer. Click on the button and save the file on your computer to work, edit or customize your design. You can also find more 3D designs for printers on 1966 Batmobile.