2001 Discovery (DX-1) with Pod Bay and Improvements

2001 Discovery (DX-1) with Pod Bay and Improvements

thingiverse

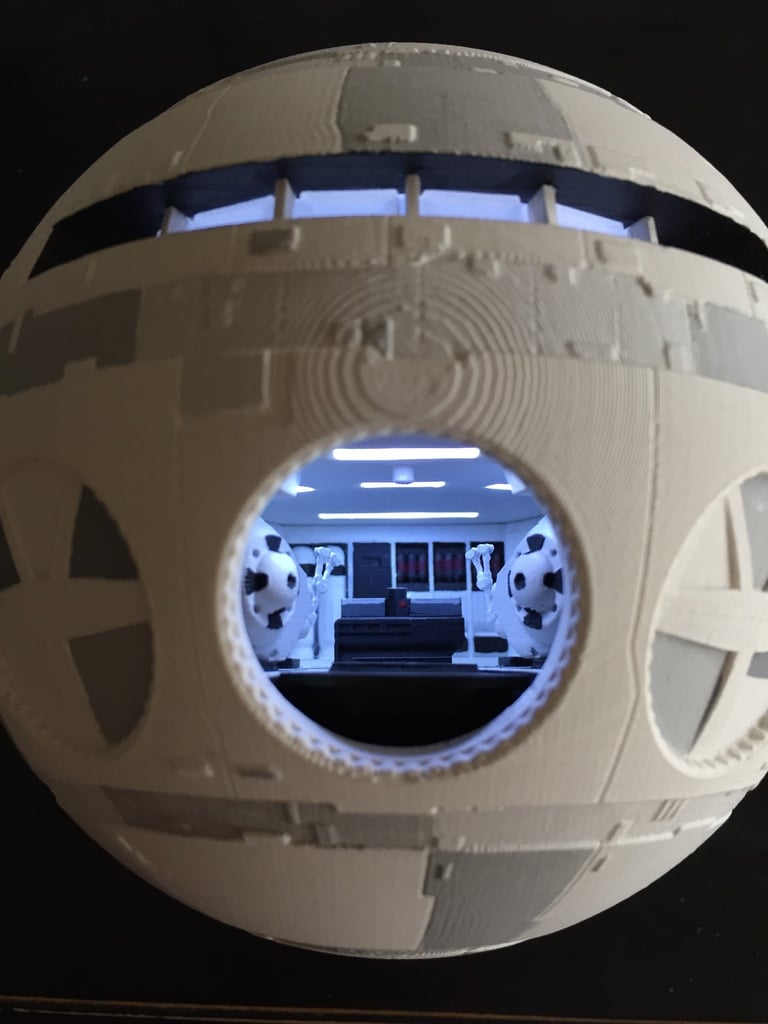
This is a remix of metaform3d's astonishingly detailed 2001 Discovery model. I can't express how amazing the original model is -- the shear quality is incredible! *I highly recommend you visit the source model posting to get more detailed information about the construction of this model.* [Discovery source model](https://www.thingiverse.com/thing:950664) A few people have made efforts to add a pod bay interior to this model but the solutions required a lot of post-print hacking and the available interior models are not awesome, so I made this modification to help facility that process. It is by no means perfect or equal to the quality represented in the original model, but it's not too shabby either. In this remix the sphere section is made hollow and a pod bay model is provided that fits neatly inside. This remix also includes modifications to make the model assembly easier and fixes a minor aesthetic issue with the EM drive section. In the nearly inconceivable possibility that you want to make this model *without* the pod bay, I've included the original solid sphere piece as well. #### Changes to the Sphere I added an internal surface to the sphere and opened up the center pod bay door and command deck windows. The rear portion, where the assembly rod fits, is now a separate removable piece that is held in place using M3 screws. ### Pod Bay Interior This is the bulk of my contribution to this remix. Included is pod bay model which features a sliding platform and translucent lighting fixtures for easy LED installation. The pod bay is designed to be assembled separately and then fitted inside the sphere. ### EVA Pod Model I used BouncyMonkey's EVA Pod Model in my build. However, his model was meant to printed *much* larger so some fine detail is lost in the down-scaling, including the built-in supports. But it turns out it this isn't problem, I added supports in the slicer and it printed great. A down-scale to around 16.75% is a good fit. Also, I used a 0.2mm nozzle for the Pod so as to preserve as much detail as possible. [EVA Pod Model](https://www.thingiverse.com/thing:2451208) ### Lighting and Electronics To light this I used eight white LEDs with sufficient resistors to use 3v-6v power and hot glued them to the top-side of the pod bay ceiling. Then soldered the wiring so that just a single set of positive and negative leads can be connected to a power source. It's up to you to figure out how you want to accomplish this. ### Wall Mount There's already a wall mount for this model on Thingiverse, but it's pain to print so I made a new one and included it here. It prints in two pieces, without supports, and assembles easily. I've also included a version of the mount that can hold a PIR module (motion sensor) if you want to make this light up automatically. ### Fixes and Improvements The source model is great, but it had a couple of fickle issues. The first is, when assembled, the EM drive section had some noticeable gaps along the seams due to the waffle pattern of grooves along the underside which serve to align assembly. Fortunately the grooves needn't be extended all the way to the edges so I closed them off 2mm prior which fixes the holes. The second is that the nuts that hold the "spine" sections together butt up against the modules in an unstable fashion which makes assembly alignment difficult. Fortunately ThingHuxter created a remix with recessed notches on the modules and nuts to match and also modified the EM drive side pieces and brackets similarly. Unfortunately there is a flaw in the geometry of his drive section brackets which makes assembly impossible. Also, the spine module for the dish mount and it's associated nuts were not updated with notches. I've corrected the geometry and updated the dish module and it's nuts with the notched versions so everything plays well together. ### Naming Conventions This remix utilizes the same naming conventions are the original model: The last part after the underscore starts with a number which is the number of times you will need to print that part. There are also optional letters after the number for special instructions. Everything prints in the provided orientation without support unless otherwise indicated. - S - needs support - P - probably needs support, but may print OK without it - M - when printing 2, print one normally and scale the other by -1 to make a mirror image - A - part has an alternate, so only one form needs to be used. ### Additional Parts The entire model is threaded onto a rod that is 36 inches (914.5mm) long and 1/4 inch (6.35mm) in diameter. I used a fiberglass rod used for kite making, mainly because I make kites and just happened to have one sitting around. Others have used steel rods and wood dowls. ###### Additional Parts list 1 - 1/4" (6.35mm) diameter rod at 36" (914.5mm) length 4 - M3x10 screws 2 - 2mm diameter rods at 72mm length LEDs, resistors, wiring, etc. for the lights. For lighting use whatever floats your boat. I had some white mini LEDs sitting around in conjunction with appropriate resistors and battery holder which you can hide inside the sphere, nestle inside the sphere back piece, or connect externally. ### Printing Considerations Included are alternate versions of the sphere. One has the sphere and it's back piece as a single model. They aren't physically connected and will separate once finished, but you will need to make sure that supports are included to hold up the top of the sphere as it prints. If you're worried about adhesion of the supports then there are separated versions of the sphere and back piece so that the supports will be printed directly onto the bed. ### Assembly Considerations You will need to do some sanding here and there to get a good fit. Make sure your machine is well calibrated to ensure accurate geometry! Everything goes together in a pretty obvious manner. The only thing that requires some post-print sorcery is the front window -- it's printed flat, ideally from clear filament, and has relief grooves that facility *bending* of the piece to fit the model. To bend it, fill a coffee mug with warm water (on the high end of warm) and dip the part in the water -- only as deep as needed to bend the facet you're working on. Only keep it in the water for a second or two and then bend a facet. Only do one facet at a time! The pillars separating the windows are part of the window piece. Be careful to not fold them over when bending the facets. Once bent the window should press fit into the model. I sanded the surfaces of the window to make it less opaque for aesthetic reasons. ###Updates **7/27/20** - On the sphere and sphere back pieces, rotated the screw holes positions 45° so that if people want to run wiring straight out the bottom of the sphere, or split the sphere into two pieces for printing on small volume printers then the screw holes won't get in the way. Also added is a sphere that is split in two halves for those with smaller volume printers. I also noticed that there were some older versions of the wall mount pieces still in the collection, even though I had deleted them, THINGIVERSE, and they should be gone as of 1:00pm Pacific 7/27/20. So if you downloaded this prior to that time, maybe you should get a fresh copy. **11/5/20** - A red-letter day in the history of science. I've added my SketchUp source files for the sphere and pod bay parts. **11/13/20 ** - Re-uped the antenna base section which had mysteriously disappeared into the void known as Thingiverse. ### Future Work I might *might* model a command deck for this instead of using an opaque window... if I can summon the will power.

Download Model from thingiverse

With this file you will be able to print 2001 Discovery (DX-1) with Pod Bay and Improvements with your 3D printer. Click on the button and save the file on your computer to work, edit or customize your design. You can also find more 3D designs for printers on 2001 Discovery (DX-1) with Pod Bay and Improvements.