28BYJ48 Micro Extruder
thingiverse
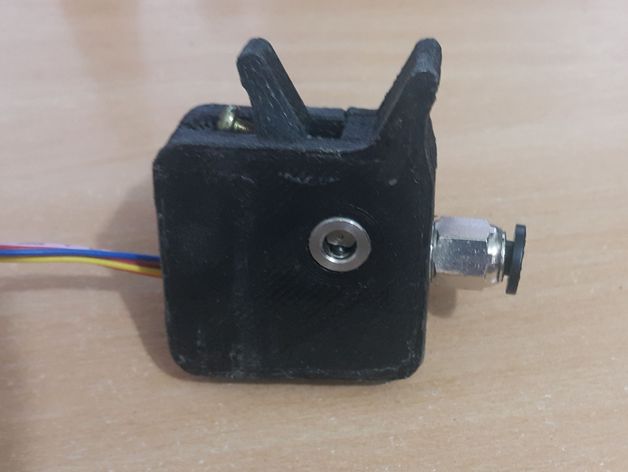
This is a compact extruder based on the cheap (both in price and quality) 28BYJ48 stepper motor. It was designed for printing flexible filaments via one channel of a diamond hotend. Features: Bowden tube out, guided in. Flexible filament friendly: Bowden tube goes right to the gear+bearing set. Quick release lever. Lightweight: 63g Compact: Stepper+square body = the size of a NEMA17 motor. Known Issues: Requires careful assembly, or the back cover may not fit well (aesthetics only). No mounting holes, it just hangs on the bowden tube. Print Settings Printer: DIY i3 Supports: No Resolution: 0.2mm Infill: 70% Notes: Parts have embedded support where needed, just make sure your slicer detects thin walls. Lever requires high infill or it breaks. Body may use down to 30%, but then it requires reinforcement later. Post-Printing The body should require little cleanup, just make sure teh corners are square where they are supposed to be. Reinforce the bottom of the spring well by gluing a piece cut from a metal washer. The tensioning screw puts a lot of concentrated force there, and may punch a hole through (guess how I know this). Be very careful when inserting the bowden nut, use a file to correct the diameter of the hole, and go back and forth several times while screwing it in. For the lever you should probably start by drilling the axis hole for the bearing, use a drill small enough that a M3 screw will still grab. After that use a small file to remove the supports where the bearing goes. Insert the bearing (not the screw), place a piece of sandpaper on a flat surface, and sand the sides of the lever untill they are completely flat, an fit inside the body without sticking out. Lock the bearing in place with an M3x8 screw, making sure the head goes inside the slot on the body, and not against the motor. Use an M3x25 screw, M3 nut and a spring to build the compression system as shown in the photos, and attach it to the lever. Install the lever on the body. Hack your 28BYJ48 to work as a bipolar motor and use decent drivers (A4988 or DRV8825, not ULN2003). Mount an MK8 extruder gear on the motor making sure the filament channel is close to the motor. Then use two M3x8 screws to hold the motor in place. The back requires a lot of careful sanding to fit. It may be held in place by press-fit or by 5x5mm cylindrical magnets. I went press-fit, but if you choose to use magnets then sand the back cover until it fits loosely on the extruder. Cut a washer in several pieces and glue 4 of them in the pockets on the inside of the back. How I Designed This Started with a guide sketch on paper, then made a base model on OpenSCAD. The body and most carvings are basic extrusions of complex shapes, so exported the base mechanics from openscad to DXF, and used librecad to draw most of the body detais. Once the body details were drawn I imported the DXF back into openscad and extruded every layer in the right place. For the OpenSCAD model build you will need my HCAD library.
With this file you will be able to print 28BYJ48 Micro Extruder with your 3D printer. Click on the button and save the file on your computer to work, edit or customize your design. You can also find more 3D designs for printers on 28BYJ48 Micro Extruder.