300 Size Mini-Quad
thingiverse
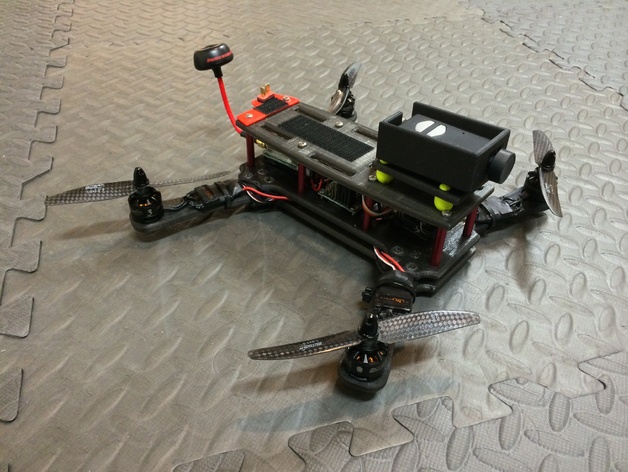
After doing a fair amount of experimenting with mini-quads over the past year or so, I have found that the 250 size carbon fiber mini-quads that have become ever popular in the RC community, are just a tad bit too small to comfortably fit all of the electronics on-board the craft. They are also lacking some features I think are key. So I decided to design my own fully 3D Printed mini-quad with features that I have wanted/ needed. Like a holder for the male end of the power cable so it’s not floating around in danger of being cut by the propellers; happened to me.... Also some frames don’t allow enough space to easily slide a video transmitter between the standoffs. My goal with this project was to build the cleanest, most streamlined, yet functional mini-quad I could design. It’s my first design with a bit of tweaking but I’m sure it could be better. So if you have any suggestions please feel free to leave them in the comments! This is just a proof of concept, it’s not the final product. I would like to have it machined out of carbon fiber and have it mass produced with a PDB board with LED’s in the future. If you or someone you know has the equipment to CNC carbon fiber frames in mass, please let me know. The quad is designed around the RC Timer mini-quad power system you can buy all in one on their website, which provides plenty of power for this frame. Also the frame is designed to hold any mini flight controller mounted dead center with 30.5mm hole spacing; Naze32, CC3D, KK Mini ect… I personally prefer the KK Mini because it is so easy to setup and tune right on the quad. I highly recommend NOT using CPPM for any RC setup UNLESS YOU KNOW HOW IT WORKS, and KNOW WHAT YOU ARE DOING. Some of people crash because CPPM is biased on electrical pulses and if you use too many channels you can confuse the board if the initial sync pulse becomes too small. Your control inputs can get mixed up and you will crash. However I do recommend using the “Hobby King Super Clean RC Male to Male Extension” for connecting your receiver to the board. I use it on all my multirotors, it’s clean and looks good. For the video system it is designed to be used with the Mobius action camera (I use the Mobius wide) I also use the Immersion RC 600mw 5.8GHz transmitter and the Immersion RC circularly polarized antennas. I also integrated an anti-vibration mount for the Mobius. Yes most mini-quads have something similar but this is a mount that is designed to use earplugs instead of the rubber isolation balls that don’t work at all… And not any foam earplugs will do, some are hard and stiff. I use the SUPER SOFT 3M earplugs. They are the consistency of a marshmallow. There is literally ZERO jello in the video. Also I like something to land on other than just the bolts sticking off on the frame, it can gouge them up and chew up the threads if you land on concrete too much. So I designed some landing feet that give it just over ¼” of ground clearance. They simply press fit onto the nuts that secure the arms. I used a hammer to tap them on. Also the nice thing is if you have to change an arm, you can just take out the screws and the nuts will stay in the landing foot and you won’t have to worry about losing them. I’ll put some products links below and list the hardware I used for the project. I used the standoffs from my ZMR 250 frame. Print parts at specified infill and pattern. Top Plate: 50%, Hexagonal, 2 Shells Bottom and Middle plate: 50%, Hexagonal, 2 shells Arms: 80%, Hexagonal, 4 Shells Landing feet: 25%, Linear, 2 Shells Hardware: X20: M3x25mm Screws X20:M3 Lock-nuts X16: M3x15mm Screws X8: M3 Standoffs Accessories and Power System: M3 Standoffshttp://www.ebay.com/itm/M3-35mm-Round-Aluminum-alloy-Standoff-Spacer-Stud-Fastener-10PCS-aluminum-column-/151456195001?pt=LH_DefaultDomain_0&hash=item23437e21b9 Hobby King Super Clean RC Male to Male Extensionhttp://www.hobbyking.com/hobbyking/store/__64626__HobbyKing_Super_Clean_RC_Male_to_Male Power Systemhttp://rctimer.com/product-1131.html Flight Controller (KK Mini)http://www.hobbyking.com/hobbyking/store/__56392__HobbyKing_174_KK_Mini_Multi_Rotor_Flight_Control_Board_36x36mm_30_5x30_5mm_.html 3M™ E-A-Rsoft™ Yellow Neons™ Earplugs 312:http://www.ebay.com/itm/40-Pairs-3M-E-A-Rsoft-Yellow-Neon-Foam-Earplugs-Earsoft-bidadoo-Auctions-/161542648886?pt=LH_DefaultDomain_0&hash=item259cb13436 Instructions Print parts at specified infill and pattern. Top Plate: 50%, Hexagonal, 2 Shells Bottom and Middle plate: 50%, Hexagonal, 2 shells Arms: 80%, Hexagonal, 4 Shells Landing feet: 25%, Linear, 2 Shells
With this file you will be able to print 300 Size Mini-Quad with your 3D printer. Click on the button and save the file on your computer to work, edit or customize your design. You can also find more 3D designs for printers on 300 Size Mini-Quad.