300mm Micro brushless 3d printed wing
thingiverse
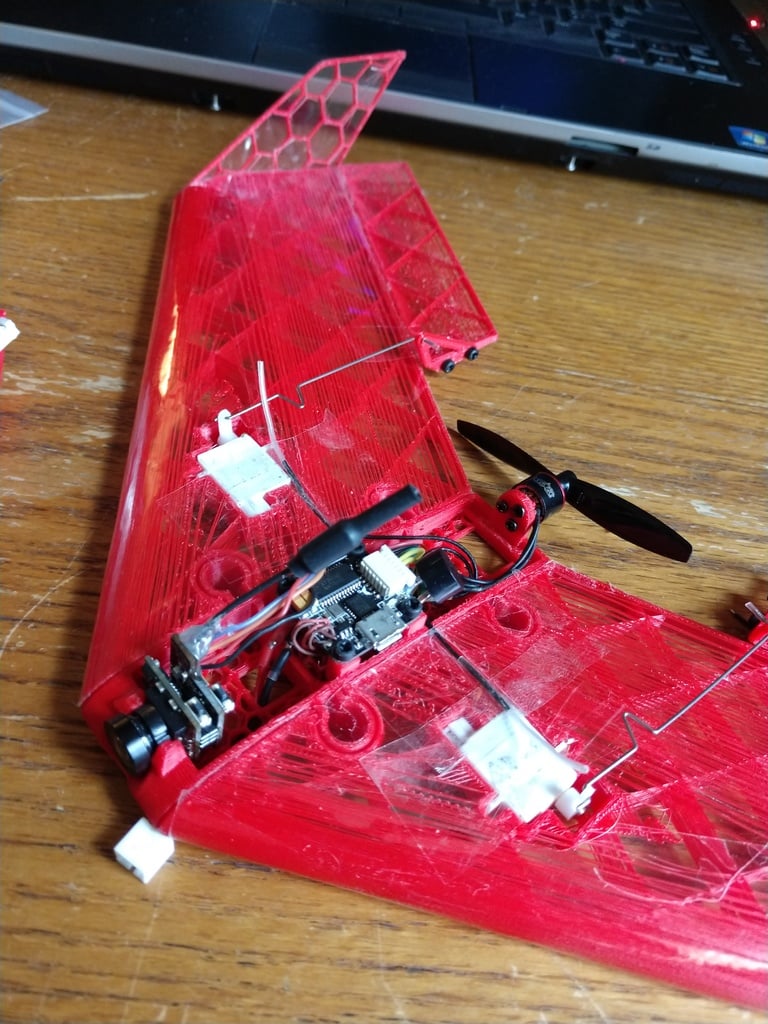
Pjbca just posted a great video to the build and flights of his wing. Check it out over here https://youtu.be/v5acqKOgH-8 7/26, Added the Center section and canopy that fits a 4x9mm mounted motor as well as the Canopy to match, matching battery bay is titled "micro wing battery bay 20x20fc" Also added updated center section titled "micro wing center section v3a" which needs to be used if you plan on adding the canopy. "Micro wing Canopy v3a" is the correct canopy to go with the center section ***fixed, the correct wings are uploaded***** 7/16, it was brought to my attention that I had mismatched wings uploaded. I removed both of them from the files and will have the correct matching one uploaded in a little while. My apologies on that. Updated 7/7/18, added right wing and elevons. no longer have to mirror those two in your slicer program. also verified the hobbyking 1.7g servos fit as well as the HK 1.9g servos https://youtu.be/mZIBpFgAOq0 This is a micro 3d printed flying wing, I will be making changes to it such as allowing different motors to be mounted, as well as eventually adding a canopy to it. For now, I just wanted to get the files out there for people to start testing and hopefully flying. I would really like feedback on how well it does for you, as well as any suggestions to make future versions better. It currently is designed around using 16x16mm mounted flight controller with Inav, hobbyking 1.9g servos, a 3x6mm mounted brushless motor such as the racerstar 0705 motors, battery is a 260mah eachine tinywhoop battery. for the fpv camera it should be able to fit most micro all in one type cameras, I only dont have that many of them to test, so i tried to make the mount as versatile as possible. Covering material is the cheapest packing tape I could find. Generally thinking, the cheaper it is, the thinner/lighter it will be. CG, is located as close to the center of the rear "Puzzle piece circle deally" Approx 75mm from the nose. The battery bay is long and allows room to slide the battery back and forth to help balance it. you will need 12 m2 nylon screws (best, steel will do, but add weight), 4 for fc, 4 for winglets, and 4 for control horns. I pretapped each hole with a 2mm steel screw, that i filed a small groove down the threads to essentially mimic a tap, but without having to buy a tap. For print settings I will try to List the most important ones for each piece. I also included only 1 side of everything for now. I will eventually upload both sides. for now in the slicer program, you will need to mirror the wing and elevons, if you want (to maintain consistency) the winglets and control horns. Print settings: .3mm nozzle All have a .15mm layer height, with .2mm base layer height Wing: 2 perimeter layers, 0 Top and Bottom layers, 1.5% to 2% infill. (Last one I did was 1.75%, with pretty good results. Elevon: Same as wing, possibly 3%-5% infill if you think you need them stronger. Center:: 2 Perimeter, 0 Top and Bottom with 15% hex infill, (shape is your choice, I thought hex had the best support. Winglets, 2 perimeter, 0 Top and Bottom, 5% hex infill Battery bay: 3 perimeter, with 10 layers horizontal (wanted to make sure it prints solid) it will best be printed on its side with supports, to keep the grain of the filament the strongest for the front holding tabs and the release tab in the rear. Control Horns: Same as battery bay Again, I will be making changes to it for the next little while, so it is a good idea to check on it every now and then
With this file you will be able to print 300mm Micro brushless 3d printed wing with your 3D printer. Click on the button and save the file on your computer to work, edit or customize your design. You can also find more 3D designs for printers on 300mm Micro brushless 3d printed wing.