3018 CNC Laser Shield

3018 CNC Laser Shield

thingiverse

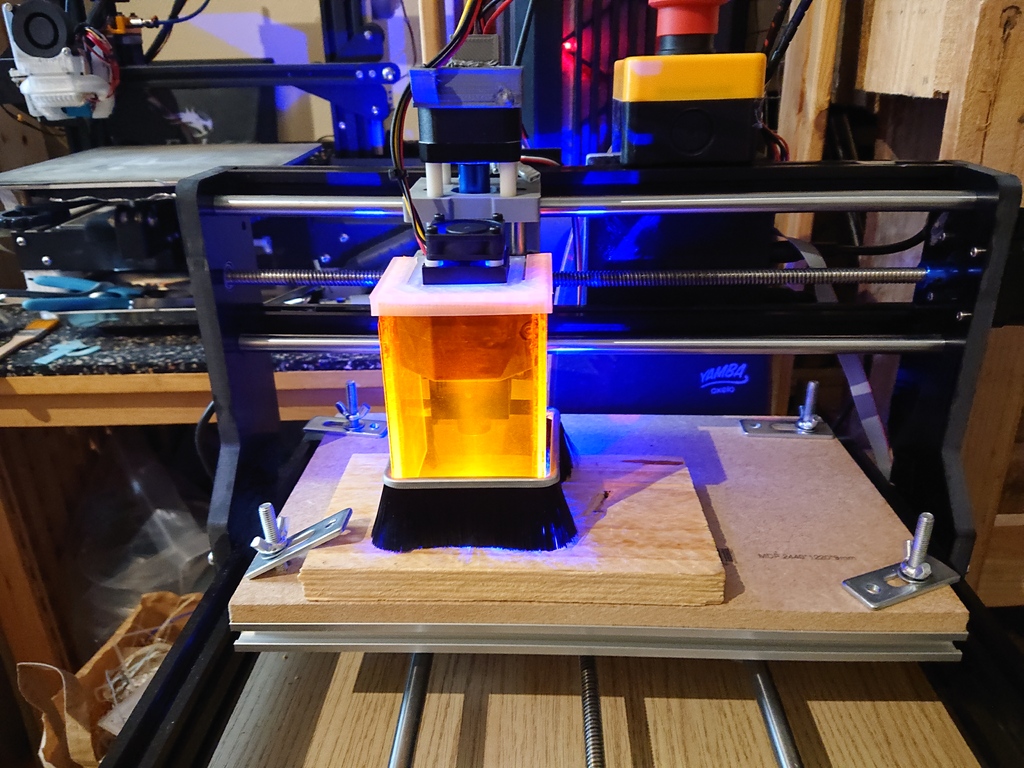
<center><b><font size="4">DIY 3018 CNC Laser Shield</font></b></center> If like me you don't have a dedicated room or enclosure for your laser working, you may be interested in this. I've tried to make this presentation as beginner friendly as possible, hence its length, but it's very simple. It's designed for a 3 mm thick acrylic laser blocking panel and will fit any 3018 (pro or not) CNC router, in order to block the laser from its source and avoid unexpected third party eye or skin exposure. <center><b>BE AWARE THAT IT DOESN'T REPLACE YOUR USUAL SAFETY GEAR !</b></center> But as long as you don't stare at the beam too closely, it adds a lot of visual comfort and safety. There're 2 options depending on your tools and motivation: - 3D print a base and mill or cut the rest (1st 2 pics): makes assembly easier and provides clip-on mounting. Will also save some material. - No 3D printing (3rd pic): mill the whole blueprint out of the acrylic, glue it together, add 2 screws and a rubber band. Pretty fast milling process either way. <u>Features and design choices :</u> - Covers roughly 260° (still implies a wall or opaque protection behind the machine) - No loss of working area - No permanent modification on the machine - Quick tool-free mounting - Easy assembly - Respects air flow and fumes extraction - Wide height adaptability - Minimum acrylic and spare material needed <u>What you may look for :</u> - Acrylic laser shielding panel (the only real expense) I don't get anything from them to share this link but these are great and quite cheap given the market prices, although the shipping were expensive to EU. They're suitable for any wavelength between 250-520nm (usual blue lasers are 445nm), and come in 12"x12" (300 mm) square panels: https://jtechphotonics.com/?product=445nm-laser-shielding <b>Whatever you do, make sure that you're buying quality stuff which matches your laser wavelength !</b> - 1 straight 1/8" (3.175mm) upcut bit To use with your spindle and a free Easel account (or exported g-code). - 1 saw Optional, or anything that will cut 3 mm acrylic without cracking it, to reduce it for the CNC plate, or to cut the needed pieces directly if you can achieve the precision needed. You can also use an adhesive method, clear the area from every clamp or wire, and mill directly out of the whole panel. - Blue tape and super glue Optional, but recommended to avoid the hassle of using clamps and post processing of the tabs. - 2 x M4x8 screws and rubber band(s) Optional, in case you don't 3D print, they secure the shield in place around the laser mounting. If you're patient enough and have precision bits, you can also modify the top panel to have the same clip-on ability as the 3D printed part. I didn't feel confident about the acrylic flexibility... Feel free to remix ! - 1 doorbrush (and 2 pliers) Optional, but useful in case of irregular surface, unleveled plate or presence of clamps. Keeps the bottom of the shield -relatively- sealed and allows some height adaptations. Hint: A remix of this https://www.thingiverse.com/thing:3410740 could also be a good idea, but only with flexible filament imo. <u>Preparation, assembly and use:</u> - Working area: You may want to pre-cut at least 110 mm from the acrylic panel to fit the CNC (current configuration of the Easel sketch), but you can put it as is with an adhesive method. Blue tape + glue is the best. <b>Remember to add tabs and separate each object within Easel if you plan on clamping your material instead of gluing it</b>, or the cutted pieces will pop out before the end of the process. If you 3D print the base, remember to erase the corresponding object from Easel to cut only the 3 big panels. - Milling: Easel is the easiest online assistant for CNC milling, I'll not cover the process of using it, but here is the shared link to the project: https://easel.inventables.com/projects/yYAn7emvcwqBGay2Bet4SQ Please check again material and machine settings to avoid any error. Recommended settings you should get: Feed rate = 635 mm/min Plunge rate = 228.6 mm/min Depth per pass = 0.5 mm I used 0.3 mm depth per pass instead of the 0.5 recommended, just to be sure, with great results. - Alternative cutting If you are equipped to cut 3mm acrylic <b>with precision</b>, you can simply cut: 2 rectangles 59x100 for the sides 1 rectangle 64x100 for the front - 3D printing: What you can see is PETG Nozzle .6 Layers .2 2 shells 20% infill No support, no bed adhesion I guess the same specs would be fine for PLA. The only trap woud be to make it too stiff, loose flexibility and break it in use. Although it is a structural part, it doesn't need to be hard. - Gluing: The biggest piece of acrylic goes to the front, the other 2 rectangles go on the sides <b>with their edges against the front panel, not the other way around</b>. You'll find convenient slots within the 3D printed part to guide the panels. Be careful with glue stains. For the screw version, put the screws slowly in the holes till they're fully inside but not more. - Brush: I chose the cheapest ugliest $3 doorbrush in a local shop, striped the actual brush out of the PVC sleeve, cut a piece and folded it with pliers around the 3 panels of the laser shield. This way I can move it up and down to fit multiple setups and it doesn't mess with the airflow or keep any potential sparkle captive. It doesn't slip thanks to the sharp edges of the metal. The brush I used is 30mm tall including the metal extrusion. - Use: For the no print version, attach the rubber band between the screws after you put it in place and take it off before you take off the shield when you're finished. Either versions will just slide from the front, the 3D printed one will also clip-on and off the easiest way possible. You must use your goggles in addition with the shield to watch close details while operating. <b>Please be extra careful with the behavior of the setup if you prepare a multi-pass cutting with decreasing Z height. To do that the shield should slip around the mount freely, but still be dragged on the X and Y axis correctly. I've not tested this so far, I guess the rubber band tension needs to be adjusted...</b> If you make it a little smaller in height, you can even make 3 to 4 shields out of a single 300 mm panel. Make some for your fiends, spare a piece for replacement, a future window on an enclosure... <b>Whatever precautions you took, never let a working laser unattended.</b> That's it ! Feel free to share any idea of optimisation, report or note. Happy CNCing :)

Download Model from thingiverse

With this file you will be able to print 3018 CNC Laser Shield with your 3D printer. Click on the button and save the file on your computer to work, edit or customize your design. You can also find more 3D designs for printers on 3018 CNC Laser Shield.