3018 pro upgrade with better rigidity and Makita router
thingiverse
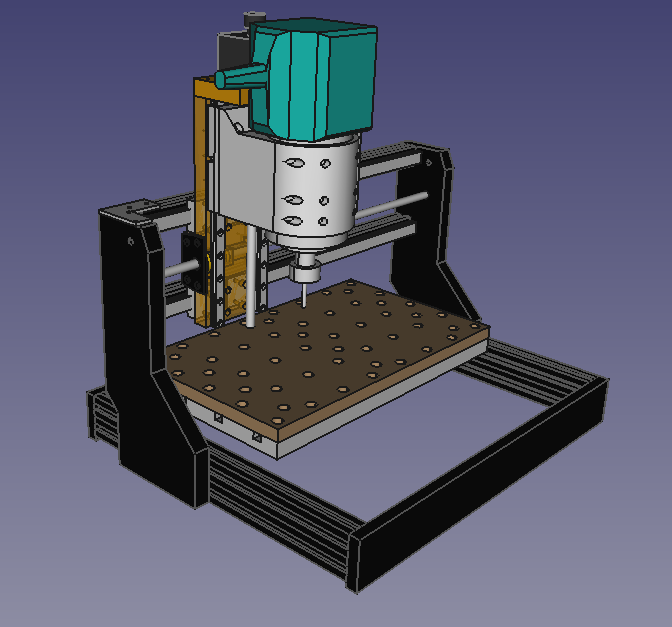
This is a project I've been working a few weeks on. I got myself a second hand 3018 and quickly found out that it was quite a joke. The motor power was too low and the vibrations were huge, mostly in my opinion because of the lousy X and Z axis, which bent easily. Though the chassis and the gantry were not too bad, thick aluminum, and I thought that if I could just replace the worst part it may actually be usable. My hope is to be able to mill aluminum and brass, though I haven't tested it yet ! I must say I was inspired by this video : https://www.youtube.com/watch?v=w26DHMccicE I then designed a replacement for the X axis with two MGN12 linear bearings directly mounted to the frame, a replacement for the whole Z assembly with two MGN9 linear bearings, and a mount for my beloved Makita RT0701C router. I milled the faceplate in MDF with the previous CNC head (bootstrapping, boys). MDF because I didn't have aluminum on hand, and it was much simpler for me. I was afraid plain wood would vary in dimension over the seasons. It does the job for now. Maybe one day I'll make it better. The router mount is the most complex part, which I 3D printed in PETG, with (I think) 5 layers of walls, top and bottom and a large infill, 60 or even 80%. It's very sturdy, lets the makita slide in perfectly and then holds it very firmly even with only one of the 3 bolts I planned. I ordered a 200mm lead screw, and chose only 2mm pitch, thinking that the motor would be less likely to struggle with the router weight. The result is perfect, and the motor is not having any issue. I reused the existing X lead screw, but ordered a new anti-backlash nut for it (4mm pitch). I had trouble with the way I thought I'd screw it to the MDF (it ripped the screws out), and ended with a messy plastic plate thing if front of it, which makes me loose like 3mm of travel. I had no such problem with the same nut in the 3d printed router mount. The overall result is largely up to my expectations, it is definitely much more sturdy than before. I can easily take passes of 4mm in wood with a 6mm endmill, at 8mm/s. That's just an example but I didn't really tried to rate the maximum passes I could take. I lost only a small amount of X travel because I kept the width contained, none in Y of course, and I gained a lot of travel in Z, with about 103mm (even more if I slide the Makita not all the way down). I lost a few mm of work area under the gantry, but nothing too bad. One small problem was the alignment of the linear bearing which is a pain to get perfect, and the movements are not as fluid as I'd like, I even had a moment when I thought it would cause the motors to loose steps, but I managed it. All the motors and the electronics are the original ones. I also added homing switches, a DIY Z probe, a "feed hold" emergency button, a drag chain which I 3d printed from somewhere on thingiverse, a spoilboard with holes and wooden spiral clamps to hold material (Marius Hornberger style). I'm working on a dust extraction holder because it's really needed. If you're interested in understanding my model, I encourage you to download FreeCad to view it.
With this file you will be able to print 3018 pro upgrade with better rigidity and Makita router with your 3D printer. Click on the button and save the file on your computer to work, edit or customize your design. You can also find more 3D designs for printers on 3018 pro upgrade with better rigidity and Makita router.