30mm to 50mm Fan Adapter
thingiverse
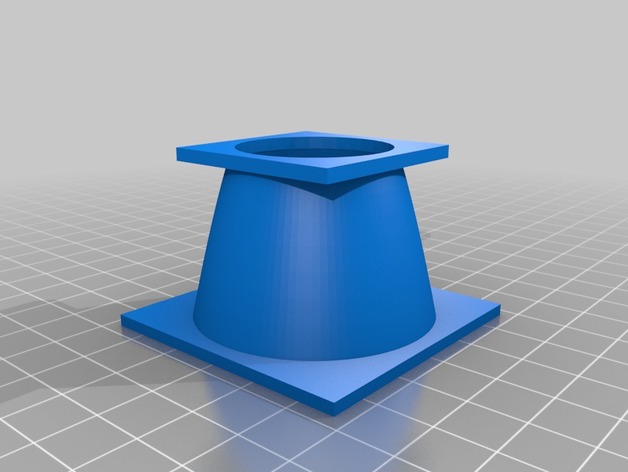
The Mono Price Select Mini comes with a 30mm cooling fan with a rating of 3cfm. If you want to print PLA faster, you need better cooling. To that end I created a 30mm to 50mm fan adapter for people to attach to their existing fan holder. If you saw the picture of the Christmas ornament I printed, you'll note that I'm able to print (PLA) hollow spheres with no supports at 1.4 (minimum) and without rafts There is only one occasion where using a raft is acceptable. You aren't Tom Hanks. You're not on a deserted island. And you probably got no soccer ball named "Wilson", so this ain't the time for rafts. (and if you "do" have a soccer ball named, "Wilson", https://www.mentalhealth.gov/get-help/immediate-help/) There are other fan adapter designs out there that remove the nozzle so you can print ABS better but, I work with both ABS and PLA, so I need to be able to cool PLA parts. For ABS, reduce your fan speed in your slicer program by ~60% (according to your ambient temperatures) so that there is less cooling. This is far easier than making a fan duct without the cooling nozzle from the other design. This design re-uses the OEM fan duct for that purpose, and for one other purpose...spacing out the 50mm fan so it doesn't crash into the tower! You're going to be cutting wires and soldering so, if that's above your skill set, move onto another project. If you're on the fence wondering if it's worth it...I now print with a speed multiplier of 1.5-1.6 so my mini-select is doing PLA prints as fast as my $2500 Replicator 2 and my two $900 Flash Forge Creators(X and Pro) Yeah...totally worth it! Parts needed: Suitable 50mm Fan (mine is a YS Tech rated at 11.7cfm but search Amazon for any ball bearing fan that is 50mmx50mmx10mm in size and rated at 12V .08a because the load rating is more important than the brand. You don't want to put more of a load on the electronics...you'll see why later) Solder Iron Solder Heat Shrink Tubing Wire Cutters Wire Stripper/razor blade/Utility Knife Zip Tie 4 Appropriately-sized screws to mount the 50mm fan and a drill bit that is just a bit smaller than the screws 1 Remove the fan duct retention clips and set them aside 2 Remove the screws holding the fan to the duct 3 Put the 50mm fan on the large end of the adapter and use the drill bit to make the mounting holes for the screws 4 Mount your new 50mm fan to the large end of the adapter 5 Line up the fan duct on the small end of the adapter and use the drill bit to make the mounting holes where you will be attaching the OEM fan duct to the small end of the adapter 6 Re-use the screws from the 30mm fan (on the inside of the fan duct) to screw it to the smaller end of the adapter 7 Remove the zip tie holding the wires to the extruder assembly 8 Making sure you leave yourself enough slack to strip off 1/4" of wire insulation twice, in case you goof up the first time, cut the wire leads going to the fan. 9 Strip 1/4" off the 50mm fan leads 10 -- SLIP YOUR HEAT SHRINK TUBING ONTO THE 50mm FAN LEAD WIRES AT THIS TIME. I all caps'd that because you really don't want to skip that step. srsly. ORLY? yea. rly. 11 Twist the wires together. (red to red and black to black) 12 Solder them 13 Slide the heat shrink over the soldered part and heat is up so it shrinks (this is the only time shrinkage is a "good" thing) 14 Re-secure the wiring with the zip tie 15 Pre-heat your printer to 210 and see if the fan is operational. Go print PLA things far faster than previously. I'm using a speed multiplier of 1.0 on the first layer and then I bump it up to 1.5-1.6. That's far faster printing with PLA. REMEMBER back in the "parts needed" section where I said that the load rating of the fan is important and that I'd mention more on that later? That's now. Then was then, but we're at "now" now. No, "now" we're at now, now. Since you're now able to print with a speed multiplier of 1.5-1.6 you're placing a greater burden on the printer. The electronics will run hotter because they're doing stuff 50% faster than they were before. You should consider adding a cooling fan for the electronics in the base of the unit. That's my next step. Print Settings Printer: Any 3D Printer will print this Rafts: No Supports: Yes Resolution: .1mm Infill: 25%-30% Notes: don't skimp on supports on this. it's one of those designs that need them. Post-Printing Clean-Up Clean the part! Don't you put no dirty, nasty parts onto your printer! You ain't no slob so stop actin' like a fool! How I Designed This How I got the idea I was standing on my toilet hanging a clock, and I fell and hit my head on the sink. And that's when I came up with the idea for the fan adapter
With this file you will be able to print 30mm to 50mm Fan Adapter with your 3D printer. Click on the button and save the file on your computer to work, edit or customize your design. You can also find more 3D designs for printers on 30mm to 50mm Fan Adapter.