360 Universal Head with Tripod for Camera & Phone
thingiverse
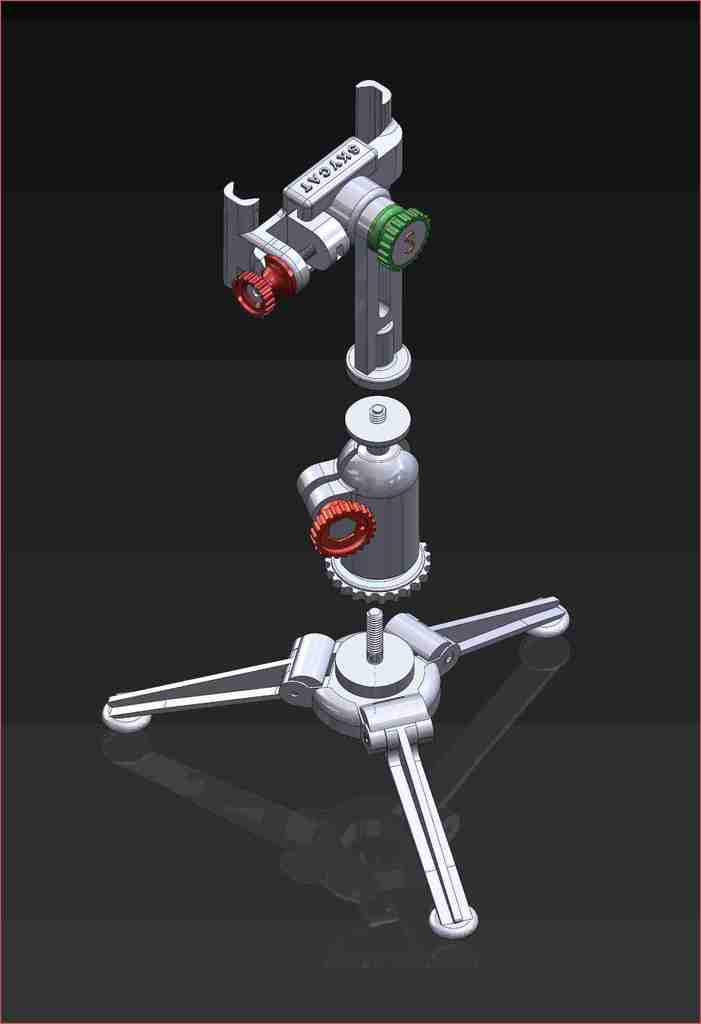
I have posted this under the name Skycat17. For unknown reasons I can no longer get into that account. So this designs is exactly the same for now, but may be updated in the future. The files under Skycat17 (this one and a model of the Chrysler Building) are still available for download on Thingiverse. But I have no access to even see how many have downloaded or responded. _________________________________________________________________________ This three part assembly is comprised of: The 360° Head (Main Body), with full 360 degree movement. The Tripod. The Phone Holder. All 3 components can be used separately. The 360 Head can be used on a conventional tripod with either the supplied phone holder (or any phone holder using a 1/4 x 20 " thread) or a camera. The Main Body consists of six parts + one 1/4 x 20 x 1.5" steel bolt and nut. A second 1/4 x 20 x 1" bolt is required for the Knob. Body Ball Sleeve Base Knob Knob Insert 360° HEAD Step 1. The steel bolt is inserted in the printed Ball prior to inserting it in the Body. Pushing the Ball and Bolt assembly to the top of the Body will require a bit of push, as it has to get past the inner retaining ridge. Once the Ball with bolt is positioned, screw the sleeve onto the threaded end of the bolt. Step 2. Push the Base unit into the Body until you feel a slight click, as the small circular ridge registers into the small concentric groove inside the Body. This might go a little easier if you slightly spread the Body open at the gap while pushing the Base into the Body. Step 3. Next insert the 1/4 x 20 x 1" bolt into the Knob, then insert the 1/4 x 20 nut into the Body and screw in the Knob/Bolt assembly. Step 4. (optional) Insert the Knob Insert into the Knob. This is both decorative and also helps to keep the bolt from sliding out of the Knob when it's not screwed into the nut. To make the 360° Universal Head work more smoothly put the ball and bolt assembly into an electric drill and use sandpaper to smooth out the ball, prior to inserting it into the Head. TRIPOD The Tripod component consists of four parts and three 3mm x 22mm screws and one 1/4 x 20 x 1" flat head bolt. Tripod Base Leg (3 needed) Step 1. After printing the three Legs, clean up the pivot joint area that will contact the Tripod Base sockets. Step 2. Place the Legs in the Tripod Base sockets and secure by inserting the 3 mm x 22mm screw into the self threading holes using an allen wrench. Step 3. Screw the 1/4 x 20 x 1" screw into the Tripod Base as shown in the photo. Note: Purchase rubber pads from: https://www.amazon.com/gp/product/B01LDLJF5K/ref=ppx_yo_dt_b_asin_title_o01_s00?ie=UTF8&psc=1 Place one of the self stick pads in the bottom of each foot pod to prevent slipping PHONE HOLDER The Phone Holder component consists of six parts and one 1/4 x 20 x 1.25" screw and one 4mm x 60mm screw. Rotating Head Clamp - Right Rotating Head Clamp - Left Rotating Head Mast - Default (two taller sizes are included) Rotating Head Clamp - Knob Large Rotating Head Clamp - Knob Small Rotating Head Mast Washer Step 1. After printing the Left and Right Clamp parts, file and sand the bottoms where the print supports were attached to make sure they slide easily into one another. Before final assembly with the Knob and screw test them for free fit. As well, push the 4mm long screw through both Clamps holes back and forth to insure they are sliding freely. Step 2. Drop the 1/4 x 20 nut into the pocket in the Left Clamp. Insert the1/4 x 20 x 1.5" bolt into the Rotating Head Clamp - Knob Large, then screw the Knob and Bolt assembly into the nut in the Left Clamp pocket. This will prevent the 1/4 x 20 nut from falling out. Once the Right Clamp has been mated with the Left Clamp the nut will be trapped and unable to fall out. Step 3. Screw the 4mm x 60mm screw into the ridged end of the Small Knob until the screws end is flush with the flat surface. Then, slide the Small Knob screw assembly into the flange on the Rotating Head Clamp - Right. Continue screwing it until it bottoms inside the Small Knob and gently tighten it. Step 4. Drop the 4mm nut into the pocket in the Left Clamp, then screw the Right Clamp Knob Screw assembly into the Left Clamp. Step 5. Screw the Rotating Head Mast Default into the 1/4 x 20 screw protruding from the 360° head. Step 6. Unscrew the Rotating Head Clamp - Knob Large and bolt assembly. Then re-screw it through the Mast using the tabbed Rotating Head Mast Washer with the tab facing the bottom. Hardware Bolt - 1/4 x 20 x 1" (Hex Head) Bolt - 1/4 x 20 x 1.25" (Hex Head) Bolt - 1/4 x 20 x 1.5" (Hex Head) Bolt - 1/4 x 20 x 1" (Flat Head) (allen or philips type) Screw - 3mm x 22mm (allen head type) Screw - 4mm x 60mm (allen or phillips type) All the above screws can be obtained from different sources. This source from the USA is from McMaster Carr: https://www.mcmaster.com/ Rubber Pads - https://www.amazon.com/gp/product/B01LDLJF5K/ref=ppx_yo_dt_b_asin_title_o01_s00?ie=UTF8&psc=1 Cement one to the bottom of each foot pad to prevent slipping The 360° Universal Head is compatible with standard camera socket mounts. Print Settings Printer brand: Prusa Printer: I3 MK3S Rafts: No Supports: Yes Resolution: 0.2 Infill: 20% Filament brand: Prusament Filament color: Any Filament material: PLA Notes: I have printed all the parts using a Prusa MK3S, a Prusa Mini, and an Ender 3. All the above printers gave great results, using .2mm .2.5mm and .3mm. For most of the parts I would suggest .2mm with .15 on the smaller parts and .3mm on the extra tall Mast. Refer to the photos for orientation on the printer plate as well as how supports and brims are used where they're needed.
With this file you will be able to print 360 Universal Head with Tripod for Camera & Phone with your 3D printer. Click on the button and save the file on your computer to work, edit or customize your design. You can also find more 3D designs for printers on 360 Universal Head with Tripod for Camera & Phone.