3D Filament Pelletizer Powered by Drill
thingiverse
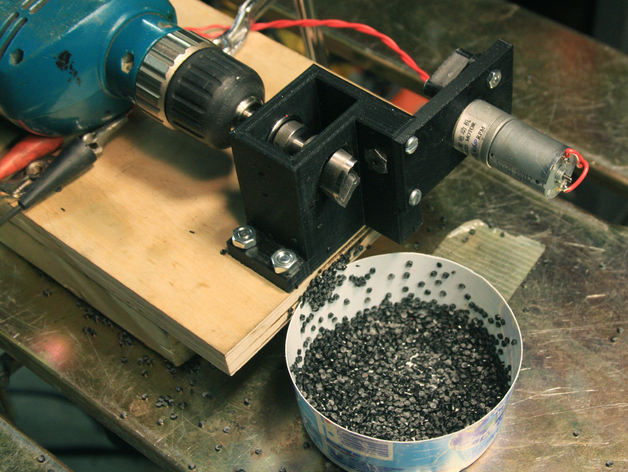
At first sight it might seem odd to make something that chops up valuable 3D plastic filament into pellets. However, if you have a Filastruder it can be very useful in making master batch colorant pellets from natural resin and powdered pigment. One can also make colored pellets for a bench top injection molding machine. Recently I replaced my old dead 3D printer that used 3 mm filament with a new one that uses 1.75 mm filament. I was stuck with 3 rolls of 3 mm filament that I could not use in the new 1.75 mm 3D printer. With this pelletizer I was able to chop up one of the 3 mm ABS reels, 1.6 pounds, into pellets in 40 minutes. Now I can use the pellets in the Filastruder to make useable 1.75 mm filament. I also pelletized 1.75 mm filament and it worked just as well. So the 3 mm hole will accommodate both 3 mm and 1.75 mm filament. There is no need to drill a another bolt with a 1.75 mm hole.This is the second version of the pelletizer. The first one was very similar but had an all metal frame that required machining, welding and brazing. This new version only requires a 3D printer to make the frame. To be honest I was not sure that an ABS plastic frame would be strong enough to do the job. I am pleasantly surprised how rigid it actually is and how well it performs. Instructions The pelletizer uses a 1 inch Forstner wood boring bit as the chopping blade and is rotated by a variable speed hand drill run in reverse. Varying the speeds of the pusher motor and hand drill changes the length of the pellets. I found that cutting off one of the two blades with a disc grinder greatly improved its performance. With both the original two blades intact it was much harder to feed in the filament and it seemed to shred up the filament instead of making nice pellets. In the parts list I have described the exact Forstner bit that I used. Another brand can be substituted but it may not have a shank that is exactly 3/8 inch ( 0.375 inch) in diameter and fit properly in the bearings. The flanged bearings are press fitted into the frame and must be installed from the inside of the frame. If they are pushed in from the outside of the frame they will eventually pop out. The two 3/8 inch shaft couplings keep the shaft from moving axially and help hold the bearings in place. The only tricky part of the build is drilling the 3 mm hole exactly down the center of the 5/16 inch 24 bolt. This can be most easily done on a lathe. However if one has any sort of home shop drill press it can be done on that. This technique is described in this Hack a Day article:http://hackaday.com/2010/02/26/drilling-perfectly-centered-holes/ I have found that when drilling deep holes, peck drilling is the best method. This evolves only drilling about 1/8 inch at a time and then backing out to clear the chips. The use of a lubricant, cutting oil, also helps a lot. The choice of bolt grade will make drilling easier. Grade 8 is the hardest, grade 5 is medium, and grade 2 is the softest steel. Grade 8 has 6 radial lines on the head, grade 5 has 3 radial lines, and grade 2 will not have any lines on the head. Avoid using a grade 8 bolt to make drilling the hole easier. It is a good idea to apply Loctite or super glue to the end threads of the drilled bolt to secure the nut. The filament pusher gear was made from a ½ inch diameter mild steel rod and then cut, or grooved, with a M4 X 0.7 hand tap. The technique for doing this can easily be found on the web by searching for hobbing a worm gear. A pusher gear from a 3D printer can also be used instead of making one. The geared pusher motor is 100 rpm at 12V DC with a 4 mm shaft. They are readily found on eBay. If one desires the pusher motor can be eliminated and the filament pushed in by hand. It will chop up filament as fast as you can push it in. My 100 rpm motor limited the speed to about 10 feet of filament a minute. The main frame and pusher motor bracket were printed in ABS with 4 outside shells, 50% infill, and a layer thickness of 0.25 mm. The motor bracket was printed with support. The main frame and pusher arm were printed with no support. The printer has a 0.4 mm nozzle. I also pelletized 1.75 mm filament and it worked just as well. So the 3 mm hole will accommodate both 3 mm and 1.75 mm filament. There is no need to drill a another bolt with a 1.75 mm hole. Here is a Youtube video of this pelletizer in action: https://www.youtube.com/watch?v=JfibqeoQEpw Parts List: 1- Freud PB-007 Precision Shear 1-Inch by 3/8-Inch Shank Serrated Edge Forstner Drill Bit 2- FR6-2RS Flanged Bearings 3/8" x 7/8" Chrome Steel, ABEC 3 1- Grade 5 or grade 2, 5/16-24 X 3/4" Hex Cap Screw and matching nut. 1- R2ZZ 1/8" Shaft 3/8" Diameter Double-Shielded Miniature Ball Bearing 2- 3/8 inch I.D. Shaft Collars 2- 6-32 X 1.5 Screws and matching nuts for pusher arm pivot and adjusting screw 1- 5-40 x ¾ inch bolt and nut to secure 1/8 inchI.D. ball bearing 2 -Sheet metal screws to fasten motor bracket to main frame
With this file you will be able to print 3D Filament Pelletizer Powered by Drill with your 3D printer. Click on the button and save the file on your computer to work, edit or customize your design. You can also find more 3D designs for printers on 3D Filament Pelletizer Powered by Drill.