3D Hubs "Rubber" Postage Stamp Mould and Stamp
thingiverse
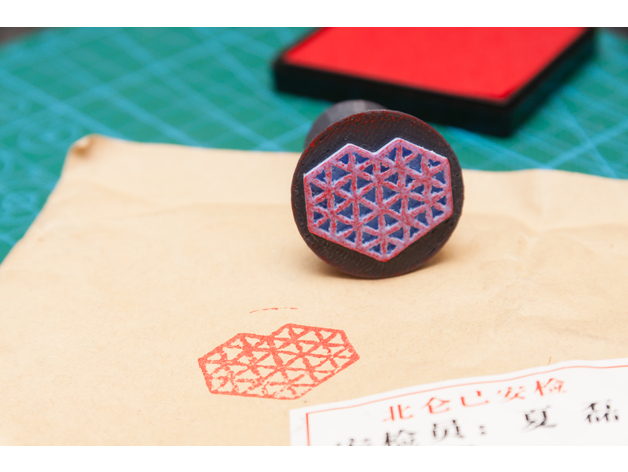
A remixed design from the 3d Hubs logo pendant that is available on Thingiverse, available here - http://www.thingiverse.com/thing:1317008 into a "rubber" postage stamp for my 3D Hubs orders. I have wanted to mark my 3D Hubs packages for some time to indicate to the receiving customer that these are their parts they have been waiting for, but didn't just want to write "3D Hubs" on the package, and wanted some kind of logo stamp. Just enough to mark it, and those in the know... will know! I took the original pendant logo model and edited it in Tinkercad to make a final stamp. I then used this positive model to make a "negative" hole in a mould which I would then 3D print and fill with silicone. I also made a stamp holder (stamper?!) at the same time to hold the silicone stamp and not get my fingers messy! The final result is a little stamper that works great with some a red ink pad on all my parcels. It prints a great rustic looking logo which, excuse the pun... looks really "stamped on"! Let me know what you think! I used Siligum Moulding Paste (silicone) for the "rubber" stamp. You can find this stuff on Amazon here - http://amzn.to/2eZbZt9 as well as hobby stores such as HobbyCraft (UK). Print Settings Below: Printer: Printrbot Simple 1405 Filament: 3DPrima 1.75 PLA - Dark Grey (Amazon http://amzn.to/2gCAqAy) Filament used: 1.49m 4.48g Layer Height: 0.2064mm Temperature Ex1: 205°C Temperature Bed: n/a Perimeters: 2 at 0.4mm (0.8mm total) Infill: 20% Raft: No Brim: No Support: None Speed: 30mm/s Time: About 50 minutes Scale: 100% YouTube video about the make: https://youtu.be/VN42iNYzmgE Print Settings Printer: Printrbot Simple Makers 1405 Rafts: No Supports: No Resolution: 0.2064mm Infill: 20% Notes: Printer: Printrbot Simple 1405 Filament: 3DPrima 1.75 PLA - Dark Grey (Amazon http://amzn.to/2gCAqAy) Filament used: 1.49m 4.48g Layer Height: 0.2064mm Temperature Ex1: 205°C Temperature Bed: n/a Perimeters: 2 at 0.4mm (0.8mm total) Infill: 20% Raft: No Brim: No Support: None Speed: 30mm/s Time: About 50 minutes Scale: 100% Post-Printing Mix the silicone paste according to the instructions and fill in the mould. Once it is set after 5 minutes - best give it 20-30 just to be sure - you can just pull it out of the mould with a knife on the sides. Then just pop it into the stamp handle, and stamp away with some ink! How I Designed This Built in Tinkercad with some basic shapes and good use of the "hole" tool to make the negative of the stamp into the mould.
With this file you will be able to print 3D Hubs "Rubber" Postage Stamp Mould and Stamp with your 3D printer. Click on the button and save the file on your computer to work, edit or customize your design. You can also find more 3D designs for printers on 3D Hubs "Rubber" Postage Stamp Mould and Stamp.