3D Magnetic Catan Tiles
thingiverse
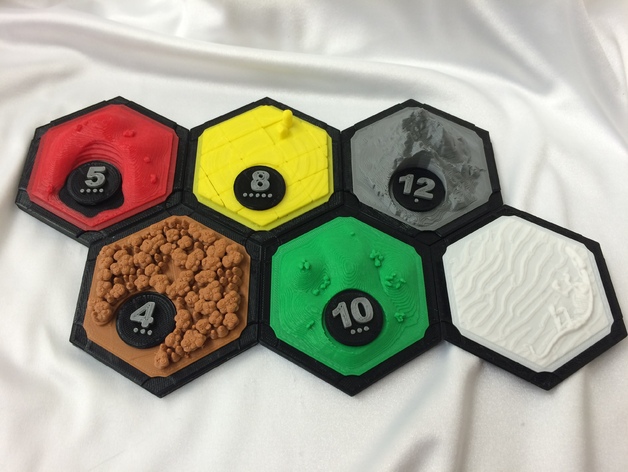
I combined JAWong's 3D tiles with neuport's magnetic base in a single print. In the red/green side-by-side image if you look closely you can see the gap between layers where I attached the individually printed pieces on the green tile, and no similar gap on the red tile. WARNING - You cannot print these in a single unattended run. Inserting the magnets in the base is required for there to be any point in using this instead of just JAWong's basic tiles. EDIT: Added port water and blank water tiles, since I am having issues getting any form of a border configured to be the appropriate height to match the rest of the set. Instructions As stated in neuport's magnetic base, the magnets you want to use are available here In case that link ever goes dead, the product stats are: Magnetic Material Grade: N50 Dimensions: 0.098" (2.5mm) x 0.196" (5mm) magnetized through the diameter I printed these out on my Printrbot Simple Metal with 0.3mm layers and 30% infill. Amazingly no support was needed to bridge the magnetic base, though the lines for the first layer over the gap are a little bit loose, so perfectionists may want to fill that area in, maybe with a manually inserted support (since you will be stopping the print anyway on the relevant layer) After slicing the STLs, I manually edited the gcode so that I could insert pauses where I needed them to insert the magnets, and to change filament for a colored top with black base/road. The hotend is bronze, so non-ferrous, and not an issue with magnets. However, the bed sensor on the Simple Metal IS ferrous, and will rip magnets out of the spacers, unless there is some filament in the way. So you want to have pauses which let you insert magnets after the sensor is well clear, and the printer is approaching the location from the right. It is best to pause a little bit before the cover for the hole is being printed though, as the printrbot won't always get a solid cover when resuming from a pause (depending on how long you waited and how much filament leaked out of the hotend mostly) Working in Repetier Host with slicer seemed very solid. You do a preview by single layer only to find the first layer with no holes. Then you move line-by-line through the Gcode, and Repetier will highlight the filament placed by the line your cursor is on. Once it highlights a line covering a hold (middle of any side), back up a little bit and insert an @pause command. Personally, I use an "on pause" script of the following: G90 ; Absolute Coordinates G1 X10 Y10 ;Move extruder to the front for filament change G91 ; Relative Coordinates G1 Z30 ;Raise print head @sound ;Play a sound @execute "C:DPPause_Email.bat" 0 0 This moves the hotend off the print to ensure I don't get warping from the heat, and allows me plenty of space for filament changes (what I normally pause for). It also sends me a text (via email through batch file). The time delay for raising and lowering the hotend is annoying if you happen to not need the pause for inserting a magnet. So maybe if you are only pausing to insert magnets you can get away with raising only 5mm and not moving the hotend at all. Run once with pauses for all 6 magnets individually, watch for which ones actually get picked up by the level sensor, and remove the unnecessary pauses before your next prints.
With this file you will be able to print 3D Magnetic Catan Tiles with your 3D printer. Click on the button and save the file on your computer to work, edit or customize your design. You can also find more 3D designs for printers on 3D Magnetic Catan Tiles.