3D Print a Topographic Map
thingiverse
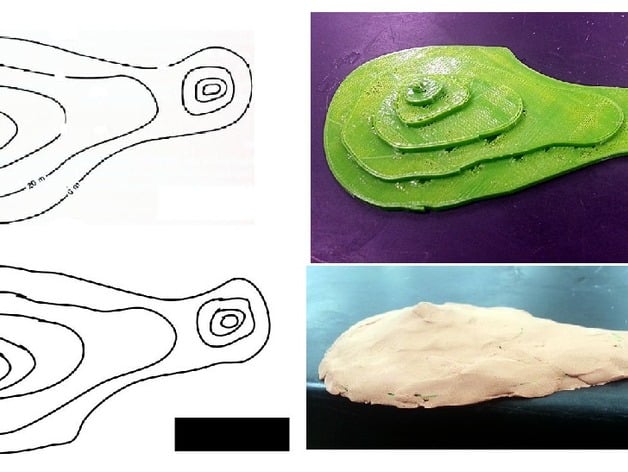
This is a somewhat simple method to 3D print a topographic map. It uses Google Drawings, which can download images as SVG files, which can then be imported into Tinkercad. The USGS has topographic maps for free, but these are too complex and busy looking for students learning about topographic maps. Manipulating the contours in Tinkercad can also be helpful for students learning to visualize topographic maps in 3D. For example, pushing the contour edges together to make a steep slope, or moving them apart to make a gentle slope. Standards NGSS Overview and Background This is a somewhat simple method to 3D print a topographic map. It uses Google Drawings, which can download images as SVG files, which can then be imported into Tinkercad. The USGS has topographic maps for free, but these are too complex and busy looking for students learning about topographic maps. Manipulating the contours in Tinkercad can also be helpful for students learning to visualize topographic maps in 3D. For example, pushing the contour edges together to make a steep slope, or moving them apart to make a gentle slope. Lesson Plan and Activity Find an image of a topographic map you'd like to model in 3D Open a new Google Drawing Insert your topographic map Draw a square in the corner of the drawing. This will be used later to make sure the contours are aligned properly. Use the Line --> Scribble tool to trace the contours Delete the topographic map, leaving behind the traced contours Use File --> Download as --> Scalable Vector Graphics (.svg) to save the first contour, give it a sensible name like contour1 Delete the first contour and repeat step 7 for each contour until all have been downloaded as SVG files Go to Tinkercad and create a new design Import the first contour with a height of 2 mm, or whatever height you want for the contour interval Import the next contour with a height 2x higher than the first. Click on Hole to make it transparent. Use the square you drew in step four to align the contours correctly. The squares of contour 1 and 2 should be matched up exactly. Use Color to change the contour back to solid instead of transparent Hole. Repeat steps 11 and 12 for each contour. it may be helpful to lock the completed contours as you finish them. Each contour should be he larger than the last. For example if your contour interval is 2 mm they should be 2 mm, 4 mm, 6 mm, etc. Delete the square that was used to line up the contours. You can do this by covering it with a block and changing the block to Hole. Download your model as an STL file and print. You can use clay to skin the. Keep the layer of clay as thin as possible so that it fills the area between the edges of the contours in a smooth slope. Project: 3D Print a Topographic map Objective Create a 3D model of a topographic map. Audience This project was designed with a 7th grade class in mind. Preparation Students should understand how to read topographic maps. Some experience with Tinkercad is recommended. Steps Find an image of a topographic map you'd like to model in 3D Open a new Google Drawing Insert your topographic map Draw a square in the corner of the drawing. This will be used later to make sure the contours are aligned properly. Use the Line --> Scribble tool to trace the contours Delete the topographic map, leaving behind the traced contours Use File --> Download as --> Scalable Vector Graphics (.svg) to save the first contour, give it a sensible name like contour1 Delete the first contour and repeat step 7 for each contour until all have been downloaded as SVG files Go to Tinkercad and create a new design Import the first contour with a height of 2 mm, or whatever height you want for the contour interval Import the next contour with a height 2x higher than the first. Click on Hole to make it transparent. Use the square you drew in step four to align the contours correctly. The squares of contour 1 and 2 should be matched up exactly. Use Color to change the contour back to solid instead of transparent Hole. Repeat steps 11 and 12 for each contour. it may be helpful to lock the completed contours as you finish them. Each contour should be he larger than the last. For example if your contour interval is 2 mm they should be 2 mm, 4 mm, 6 mm, etc. Delete the square that was used to line up the contours. You can do this by covering it with a block and changing the block to Hole. Download your model as an STL file and print. You can use clay to skin the. Keep the layer of clay as thin as possible so that it fills the area between the edges of the contours in a smooth slope. Results This project hasn't been tested with students yet but I made 3 models using this procedure as a proof of concept.
With this file you will be able to print 3D Print a Topographic Map with your 3D printer. Click on the button and save the file on your computer to work, edit or customize your design. You can also find more 3D designs for printers on 3D Print a Topographic Map.