3D print infill percentage disks (MakerWare profiles)
thingiverse
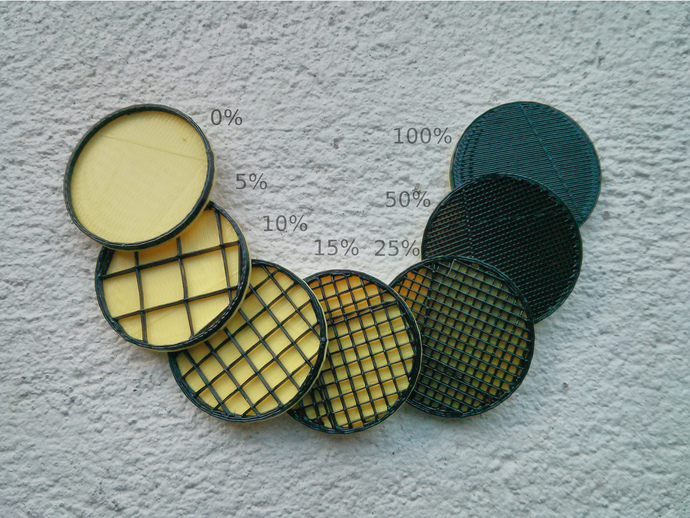
A set of 3D print profiles for MakerBot Slicer in MakerWare. The purpose is to easily visualise how dense the following different infill percentages No roof layer - 0% infill No roof layer - 5% infill No roof layer - 10% infill No roof layer - 15% infill No roof layer - 25% infill No roof layer - 50% infill No roof layer - 100% infill The 3D model is simply a scaled-up (3 mm) version of the built-in large helper disk in MakerWare. (http://www.makerbot.com/makerware) We attached the x3g print files which you can copy to an SD card and 3D print with PLA plastic on a MakerBot Replicator 2 3D printer. The ready-made 3D print profiles are adapted in MakerBot Slicer so that no roof is made. This leaves the top open and exposes the infill. To achieve a clear visualisation the model was made of two contrasting plastic colours. Thing video http://www.youtube.com/watch?v=Fhv2TvBUyQs By Creative Tools Home - Things - GooglePlus - Twitter - Facebook - Youtube - Instructables - Instagram - Flickr - Vimeo - LinkedIn Instructions Download the file "No roof layer - Infill profies.zip" Unpack the file. You will se several folders Copy them to your computers /user-home-folder/Things/Profies Download the file "Helper_Disk_Large_3_mm_height.thing" Start MakerWare and open the thing file. You will see a small disk Press the Make-button From the "Profile" drop-down menu, make sure you see the following added profiles No roof layer - 0% infill No roof layer - 5% infill No roof layer - 10% infill No roof layer - 15% infill No roof layer - 25% infill No roof layer - 50% infill No roof layer - 100% infill Choose a preferred profile Start the 3D print and use a bright PLA plastic colour Via the built-in LCD panel on the Replicator 2 using the arrow keys, choose Change filament. Wait until the the 3D printer prints the forth layer and just before it finishes this layer, press the M button on the Replicator 2. Proceed and change the filament as usual to a darker colour. Resume the 3D print After it finishes you will see the disk with no top layers and all the infill exposed! :) MAKE YOUR OWN ADAPTED PROFILE If you wish to make your own adapted profile as we did, please do as follows. Start MakerWare Add any STL file into the scene Press the Make button Choose Advanced Options Press Create Profile From the drop-down menu, choose MakerBot Slicer PLA Template Choose a name for your roofless profile Press Create Press Edit Profile A text editor window should open and show all the profile settings In the line ("infillDensity": 0.1), edit the 0.1-value and change it to the amount of infill you desire. 0 means no infill and 1 means 100%. In the line ("roofThickness" : 1.2), change the value 1.2 to 0 (zero). This will tell Slicer to disregard the top layers by making them 0 mm in height. Save and close the file Test print your new profile! :) Fore detailed instructions on how to edit MakerBot Slicer settings, check out this URL: http://www.makerbot.com/support/makerware/documentation/slicer/
With this file you will be able to print 3D print infill percentage disks (MakerWare profiles) with your 3D printer. Click on the button and save the file on your computer to work, edit or customize your design. You can also find more 3D designs for printers on 3D print infill percentage disks (MakerWare profiles).