3D Print Mini Selfie Hexacopter Modeling - ELF VRdrone Project
thingiverse
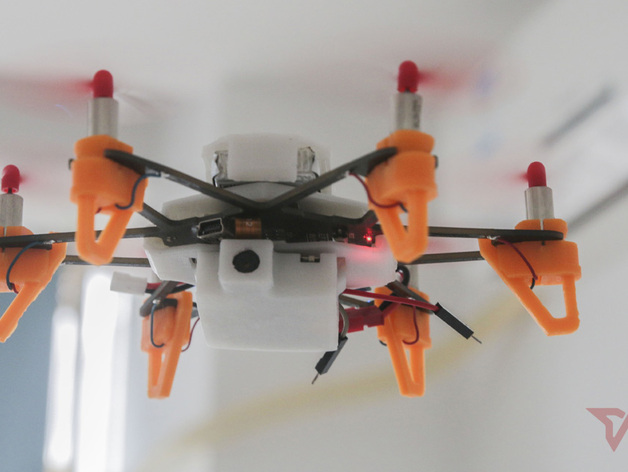
Thanks for your interest continued to our last share: http://www.thingiverse.com/thing:721744 We got request for the whole 3D print ELF nano drone body from folks. So here again, we come back with 3D modeling for the entire printable parts. Hope you enjoy it. ELF VRdrone is a min drone that takes selfies and combines the virtual reality cardboard for very low-cost 3D first-perspective immersion experience. It's 3D print and open source for makers as well as folks who love to build and modify. Carrying a 720p HD wifi camera, ELF is ready to take selfies from different perspectives (in the air, we can call it "dronies") as well as videos, basically commanded by your iOS or Android (Bluetooth 4.0 or later version) devices. The footage/videos can then be streamed back to your devices in real-time, or can be stored in the onboard micro SD card. Users can put on the virtual reality cardboard, slap the smartphone into it, and experience first-person view piloting. You can get access to ELF here: https://www.indiegogo.com/projects/elf-open-share-3d-vr-nano-drone There're several points that we need to pay attention when designing the 3D files. The past two years has seen a lot of low-cost desktop 3D printers, which are mostly based on FDM, such as the most well-known Makerbot, Ultimaker, Reprap and more others. The requirements on 3D print files may differ a lot depending on the type and the processing method of the 3D printer. In this article we’ll focus on how to design the 3D software specifically for FDM machines, in addition to some precautions. 1.The 3D design models must be the same size up and down, or large lower part and small upper part structure. As we all know about the principle of 3D printing – or “additive manufacturing, AM, additive processes are used, in which successive layers of material are laid down under computer control.” (quoted from wikipedia) , so if the lower part is smaller than the upper, the top will easily collapse down due to a lack of support. Thus, if this occurs, it will impact the printing results, or eventually leads to failure. 2.If the model has to be “large upper par and small lower part”, you need to remember the “45-degree” rule or try to adopt arc structure. Change the structure where the curves drop sharply as the above image shows, into a 45-degree angle. This will help improve the print quality. Likewise, using the arc structure will help avoid collapse as much as possible. 3.Try to design a flat base. It is crucial because it eliminates the trouble of the later removal of the support, saving filaments. The bottom surface of the arc cannot be printed directly, except that you increase the base and support. After printing, you have to spend much energy to wipe off the base to only find that the finished very rough in shape. 4.How do we do to guarantee the strength? Larger contact area between layers. 3D print parts, unlike the injection molding or CNC as a complete block of plastic, are of different degrees of solidity, which largely depends on the viscosity between layers. So the only way to improve the model is to increase the contact area between them. Let’s take the same model as an example, while the print method changes, the strength changes. 5.Modular design: split complex parts into a few simple parts, assemble them after printing. If we noticed, we’ll find that by splitting the motor housing into 2 parts, the structure of “large upper part, small lower part” we mentioned at the beginning will not appear, and the success rate is greatly enhanced. Thus, for more complex designs, and those “large upper part, small lower part” unavoidable, consider about dismantling the model into several parts. 6.Important points of modular design Traditional assembly design requires up to 0.1 mm difference in size between the parts. However, due to the nozzle head diameter of FDM, the final prints have some discrepancy compared to the 3D models. Take the nozzle of 0.4 mm diameter as an instance, to print a 10x10x10 (mm), but it will result in 10×10.4×10.4 (mm) cube. Why is that? It is because the nozzle head diameter is 0.4 mm, the print length and width are both 10.4 mm, while the height remains 10 mm. If it is a single object, such errors can be ignored; but if it is several parts which will be assembled into something new, then still using the “0.1 mm difference” like we normally do will be a problem. Taking into account the mutual engagement of the two parts will eventually be more than 0.4 mm error as the design size, we come to the conclusion that the two parts must have 0.9 mm difference in size. If you need to fit them tight, narrow that difference to 0.8 mm. 7.Design the most efficient print how-tos. Try to leave out support, which consumes much time outside of the useful print part and requires removal. Use hollowed design if necessary since this saves time and filaments. 8.Choose the proper filaments. FMD mainly uses two filaments: ABS and PLA, each with its own characteristics. We need to choose the proper type under different circumstances. PLA with lower melting point, has better adhesive properties, emits no odor during the printing process-which is the biggest advantage. ABS is better known for its low density, light weight, good toughness and certain flexibility. If you need to print a craft, having nothing strict requirement on the weight and the toughness, then PLA is the best choice. But if you want the model lighter with some hooks or buckles, and toughness, ABS must be better. The ELF is printed by using ABS.
With this file you will be able to print 3D Print Mini Selfie Hexacopter Modeling - ELF VRdrone Project with your 3D printer. Click on the button and save the file on your computer to work, edit or customize your design. You can also find more 3D designs for printers on 3D Print Mini Selfie Hexacopter Modeling - ELF VRdrone Project.