3D Print Your Own Miniature Model of A 3D Printer Using These GCODE Files Includes Detailed Drawings Package & Step-By-Step Pictures
thingiverse
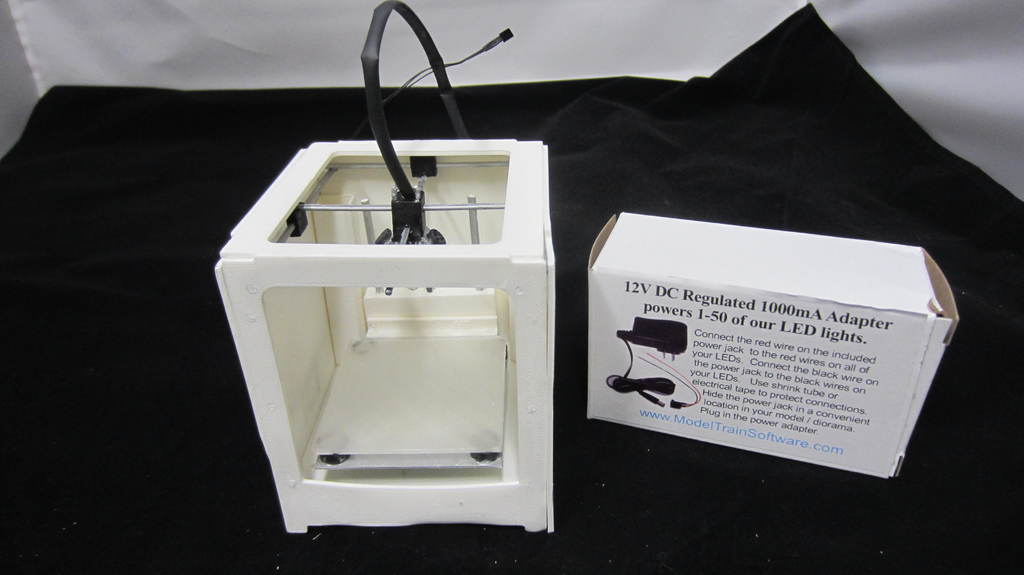
<head> <meta charset="utf-8"> <meta http-equiv="X-UA-Compatible" content="IE=edge"> <meta name="description" content="An interactive getting started guide for Brackets."> <link rel="stylesheet" href="main.css"> </head> <body> <h1>3D Printer Build Guide</h1> <h3>Overview</h3> <p> The pictures show what is possible with these files and the final result is a Miniature 3D Printer model for display only. If you purchase the lighting kit that I used, this model will be able to light up with a remote and can be used as a bedside lamp. </p> <p> Please continue to develop and make this better. Would be cool if someone could engineer this tp actally work as a miniature printer. </p> <p> Please be aware the some tweaking and experimenting might be required, as I cant gaurantee these printed parts with work on your machine. I will include the original model files if you need to make modifications or redign for whatever you wany. This is an open source project </p> <h3>More Detailed Description</h3> <p> Based on my Cura software, the time it will take to print all the files will be around: 14h : 26min </p> <p>Based on my actual Full size 3D Printer this model as seen in the pictures, I measured it and created a 3D Model in Autodesk Inventor, converted and scaled down the 3D model into gcode parts to be 3D Printed. The item is printed using PLA material and gcode generated with Cura using a 0.4mm nozzle. <p> All parts will need to be glued together and I added information on buying parts to add an optional LED light package, so it could be light up with a remote control as seen in the photos. </p> he optional light if you choose is located inside the hot end (area where material would normally come out). The size is roughly 3.75" Wide x 3.5" Depth x 3.875" High. <p> The item is purely designed as an ornament or bedside lamp. The model as seen in the pictures displays the optional lighting package that can be added. I also painted the areas of the model that represent steel and plastic to give it a realistic look. The wired connections where soldered and this will be something you would need to do if you choose to take that option. </p> I have created a 33-page detailed step by step instruction drawing package to assist in the assembly process, and many installation steps by step photos <a href="https://drive.google.com/drive/folders/1-ZAHvSyMFe9ulqXYWYAy7-oliM05yh_c" target="_blank">Step-By-Step Pictures </a> <p> The drawings in the package are to scale and once the parts are printed you can match the part to the drawing to locate parts and how they fit on the model. <br><br>All you need to do is put all the gcode files on an SD card and load each part into your printer and print it out. This project will require some experience in assembling and gluing complex 3D printed parts and understanding how to 3D print files using slicing software like Cura. While I was designing this I printed and assembled the model as seen in the assembly pictures in the instruction package. </p> <h3>Links to Files To Assist in Printing</h3> <ul> <li><a href="https://drive.google.com/file/d/1YVEWoN83QBXkDdarI1It7fgFjMkN2drr/view?usp=sharing" download target="_blank">Reference Manual</a> </li> <ul> <li><a href="https://drive.google.com/drive/folders/1kzP00qmhG4pGjrzmJCELZTE-Ba148030" target="_blank">Tools Needed</a> </li> <li> <a href="https://drive.google.com/drive/folders/19lGwvwqTYQEOottPgBes1ALR7uvbsnk4" target="_blank">Lighted Up Images</a> </li> <li> <a href="https://drive.google.com/drive/folders/1-ZAHvSyMFe9ulqXYWYAy7-oliM05yh_c" target="_blank">Set-By-Step Install Reference Pictures</a> </li> <li> <a href="https://drive.google.com/drive/folders/1ej_274KcguTJLmkIZoCMTDxug9tqBiyn" target="_blank">General Pics</a> </li> <li> <a href="https://drive.google.com/drive/folders/1Igk8sK-nWnjFzClc2gfIapUIG_1_0KJc" target="_blank">Extras</a> </li> </ul> <h3></h3> <h3>What Hardware is Required, I used.</h3> <ul> <li> 3D Printer - 0.4mm nozzle</li> <li>Black PLA- Optional, saves you painting</li> <li>White PLA</li> <li>Silver PLA - Optional, saves you painting</li> <li>Metal PLA - Optional, saves you painting</li> <li>Metal PLA - Optional, saves you painting</li> <li>Super Glue - Loctite</li> <li>Hobby Hammer - I found this useful</li> <li>Hobby Knife</li> <li>Xuron Cutting pliers - Helps clean printed parts</li> <li>1/16” and 3/32” drill bits</li> <li>Hobby size Dremel Tool, for cleaning and drilling holes a bit larger</li> <li>Soldering Iron with solder - only needed if you purchase the lighting package</li> </ul> <h3>What Software is Required</h3> <li>Acrobat Reader</li> <li>Cura - Slicing Software, normally something similar comes with your printer. Cura is a free download</li> <li>Winzip for unzipping all the files</li> </ul></body>
With this file you will be able to print 3D Print Your Own Miniature Model of A 3D Printer Using These GCODE Files Includes Detailed Drawings Package & Step-By-Step Pictures with your 3D printer. Click on the button and save the file on your computer to work, edit or customize your design. You can also find more 3D designs for printers on 3D Print Your Own Miniature Model of A 3D Printer Using These GCODE Files Includes Detailed Drawings Package & Step-By-Step Pictures .