3D-Printable cover for 7x10/14/16 Minilathe Apron Gears
thingiverse
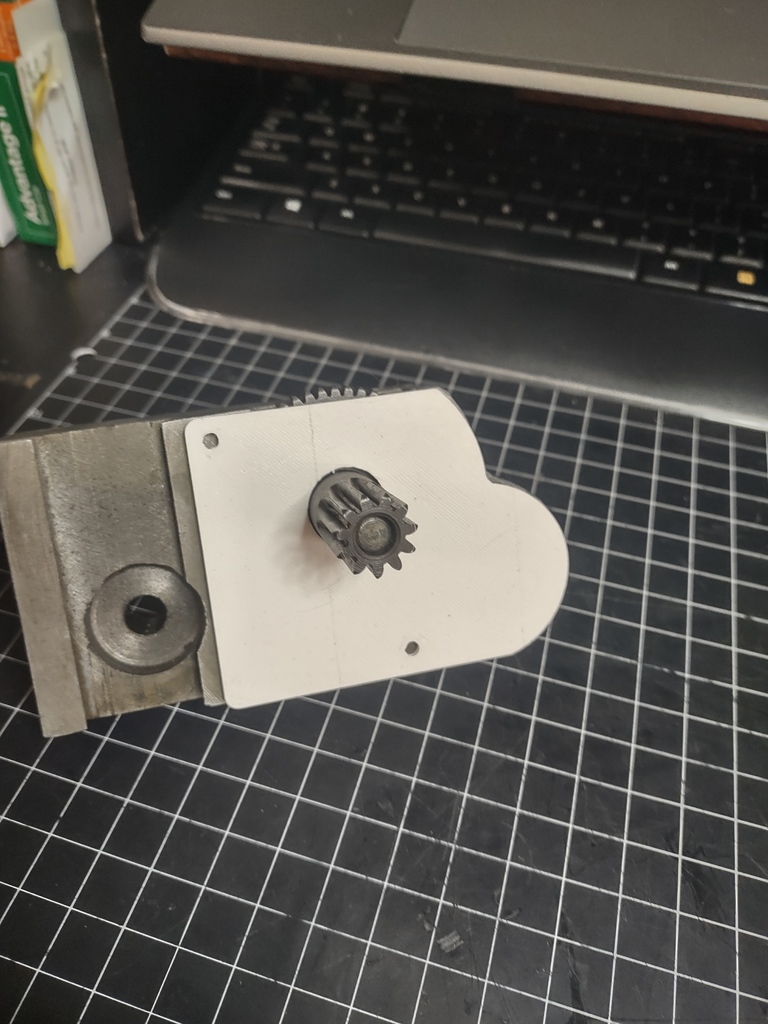
Many inexpensive mini-lathes use a rack-and-pinion system to move the carriage when the half-nuts are disengaged. This gear system is exposed to swarf and can jam with debris after extended use. I experienced this issue, and this part is my attempt to prevent it from recurring. There are several options for fixing this, e.g. [a homemade cover](https://sites.google.com/site/pjsminilathe/my-modifications/apron-mod), and this 3d-printable cover is inspired by that design. Installation: * Remove the Apron > Remove the set screw from the right end of the leadscrew. > Unscrew the leadscrew end bushing from the right end of the leadscrew. > Support the leadscrew with a block of wood or similar > Remove the right leadscrew mounting bracket > Disengage the half nuts > Remove the two Carriage to Apron mounting bolts while supporting the apron > Gingerly slide the apron off the end of the leadscrew banging it as few times as possible. * Prepare the casting > You do not need to remove the half-nuts, half-nut locking lever, or handwheel > Thoroughly clean the inside of the casting to remove swarf and oil. A solvent may be helpful, but use caution to avoid damaging painted surfaces. > Align the 3-D printed cover to the bottom edge of the casting and use the cover as a guide to center punch the location for the two mounting holes. > Confirm the mounting screws will not intersect the half-nut gibs or other mechanisms. > Drill, and tap the two mounting hole locations for M4 screws. > Clean the casting again to remove debris. * Installation > Lubricate the gears with grease. I use White Lithium grease from my local auto parts store. >If necessary, enlarge the holes in this 3-d printed cover to fit your screws. A printer that holds good tolerances won't need this. My printer does not, > Mount the cover with two M4x8mm screws. I used [Sutemribor 240 Pieces M4 Stainless Steel Button Head Hex Socket Head Cap Bolts Screws Nuts Assortment Kit + Wrench (Amazon Affiliate Link)](https://www.amazon.com/gp/product/B07CYM1N8R?ie=UTF8&psc=1&linkCode=sl1&tag=egreene-thingiverse-20&linkId=6134569d80110be15e2ddae01d87d16f&language=en_US&ref_=as_li_ss_tl) from Amazon because it's what I had on hand. [McMaster-Carr 97763A816](https://www.mcmaster.com/97763A816/) would also work. > Clean and lubricate the half nuts and dovetail mounts. I use grease sparingly for these as they are difficult to access, but oil might be better since it would trap less debris. * Reassembly > Slide the apron over the leadscrew > Reattach it to the carriage > Reattach the leadscrew support, end bushing, and leadscrew using care to keep the leadscrew straight. Sliding the carriage to the right end of the bed and engaging the half-nuts can help hold it in the correct position during reassembly. This was specifically designed to fit my Homier Speedway series Mini-lathe. Check the fit carefully before drilling holes in your machine. Note: I don't consider the swarf accumulation here a defect in the mini-lathe; Despite poor maintenance it worked properly for more than a decade. This is an improvement, not a bugfix.
With this file you will be able to print 3D-Printable cover for 7x10/14/16 Minilathe Apron Gears with your 3D printer. Click on the button and save the file on your computer to work, edit or customize your design. You can also find more 3D designs for printers on 3D-Printable cover for 7x10/14/16 Minilathe Apron Gears.