3d-printable Onion cutter
thingiverse
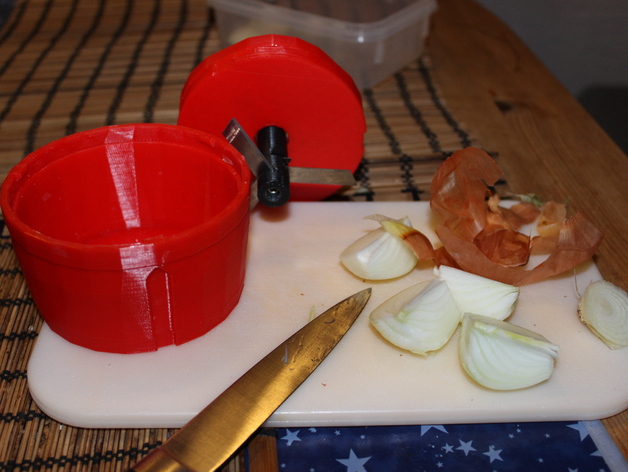
No more tears in your kitchen as from now on you will be hacking and slicing these annoying onions in seconds! Custom designed 4:1 involute planetary gearset and easy to grip bowl and ring gear for big torque capacity and blade speeds up to 340 rpm. No escaping these blades for your onions anymore! This fully 3d-printable onion cutter makes use of the fact that an M3 tap screw fits perfectly through the hole of 9mm stainless steel cutter blades. compared to it's functionality, it's a rather easy print: no support needed only small (11mm wide) bridges and some hole bridging no overhangs above 45° big bottom surface for good bed adhesion no tweaking of the parts needed small internal surfaces for correct hole bridging have been integrated in the parts coordinate systems have been reoriented so parts are placed in correct printing orientation automatically tolerances have been considered so parts do not have to be modified after print (except pushing out bridging in some holes), also print quality doesn't need to be perfect. small edge chamfers have been added to the bottom side of the gears. Not only is this common in modern gear design, but it also makes up for over-squished first layers so you won't have to clean the teeth. I managed to print this on my (poorly calibrated) Prism (a mendel derivate) with a damaged nozzle, uneven print bed and leaning problems and it still works like a charm! I had printer parts coming loose halfway through the print, filament clogging and still it works. So don't be scared by the sheer volume of the parts, you who own a makerbot should really have no problems, this is a very forgiving print. Total print time was ~10h with the bowl taking up almost half of it. I printed .3 layer height at 30mm/s so one might even be able to print it considerably faster. Total filament used was ~20m of 2.95mm PLA. The ring gear is glued into the shaft gear using a shaft-in-shaft bearing concept. You have the option to go for an easy version where the ring gear is only held in place by the planetary gears. For more information read the Instructions. demonstration of blade speed:https://www.youtube.com/watch?v=5T4PXQD87Pg proof that it works: =)https://www.youtube.com/watch?v=kWxKJF94bA0 Instructions Vitamins needed: 1x ISO 4762 M3x50 tap screw (these are widely used in extruder idlers, f.i. Wade's, so you should have a spare) 1x ISO 4032 M3 nut 1x 608 bearing (most common bearing among printers) 4x 624 bearing (not that common although used in many extrusion frame printers, nevertheless they are so cheap so don't worry) 3x stainless steel cutter blades 9mm width, you can find them in your local hardware store or get them from amazon (you might even use normal steel, but then you have to clean the cutter immediately after use) Assembly instructions: Print out all the parts the shaft_gear_easy_print is not needed Parts are designed for a layer height of .2 OR .3 mm or any dividor of either (e.g. .15, .1). DO NOT USE .25, .33, .4 or something like that or you might miss bridging layers I suggest printing all parts at .3 layer height, 2 perimeters, 2 solid top/bottom layers and 20% honeycomb infill. I suggest printing the bowl with 3 solid TOP layers to ensure it is water-tight. I suggest further to print all parts in PLA only as it is safe for food use. The shaft should not be printed alone as the layers need time to cool and your bridges might droop, making the insertion of the blades impossible, so be sure to print it alongside the shaft gear don't be fooled when printing the top part: the planetarys are NOT spaced 120deg each as the installation conditions are not met with the given tooth numbers. So dont worry if they do not line up with the gaps for snapping the bowl i suggest reducing first layer spped for shaft_gear as it can prove quite of a challenge to your printer. If you're having trouble getting this printed, you can still go for shaft_gear_easy_print Clean the parts there isn't much cleaning needed as no support is used push through all holes that use hole bridging, I use a hex key of the given size to do that depending on how over-squished your first layer is, you might have to clean the teeth of the gearset. Use a sharp knife for that, maybe sanding will already be enough. cut through the gaps in the shaft with a pointy, sharp and strong knife and make sure the cutter blades can be inserted cut out the bridging layer in shaft_gear Assembly first, take the top part and push in a 608 and three 624 bearings next, insert the shaft gear break the blades so that they don't touch the bowl when inserted, yet come as close as possible to the rim of the bowl (maximum reasonably possible distance from the hole in the blades to the tip is 40mm) insert the blades into the shaft in a way that they cut when the shaft turns counterclockwise (seen from above) the blades will only fit in one orientation as the hole is not in the center of the blades make sure the cutting edge faces the thicker side of the shaft (see sketch) look through the shaft to make sure all holes align insert an M3 nut into the shaft gear and the M3x50 screw into the shaft place the shaft with the blades onto the square part of the shaft gear screw the parts together so that they clamp onto the inner ring of the 608 bearing put the three planetary gears in place make sure the gears move smoothly glue a 624 bearing in the shaft gear, add some glue to the pin of the ring gear and place the ring gear on top of the assembly (If you went for shaft_gear_easy_print, break of the pin of the ring gear and just place the ring gear on top of the assembly, it will be held in place by the planetarys. The cutter will work with the shaft_gear_easy_print version but you might have the ring gear coming off when opening the bowl after cutting.) Use instructions: peel and cut onions, insert into bowl lock on the top turn the ring gear and the bowl really fast against each other back and forth enjoy your super small onions empty and repeat for more onions clean using cold water and soap only, do not put in dishwasher
With this file you will be able to print 3d-printable Onion cutter with your 3D printer. Click on the button and save the file on your computer to work, edit or customize your design. You can also find more 3D designs for printers on 3d-printable Onion cutter.