3D Printable Quick-Connect Quadcopter
thingiverse
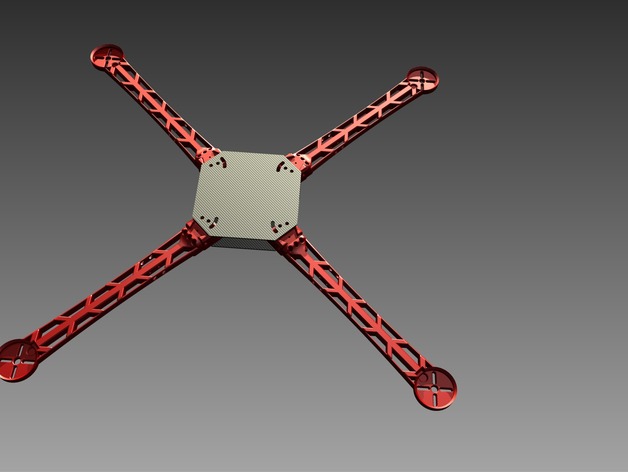
This is a 3D Printable model of a Quadcopter that has designed with many features that you normally would not find on the average copter. . Some of these features include the following: Quick Connectable and Dis-connectable arms, allowing you to easily transport the copter and disassemble it on the go! . Fold-able assembly, allowing you to easily change the orientation of the frame from X to Dead Cat style and everything in between! . Super lightweight Makeup, giving you longer flight times, and larger weight load possibilities! . Carbon Fiber Reinforced middle structure to give the frame optimum strength and efficiency! . Easy assembly, only requiring few tools and resources. . The Quick-Connects have holes built into the booms and main body made to accomidate glue-in 3.5mm bullet connectors! Not only making a physical connection, but also make an electrical connection! This means no more hard to dis-connect wires! This just names a few features of this frame, its your job to help find all of the others! This frame requires a few things to be flyable, this includes screws smaller than .2" in diameter, and 2 5.5" X 5.5" Carbon fiber plates, which you can all find in the internet with ease. UPDATE 1-23-17 --------------------------------- Hello everyone, Over the past many months and thousands of hours of design time I am nearly ready to release the final version of my consumer version of the Dimension 3 MultiMachine Delta 3D Printer. Check it out at http://www.Dimension3fab.com Instructions The assembly of this Copter requires a few tools, and materials as well as all of the 3D printed parts supplied on this page. The assembly should not take too long, but i would recommend that you dedicate at least an hour of your time to this project. . . Materials All 3D Printed parts 12 Smaller than .2" Screws with matching nuts 2 plates of carbon fiber measuring 5.5" by 5.5" by 2mm thick Sand paper, or a file (For cleaning up 3D Printed parts. . . Tools Screw Driver (Optional) thread lock for screws An Hour or so of your time. . . Start by laying out all of the 3D Printed parts, these include the following: 4 Quick-Connect Booms (Male) 4 Quick Connect Main Body Adapters (Female) Battery Holder . . The two CAD Files that are called "Main Plate" are scale examples of how you need to cut your carbon fiber. Using a saw and drill cut your carbon fiber pieces to the requirements set by the CAD File. You will make 2 pieces the exact same. If you want to print out the main plate as a cut template you will need to scale the STL file up by a factor of 10 times. . . After you have cut both pieces of carbon fiber you are ready to assemble the rest of the copter. You can use 4-40 screws to do so, that's what i used. First guide 2 screws into the outer most holes of the Female Quick connect, with the top and bottom carbon fiber plates in place. The holes you drilled near the cut off corners of the plate is where the quick connects are placed. You can see in the assembled model that i added in the project files how they are orientated and placed. . . Once all four of the main body quick connects are secured between the 2 pieces of carbon fiber, you can add the battery holder! To add the battery holder you simply place the open end of the holder toward the back end of the copter, and line up all four screw holes, if everything was cut correctly you should be able to use some long 4-40 screws guided through the top of the main body through the openings in the battery holder to adhere it to the bottom of the copter. (You can place the battery holder on the top or the bottom of the copter, it does not mater. I prefer the bottom though.) . . After the battery holder is installed, and all four female quick connects are in place you are done with the main body! The only thing left to do is some light sanding to the quick connect Booms, sand the booms quick connect portion until the boom snugly but smoothly slides into lace in the main body female portion of the quick connect. . . After the main frame is assembled you will notice that in the bottom of all the quick connects there are three holes, which intern line up with the connected boom's three holes. This is used to mount bullet connectors for your motors to connect to the esc's. You first use some epoxy to mount the female end of the bullet connectors into the boom's three holes, and the male end of the bullet connectors on the main body's three holes. After the glue is set you should be able to click together the booms, and not only make physical connection, but an electrical connection as well! . (The holes were sized to accommodate a 3.5mm bullet connector) . . Now it's time to install your electronics, i am not going to walk you through the installation process, but i will tell you that there is just enough room between the two carbon fiber plates in the middle of the copter to mount a flight control board, and even all of your ESC's! Also the carbon fiber would be great protection for your expensive electronics! . You are done! Congratulations!
With this file you will be able to print 3D Printable Quick-Connect Quadcopter with your 3D printer. Click on the button and save the file on your computer to work, edit or customize your design. You can also find more 3D designs for printers on 3D Printable Quick-Connect Quadcopter.