3D printable RC airplane.
thingiverse
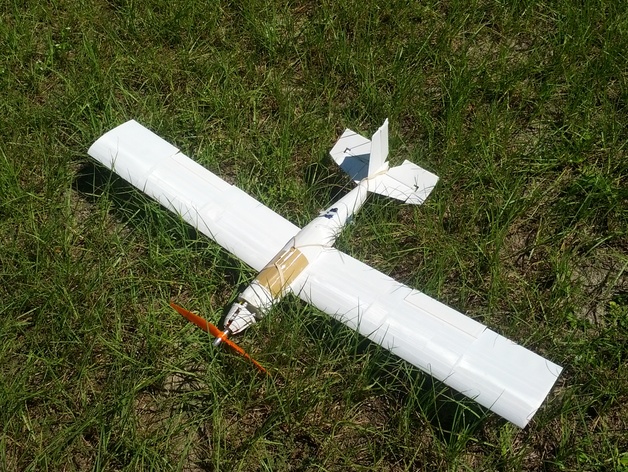
I created this fully 3d printed airplane just to make something cool. With a 36 inch wingspan, 4 servos, and a 210w motor this is a fully functional flying airplane. Parts: 4 - 25mm x 3mm or 1 inch #4-40 machine screws + respective bolts 4 - 40mm x 6mm or 1.5 inch x 1/4 inch bolts 8 - 6mm or 1/4 inch washers 4 - 10mm x 4mm or 1/2 inch x #6 machine screws + respective bolts 4 - 1/8 inch x 3/8 inch x 2 foot basswood or (untested) 1/8 inch x 1/4 inch x 2 foot basswood piano wire or paperclips rubber bands glue (abs + acetone recommended for an abs print) sandpaper RC parts: I used: 1 - TURNIGY Plush 30amp Speed Controller 1 - D2830-11 1000kv Brushless Motor 1 - ZIPPY Compact 2200mAh 3S 25C Lipo Pack 4 - Turnigy TG9e 9g / 1.5kg / 0.10sec Eco Micro Servo As well as a battery charger and 4 channel transmitter/reciever . As a poor college student, if you are viewing this and work for a cool company i would love to hear from you about any possible employment. :) Instructions Print settings: I recommend printing at least the wings in ABS due to being able to glue and fill print imperfections with abs/acetone mix. I used rafts on everything. Wing sections should be printed vertically, as should most things in in this model because they are designed to not need supports. Turn the body back and body tail to print vertically. move the cover down on the Z axis until the top is within the print area. 2 shell 20% infill with supports: body front wing servo 2 shell 20% infill no supports everything else except tail pieces 3 shell 5% infill no supports tail flaps 2 shell 5% infill no supports tail and tail upper Assembly: Basswood: The basswood will not fit into the slots in the wings without trimming about 1/16 off the top of the 3/8 tall side. Using 1/8 x 1/4 basswood might work but i haven't tried it. Trim the end off the basswood so the entire piece is contained within the wing. Body: bolt the back of the body to the front with the #6 or 4mm bolts. Glue the body tail latice into the slot on the back of the body. Body servos: The ideal way to insert the servos is from the inside, the rear one first, you should be able to maneuver each servo into their respective bracket without much trouble. If not then some material from the triangular part of the hole will need to be cut out to allow for insertion from the outside. Either way the servos are held in place with a small plastic tab with a servo mounting screw threw it. the plastic from hard packaging cut into a 10x20mm rectangle works perfectly. Tail: The cylindrical parts of the tail flaps will need to be sanded down to rotate easily within their holes. The rectangular spires from the tail_upper are to be inserted into their holes in the base of the tail_upper piece. The tab on the elevator should be on the top left. Attach the elevator to the tail by angling the tail and sliding the elevator into each hole one at a time. Place the elevator assembly into the lattice of the body. Place the rudder into the small round hole with the tab on the right side. Slide the upper tail into the diamond holes and on the top cylindrical rudder tab. The tail assembly is secured via two rubber bands attached in a cross fashion, or more permanently by glue. Motor: Motor and mount first, followed by each cowl section, push motor wires through the hole on body, bolt everything together. Wing Aileron: There may be gaps in the print on the wing sections, use abs glue to fill any imperfections. One very important area to glue is the channel where the aileron attaches. It is likely that the channel has a gap running along the entire length of it. Pour a couple drops of glue and let them run from one end to the other to connect both halves of the section. sand the rounded aileron tab so that after the glue FULLY dries it can turn with little resistance but not too much to have it fall out. The aileron tab should be facing down and closer to the body. Wing servos: The servos should just snap in, the small bottom piece will probably break upon insertion, not a big deal, either glue it back together or leave alone. Attach the servo arm before assembling into the wing. Wings: slide two prepared basswood sticks into each wing tip. Next slide the aileron/middle wing section. Followed by the servo and base wing sections. Using two rubber bands placed outside the wing along each basswood stick to clamp it together, glue all of the wing sections together. Landing gear: Snap wheels onto the clips, sanding where necessary to have the wheels spin freely. The landing gear is optional. Wing to body assembly: Tapping each wing is suggested. But tapping with a bolt is possible, just be careful. Each bolt has two washers against it's head. Route the servo cable through the hole in the landing gear and body. Bolt each wing on securely. Using too much force can and will crack the plastic. The wing servos need a splitter so buy one or splice one servo into the other. Final assembly: Add all electronics, using the transmitter, find the neutral spot for all of the servos and make linkages out of piano wire or paperclips to all of the flight control surfaces. The cover is attached via two rubber bands and a paperclip. Have Fun :)
With this file you will be able to print 3D printable RC airplane. with your 3D printer. Click on the button and save the file on your computer to work, edit or customize your design. You can also find more 3D designs for printers on 3D printable RC airplane..