3D Printed Bartop (Desktop) Arcade
thingiverse
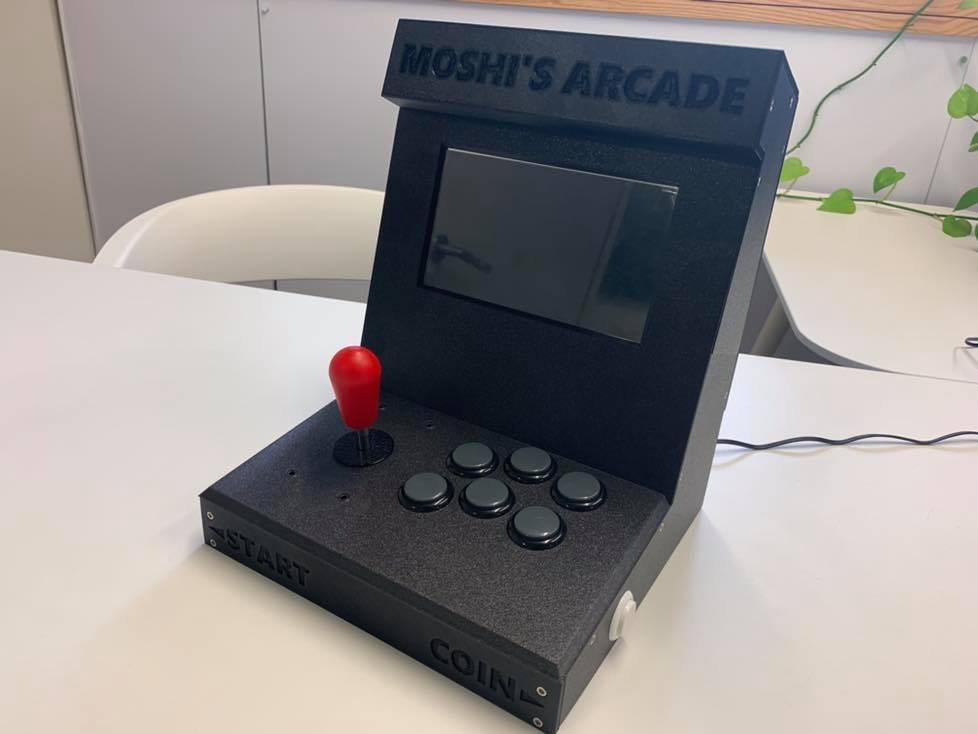
**Note: The files don't have the "Moshi's Arcade" text at the top of the machine. It's your machine if you print it, after all :)** BOM (Bill of Materials) ======================= * LCD: Waveshare 7 inch LCD. [Option 1](http://s.click.aliexpress.com/e/b8lV7xR2), [Option 2](http://s.click.aliexpress.com/e/WgBR0NK) * 4x [Sanwa OBSF-24 buttons](http://s.click.aliexpress.com/e/XqodA1E) (push-in type, not screw). * 6x [Sanwa OBSF-30 buttons](http://s.click.aliexpress.com/e/gLaqJag) (push-in type, not screw). * Joystick: * [Sanwa JLF-TP-8YT](http://s.click.aliexpress.com/e/cpFyzLsU) * [Alternative joystick with bat-top instead of ball head](http://s.click.aliexpress.com/e/bjomdiiM) * Joystick + 8 OBSF-30 buttons - [might be a better deal here](http://s.click.aliexpress.com/e/ncpFcTq) * [Raspberry Pi 3 B+](http://s.click.aliexpress.com/e/5alEJPw) - you need the Pi itself, an SD card, a power adapter and a case (though you can also print a case instead). You don't need the touch screen for this project. * [Zero Delay USB encoder](http://s.click.aliexpress.com/e/bp3mZ0QM) - this also comes with the cables needed. * Nuts & Bolts: * 26x M3 nuts * 24x M3x12 bolts (You can use longer bolts for most connections) * 2x M3x18 bolts (Longer are fine too) * 4x M4 nuts * 4x M4x20 bolts (for the joystick) * Optional: * [Mini USB Speaker](http://s.click.aliexpress.com/e/bRXB9Jg4), you can also get ones that are powered by USB and get audio from a 3.5mm jack, but this one needs less wires. * [Sanwa GT-Y Octagonal Restrictor Plate](http://s.click.aliexpress.com/e/cHpDIrde) - This plate restricts the joystick to an octagonal shape, making it far easier to hit sweeping movement combos (e.g. Down, Down-Right, Right). Very useful if you're planning on playing any fighting games. Printing Notes ============== Most of the parts are simple - print them with your usual amount of top/bottom layers, perimeters, and some sparse infill (Anywhere between 5% and 10%). The back can be printed as-is. However, I liked the hexagonal aesthetic (shown in my pictures). To print it like that, use a 25% hexagonal infill, with 0 bottom layers and 0 top layers. Note that the captive nut holders do need top layers, so set your slicer to return doing top layers after 3mm height. This ratio also lets you use M3 nuts and bolts to mount things to the back, like a raspberry pi case, or a speaker. Assembly Instructions ===================== Start by mounting the LCD. Slip nuts into their captive slots on the LCD holder, then use short M3 bolts to mount the LCD into the holder. Connect micro USB and HDMI to the screen now. Connect the two halves of each of the frame sides to one another using the longer M3 bolts (M3x18 or higher). Mount each side to the LCD holder using the two captive nuts (on each side). You might need to bend the HDMI cable a little to make it fit. Mount the controller pad to the sides and make sure it sits flush against the LCD holder. Mount the front control panel and bannertop to make the assembly sturdier. At this point you should start connecting the joystick and buttons. Joystick needs M4 nuts and bolts to mount, and the buttons are simply pushed into their slots. This is also a good point to start wiring the buttons and joystick to the Zero Delay USB encoder. Once the buttons and joystick are wired, you can test the electronic side of things by connecting the Raspberry Pi to the LCD and to the Zero Delay USB encoder. Consult the RetroPie documentation on how to install RetroPie on your Raspberry Pi. When you're certain everything works correctly, mount the Zero Delay USB encoder to the back of the LCD holder using some double sided tape. If you printed the back as a solid, mount the Raspberry Pi to it using some double sided tape. If you printed it without top/bottom layers using hexagonal infill, you can use M3 nuts and bolts to mount a printed case [like this one](https://www.thingiverse.com/thing:922740). Mount the back plate to the rest of the case and have fun!
With this file you will be able to print 3D Printed Bartop (Desktop) Arcade with your 3D printer. Click on the button and save the file on your computer to work, edit or customize your design. You can also find more 3D designs for printers on 3D Printed Bartop (Desktop) Arcade.