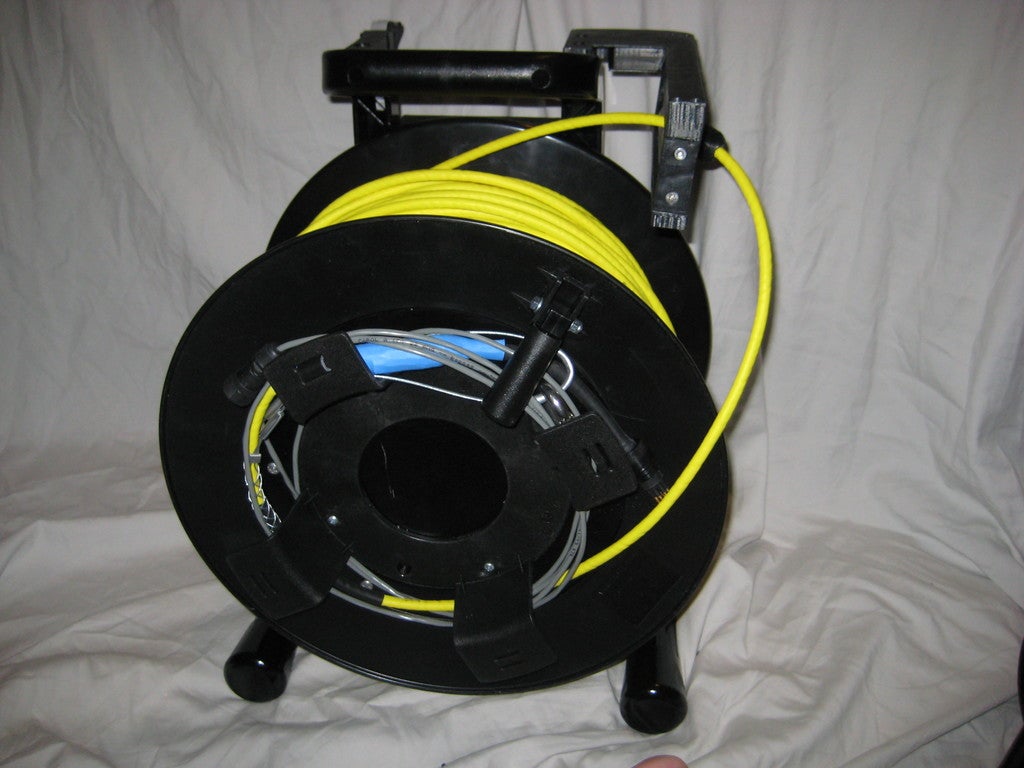
3d printed cable roller and waterproof control box for a Schill GT380 reel to turn it into a ROV or robot tether
prusaprinters
<p>To build one of these, you will need a Schill Gt380 <a href="http://www.markertek.com/product/schill-gt380/schill-gt380-19x11-plastic-rubberized-cable-reel">http://www.markertek.com/product/schill-gt380/schill-gt380-19x11-plastic-rubberized-cable-reel</a> . They are not inexpensive. You will also probably want the optional solid lid plate and the cable auxiliary ring as shown in my pictures, that adds about $60 more.</p> <p>16 M3 heat set inserts ( <a href="https://www.mcmaster.com/#94180a331/=17gvlmb">https://www.mcmaster.com/#94180a331/=17gvlmb</a> )<br/> a variaty of m3 stainless bolts (should be 12 8mm ones and 4 10mm ones) and 4 12mm M3 botls and nuts for the cable stop. You will also need 4 m3 12mm long bolts and nuts to hold the cable roller and the velcro bit to the jackreel<br/> 6 13mm OD 4mm ID stainless steel bearings. (something like this should work <a href="https://www.mcmaster.com/#7804k103/=17gvmvh">https://www.mcmaster.com/#7804k103/=17gvmvh</a> )<br/> 2 sections of 16MM OD X 13MM ID (1.5MM WALL) 316 SEAMLESS STAINLESS STEEL TUBE X 200MM cut to around 150mm lengths. (Mcmaster carr has them)<br/> 2x 13 mm overall lenght M4 bolts and nuts for the inner bearings and 4x 32mm long M4 bolts and nuts for the rollers<br/> The waterproof one is designed to use 3 small stainless steel plastic screws to attach to the frame.</p> <p>You will need 1 RCA to 2 wire vga balun (well technically 2, since you'll want one on the other end as well) You can optionally just fill that hole in instead if you don't wish to use a secondary camera feed<br/> You will also need 4 m3 bolt sized 1/8" plastic spacer standoff things to move the Fathom board away from the brass inserts.<br/> a 75m to 100m section of blue robotics tether <a href="http://www.bluerobotics.com/store/cables/fathom-tether-nb-4p-26awg-r1/">http://www.bluerobotics.com/store/cables/fathom-tether-nb-4p-26awg-r1/</a> or whichever other cable you would like to use. The cable stop and rollers are sized for that (8mm dia) cable though.<br/> a 6 or 8 wire slip ring of some sort, I used this one:<br/> <a href="http://www.ebay.com/itm/141778020060?_trksid=p2060353.m2749.l2649&ssPageName=STRK%3AMEBIDX%3AIT">http://www.ebay.com/itm/141778020060?\_trksid=p2060353.m2749.l2649&ssPageName=STRK%3AMEBIDX%3AIT</a><br/> For the waterproof version you will also need RTV or clear silicone<br/> a "NETWORK TECHNOLOGIES case side waterproof rj45 connector with jack N cap " (no idea where to get those, I bought one on Ebay Possibly part numbers RJ45-5EWTP-CS-JCK RJ45-5EWTP-CB and RJ45-5EWTP-CAP (this looks to be the same thing <a href="http://www.ebay.com/itm/RJ45-Ethernet-LAN-Network-AP-Plug-Jack-Socket-Connector-8-Core-Waterproof-IP68-/291866258836?hash=item43f495ad94:g:uZwAAOSwFV9Xzo7M">http://www.ebay.com/itm/RJ45-Ethernet-LAN-Network-AP-Plug-Jack-Socket-Connector-8-Core-Waterproof-IP68-/291866258836?hash=item43f495ad94:g:uZwAAOSwFV9Xzo7M</a>)<br/> and a waterproof USB mini cable interface. I actually have another one on the way with the pigtail since I can't find a USB mini male male cable in a short length anywhere. But for now this one worls <a href="http://www.ebay.com/itm/220627320201?_trksid=p2060353.m2749.l2649&ssPageName=STRK%3AMEBIDX%3AIT">http://www.ebay.com/itm/220627320201?\_trksid=p2060353.m2749.l2649&ssPageName=STRK%3AMEBIDX%3AIT</a> (that is for powering the Fathom board, you could also run 2 wires to the battery contact using that hole instead.<br/> Optionally, you can run a 2 wire connector for the USBL system if you have a spare kidney to sell to buy one. I used these connectors. LLT-USA-M14BMR02 <a href="http://www.ebay.com/itm/252493396652?_trksid=p2060353.m2749.l2649&ssPageName=STRK%3AMEBIDX%3AIT">http://www.ebay.com/itm/252493396652?\_trksid=p2060353.m2749.l2649&ssPageName=STRK%3AMEBIDX%3AIT</a></p> <p>Everything should print without support.</p> <p>Assembly:<br/> Insert heat set inserts everywhere that looks like it needs one, using the pictures as guides. Install the bearings in the cable roller sides first, then insert the longer bolts and last 4 bearings for the main rollers. Cut the rollers to length using a tubing cutter, clean up the inside edge to ensure it fits over the bearing, then bolt the assembly togherer. Use the upper frame to locate the holes you need to drill in the jack wheel handle and then bolt that on. repeat that with the velcro cable holder on the other side.</p> <p>For the box, assuming you are using the waterproof version, use the box held flush against the back of the handle so it isn't obstructing the roller to locate and mark the 3 holes for the plastic screws, and then drill a small pilot hole. Then mount the box using 3 screws</p> <p>Next, drill a 13mm hole in the inside front center hub cover for the slipring. This model IS NOT HOLLOW, but is mild steel. you'll want a really long carbide bit. It drills pretty easily though, and will not affect structure. . Drill a similar sized hole on the back side of the frame. Screw the slipring adaptor into the center hub using stianless screws in the recessed pocket, and then screw the slipring over it, making sure the spinny around part is inside the reel. Route the static wires into the back box. Now glue or tape the potting guide curved section to the back frame.</p> <p>Install the RCA balun in the box and attach to 2 wires. Now fill that compartment with RTV or clear silicon and secure the lid. Install the 3 potting well lids around the screw holes for the box, making sure to use the one with the cable cutout on the bottom, and then fill those 3 sections with RTV or silicon as well. Fill the potting guide curved section as well.</p> <p>Now, assemble the lid by installing the network cable, optional 2 wire ISBL, and and mini usb connectors, and run their respective wires to the fathom board. Mount the fathom board using M3 bolts and spacers, and attach two of the tether wires. When everything is ready to be assembled, run a bead of rtv or silicon around the edge of the box in the gasket groove, then bolt the lid down. Allow to dry for the manufacture recommended duration.</p> <p>Next attach the tether wire to the slipring through the integral spool hole. fill that hole with silicon. if you have some, add some spare ROV float material into the center drum, then attach the lid with silicon and screws to make it theoretically watertight. There will be a future drill interface (for higher speed tether rolling up) and cable wrap section that goes here, but ignore those for now.</p> <p>The last remaining thing is to finish your tether interface. I used 8 pin Seaconn connectors and this cable support grip <a href="https://www.mcmaster.com/#69675k23/=17gw3j1">https://www.mcmaster.com/#69675k23/=17gw3j1</a> along with 3m Scotchcast flexible cable overmold resin to attach the seconn 8 pin micro wetcon section. That allows me to still attach to the kevlar strength member in the ROV cable and tie that directly to structure, but still have a removable tether. There are plenty of other methods as well, so use the connectors and attachments that make sense for you.</p> <h3>Print instructions</h3><h3>Category: Robotics Summary</h3> <p>To build one of these, you will need a Schill Gt380 <a href="http://www.markertek.com/product/schill-gt380/schill-gt380-19x11-plastic-rubberized-cable-reel">http://www.markertek.com/product/schill-gt380/schill-gt380-19x11-plastic-rubberized-cable-reel</a> . They are not inexpensive. You will also probably want the optional solid lid plate and the cable auxiliary ring as shown in my pictures, that adds about $60 more.</p> <p>16 M3 heat set inserts ( <a href="https://www.mcmaster.com/#94180a331/=17gvlmb">https://www.mcmaster.com/#94180a331/=17gvlmb</a> )<br/> a variaty of m3 stainless bolts (should be 12 8mm ones and 4 10mm ones) and 4 12mm M3 botls and nuts for the cable stop. You will also need 4 m3 12mm long bolts and nuts to hold the cable roller and the velcro bit to the jackreel<br/> 6 13mm OD 4mm ID stainless steel bearings. (something like this should work <a href="https://www.mcmaster.com/#7804k103/=17gvmvh">https://www.mcmaster.com/#7804k103/=17gvmvh</a> )<br/> 2 sections of 16MM OD X 13MM ID (1.5MM WALL) 316 SEAMLESS STAINLESS STEEL TUBE X 200MM cut to around 150mm lengths. (Mcmaster carr has them)<br/> 2x 13 mm overall lenght M4 bolts and nuts for the inner bearings and 4x 32mm long M4 bolts and nuts for the rollers<br/> The waterproof one is designed to use 3 small stainless steel plastic screws to attach to the frame.</p> <p>You will need 1 RCA to 2 wire vga balun (well technically 2, since you'll want one on the other end as well) You can optionally just fill that hole in instead if you don't wish to use a secondary camera feed<br/> You will also need 4 m3 bolt sized 1/8" plastic spacer standoff things to move the Fathom board away from the brass inserts.<br/> a 75m to 100m section of blue robotics tether <a href="http://www.bluerobotics.com/store/cables/fathom-tether-nb-4p-26awg-r1/">http://www.bluerobotics.com/store/cables/fathom-tether-nb-4p-26awg-r1/</a> or whichever other cable you would like to use. The cable stop and rollers are sized for that (8mm dia) cable though.<br/> a 6 or 8 wire slip ring of some sort, I used this one:<br/> <a href="http://www.ebay.com/itm/141778020060?_trksid=p2060353.m2749.l2649&ssPageName=STRK%3AMEBIDX%3AIT">http://www.ebay.com/itm/141778020060?\_trksid=p2060353.m2749.l2649&ssPageName=STRK%3AMEBIDX%3AIT</a><br/> For the waterproof version you will also need RTV or clear silicone<br/> a "NETWORK TECHNOLOGIES case side waterproof rj45 connector with jack N cap " (no idea where to get those, I bought one on Ebay Possibly part numbers RJ45-5EWTP-CS-JCK RJ45-5EWTP-CB and RJ45-5EWTP-CAP (this looks to be the same thing <a href="http://www.ebay.com/itm/RJ45-Ethernet-LAN-Network-AP-Plug-Jack-Socket-Connector-8-Core-Waterproof-IP68-/291866258836?hash=item43f495ad94:g:uZwAAOSwFV9Xzo7M">http://www.ebay.com/itm/RJ45-Ethernet-LAN-Network-AP-Plug-Jack-Socket-Connector-8-Core-Waterproof-IP68-/291866258836?hash=item43f495ad94:g:uZwAAOSwFV9Xzo7M</a>)<br/> and a waterproof USB mini cable interface. I actually have another one on the way with the pigtail since I can't find a USB mini male male cable in a short length anywhere. But for now this one worls <a href="http://www.ebay.com/itm/220627320201?_trksid=p2060353.m2749.l2649&ssPageName=STRK%3AMEBIDX%3AIT">http://www.ebay.com/itm/220627320201?\_trksid=p2060353.m2749.l2649&ssPageName=STRK%3AMEBIDX%3AIT</a> (that is for powering the Fathom board, you could also run 2 wires to the battery contact using that hole instead.<br/> Optionally, you can run a 2 wire connector for the USBL system if you have a spare kidney to sell to buy one. I used these connectors. LLT-USA-M14BMR02 <a href="http://www.ebay.com/itm/252493396652?_trksid=p2060353.m2749.l2649&ssPageName=STRK%3AMEBIDX%3AIT">http://www.ebay.com/itm/252493396652?\_trksid=p2060353.m2749.l2649&ssPageName=STRK%3AMEBIDX%3AIT</a></p> <p>Everything should print without support.</p> <p>Assembly:<br/> Insert heat set inserts everywhere that looks like it needs one, using the pictures as guides. Install the bearings in the cable roller sides first, then insert the longer bolts and last 4 bearings for the main rollers. Cut the rollers to length using a tubing cutter, clean up the inside edge to ensure it fits over the bearing, then bolt the assembly togherer. Use the upper frame to locate the holes you need to drill in the jack wheel handle and then bolt that on. repeat that with the velcro cable holder on the other side.</p> <p>For the box, assuming you are using the waterproof version, use the box held flush against the back of the handle so it isn't obstructing the roller to locate and mark the 3 holes for the plastic screws, and then drill a small pilot hole. Then mount the box using 3 screws</p> <p>Next, drill a 13mm hole in the inside front center hub cover for the slipring. This model IS NOT HOLLOW, but is mild steel. you'll want a really long carbide bit. It drills pretty easily though, and will not affect structure. . Drill a similar sized hole on the back side of the frame. Screw the slipring adaptor into the center hub using stianless screws in the recessed pocket, and then screw the slipring over it, making sure the spinny around part is inside the reel. Route the static wires into the back box. Now glue or tape the potting guide curved section to the back frame.</p> <p>Install the RCA balun in the box and attach to 2 wires. Now fill that compartment with RTV or clear silicon and secure the lid. Install the 3 potting well lids around the screw holes for the box, making sure to use the one with the cable cutout on the bottom, and then fill those 3 sections with RTV or silicon as well. Fill the potting guide curved section as well.</p> <p>Now, assemble the lid by installing the network cable, optional 2 wire ISBL, and and mini usb connectors, and run their respective wires to the fathom board. Mount the fathom board using M3 bolts and spacers, and attach two of the tether wires. When everything is ready to be assembled, run a bead of rtv or silicon around the edge of the box in the gasket groove, then bolt the lid down. Allow to dry for the manufacture recommended duration.</p> <p>Next attach the tether wire to the slipring through the integral spool hole. fill that hole with silicon. if you have some, add some spare ROV float material into the center drum, then attach the lid with silicon and screws to make it theoretically watertight. There will be a future drill interface (for higher speed tether rolling up) and cable wrap section that goes here, but ignore those for now.</p> <p>The last remaining thing is to finish your tether interface. I used 8 pin Seaconn connectors and this cable support grip <a href="https://www.mcmaster.com/#69675k23/=17gw3j1">https://www.mcmaster.com/#69675k23/=17gw3j1</a> along with 3m Scotchcast flexible cable overmold resin to attach the seconn 8 pin micro wetcon section. That allows me to still attach to the kevlar strength member in the ROV cable and tie that directly to structure, but still have a removable tether. There are plenty of other methods as well, so use the connectors and attachments that make sense for you.</p>
With this file you will be able to print 3d printed cable roller and waterproof control box for a Schill GT380 reel to turn it into a ROV or robot tether with your 3D printer. Click on the button and save the file on your computer to work, edit or customize your design. You can also find more 3D designs for printers on 3d printed cable roller and waterproof control box for a Schill GT380 reel to turn it into a ROV or robot tether.