3D-Printed Circuit Board v0.2
myminifactory
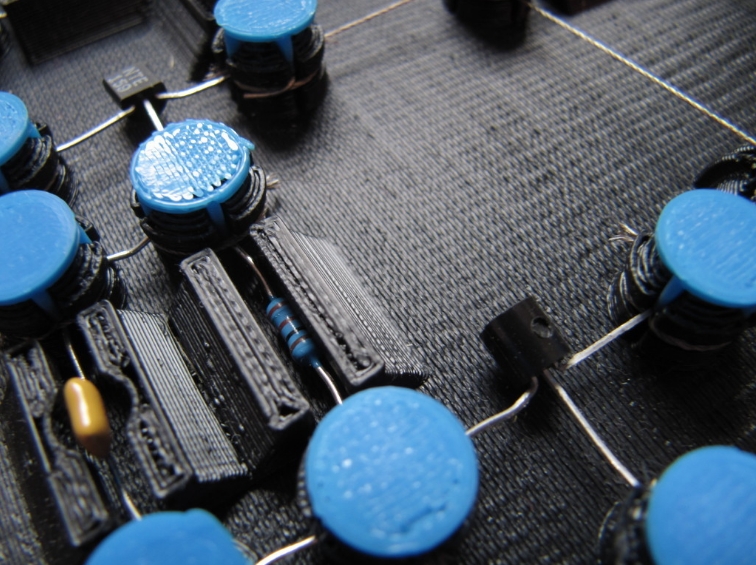
You can support us by visiting our Etsy store! http://etsy.me/16o3ZGE The main goal of this project is to enable the personal creation of simple electronics, especially for Open Source Hardware -- with nothing except a 3D printer, your hands or equivalent, and basic electronic components (capacitors, motors, transistors, etc. - but will eventually include ICs, microcontrollers, etc.). Instead of solder, wires, and breadboards, OpenSCAD generates a peg-board PCB and component holder, and a circuit can be hand-wound together with conductive thread. This code base is intended to replace conventional etched PCBs, initially for very simple applications. Included is a basic feature set, described in the instructions. You can buy a lamp built around this design at https://www.etsy.com/listing/154340925/3d-printed-led-desk-lamp?ref=shop_home_active Also check us out on Facebook: https://www.facebook.com/carry.the.what.replications! Detailed instructions for use can be found on http://www.instructables.com/id/3D-Printed-Circuit-Boards-for-solder-free-printab/, as part of the Make-It-Real Challenge (so your vote would be greatly appreciated!). If you want to practice your trace wrapping, and would rather build something useful, I'd suggest building the LED Flashlight http://www.thingiverse.com/thing:22052 or Desk Lamp http://www.thingiverse.com/thing:27389! Tools and Materials Currently, it has only been thoroughly tested on the MakerBot Replicator, with ABS plastic. Support for Up! is coming soon (but different tolerances prevent immediate support). I have tried several types of conductive thread, and the best so far (by a wide margin) is http://members.shaw.ca/ubik/thread/order.html I also suggest some fine tweezers & tiny scissors, for circuit wrapping and placing components. Software Programming was done in OpenSCAD. To use the library with OpenSCAD, download the .scad file, put it in the same folder as your file, and place at the top of your file an include statement for 3D-PCB.scad You will also need to use the MCAD library: https://github.com/elmom/MCAD I have found success arranging components in grids, in multiples of 'get_component_distance()', which is a standardized distance between pegs. Overlapping pegs between components allows you to save thread and time. Print the parts with standard replicator defaults or equivalent, with no raft and no support, in the proper orientation (as uploaded). Alternatively, you can also place components free-hand. Either plot it out in OpenSCAD, or import the components in Blender -- but try to maintain roughly the same orientation for printing. Detailed instructions for use can be found on http://www.instructables.com/id/3D-Printed-Circuit-Boards-for-solder-free-printab/, as part of the Make-It-Real Challenge (so your vote would be greatly appreciated!). Primary feature set: -- power components: by default only 1, but support for multiple in series -- battery holders: AAA(count = 1), AA(count = 1), button cell(count = 1) -- component holders: capacitor(diameter = 5.5), LED(diameter = 5), 2 LEDs(diameter = 5), resistor(), transistor() -- and tie it all together: base_board(length, width, thickness), peg(peg_height = 5, slot_width = 0.8) // start and end point for traces, peg_cap() // end cap for peg, print separately, SPST_slide_switch_base() // base structure of slide switch (place this), SPST_slide_switch_toggle() //sliding structure of switch, print separately, trace_hop() //for when traces cross, give two separate channels at 90 degree angle -- functions for placing: this is the distance between the center of any component and their pegs. currently limited by width of slide switch -- get_component_distance() = 13.5 Contribute For the most up to date code, or to contribute directly to the project, https://github.com/CarryTheWhat/3D-PCB To contribute indirectly, visit www.carrythewhat.com for our Etsy store and other info. Remixed From 3D-Printed Circuit Board library (solder-free) by CarryTheWhat 3D-Printed Circuit Board v0.2 by CarryTheWhat is licensed under the GNU - LGPL license
With this file you will be able to print 3D-Printed Circuit Board v0.2 with your 3D printer. Click on the button and save the file on your computer to work, edit or customize your design. You can also find more 3D designs for printers on 3D-Printed Circuit Board v0.2.