3d printed frames for a Blue Robotics Bluerov 2
prusaprinters
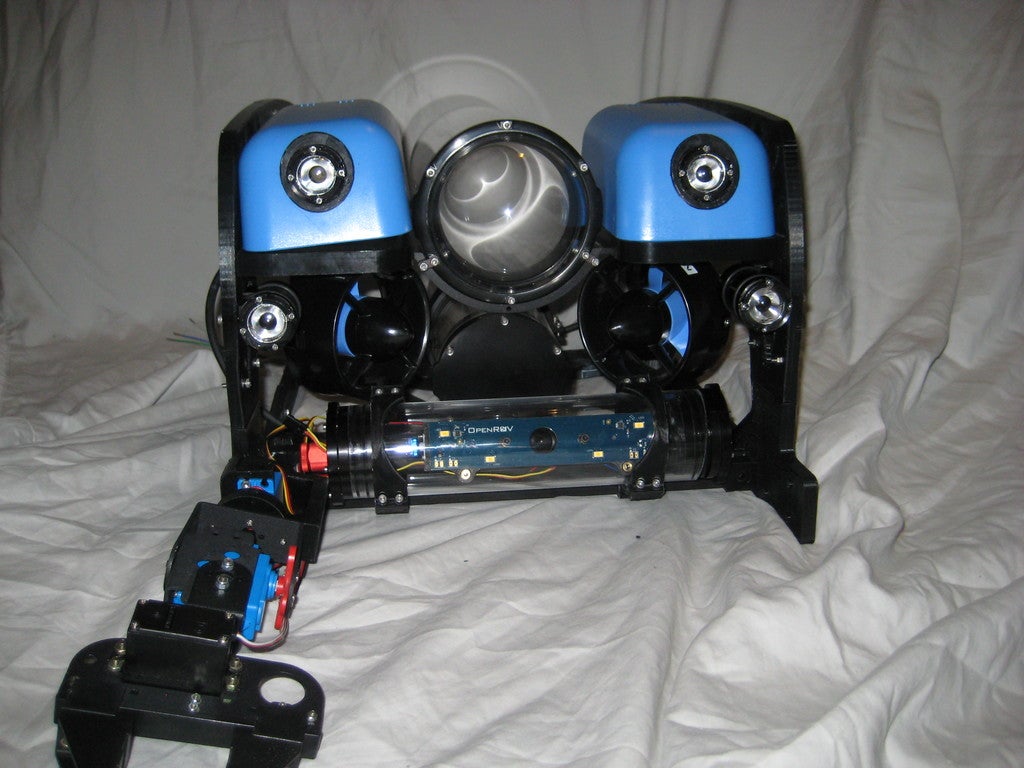
<p>This project contains a set of 3d printable main side frames and lower frame for a BLue Robotics Bluerov 2 Remote underwater Vehicle <a href="https://www.bluerobotics.com/store/rov/bluerov2/">https://www.bluerobotics.com/store/rov/bluerov2/</a> At the time I created these STL copies of the real frame you were unable to purchase the frame components separately. That has since changed and you can purchase the entire frame or any components from the Blue Robotics store as needed. I also did not create the mid frames in STL form as I was able to source them separately.</p> <p>The main frame segments are not my design. All rights, including copyright and trademark remain with Blue Robotics Inc. They have graciously allowed me to post these here so that others may use them (<a href="https://discuss.bluerobotics.com/t/3d-printed-bluerov-2-frames/2295">https://discuss.bluerobotics.com/t/3d-printed-bluerov-2-frames/2295</a>)</p> <p>The exception is the lower frame segments, robot arm mount and lightbar components. Those are my design.</p> <p>Instructions: You will need a large 3d printer to print most of these. I sized them to fit on a Taz 300mm bed. They may fit others. Print them out of the strongest plastic you can print, at the highest infil your machine is capable of (air voids + deep ocean pressures = bad). When finished, join them with marine epoxy, and then paint them with an epoxy based waterproof paint.</p> <p>The robot arm, light bar mounts and other items remain a work in progress. The intent is that the lightbar is split off the main housing camera tilt servo, and an auxiliary arm viewing camera is mounted offset in the center. The housing LED pieces extend into the float foam, however there is sufficient room in the foam covers to still retain and install that foam. the 3d printed frames in ABS are buoyant anyways, so you may find you need to add more weight than stock.</p> <p>For assembly of the ROV, other components and instructions, check out the blue robotics store. It is in my opinion the most accessible "pro" grade ROV available to the hobbyist in manageable part cost chunks. As you can tell by my other projects I tend to use a fair amount of their hardware. It works really well though. And the cost is reasonable compared to alternatives.</p> <h3>Print instructions</h3><h3>Category: Robotics Summary</h3> <p>This project contains a set of 3d printable main side frames and lower frame for a BLue Robotics Bluerov 2 Remote underwater Vehicle <a href="https://www.bluerobotics.com/store/rov/bluerov2/">https://www.bluerobotics.com/store/rov/bluerov2/</a> At the time I created these STL copies of the real frame you were unable to purchase the frame components separately. That has since changed and you can purchase the entire frame or any components from the Blue Robotics store as needed. I also did not create the mid frames in STL form as I was able to source them separately.</p> <p>The main frame segments are not my design. All rights, including copyright and trademark remain with Blue Robotics Inc. They have graciously allowed me to post these here so that others may use them (<a href="https://discuss.bluerobotics.com/t/3d-printed-bluerov-2-frames/2295">https://discuss.bluerobotics.com/t/3d-printed-bluerov-2-frames/2295</a>)</p> <p>The exception is the lower frame segments, robot arm mount and lightbar components. Those are my design.</p> <p>Instructions: You will need a large 3d printer to print most of these. I sized them to fit on a Taz 300mm bed. They may fit others. Print them out of the strongest plastic you can print, at the highest infil your machine is capable of (air voids + deep ocean pressures = bad). When finished, join them with marine epoxy, and then paint them with an epoxy based waterproof paint.</p> <p>The robot arm, light bar mounts and other items remain a work in progress. The intent is that the lightbar is split off the main housing camera tilt servo, and an auxiliary arm viewing camera is mounted offset in the center. The housing LED pieces extend into the float foam, however there is sufficient room in the foam covers to still retain and install that foam. the 3d printed frames in ABS are buoyant anyways, so you may find you need to add more weight than stock.</p> <p>For assembly of the ROV, other components and instructions, check out the blue robotics store. It is in my opinion the most accessible "pro" grade ROV available to the hobbyist in manageable part cost chunks. As you can tell by my other projects I tend to use a fair amount of their hardware. It works really well though. And the cost is reasonable compared to alternatives.</p> <h3> Print Settings</h3> <p><strong>Printer Brand:</strong> LulzBot</p> <p><strong>Printer:</strong> TAZ 5</p> <p><strong>Rafts:</strong> No</p> <p><strong>Supports:</strong> No</p> <p><strong>Resolution:</strong> 0.5mm nozzle in push plastics ABS</p> <p><strong>Infill:</strong> literally as close to 1005 as you can get it so your frame doesn't implode under pressure.</p> <p><strong>Notes:</strong></p> <p>Any other project advising you to print at 100% you could probably ignore and print it at a lower infil and get away with it. If you plan on actually using your ROV, please do not do that. If you go below about 100 feet, any air bubbles inside will compress, suck water into the voids, and most likely blow your layers apart. You can compensate for that a little bit with a very thick coat of epoxy over the surface, but why risk it?</p>
With this file you will be able to print 3d printed frames for a Blue Robotics Bluerov 2 with your 3D printer. Click on the button and save the file on your computer to work, edit or customize your design. You can also find more 3D designs for printers on 3d printed frames for a Blue Robotics Bluerov 2.