3D Printed & Laser Cut, Lil-CNC Mill ACv2
thingiverse
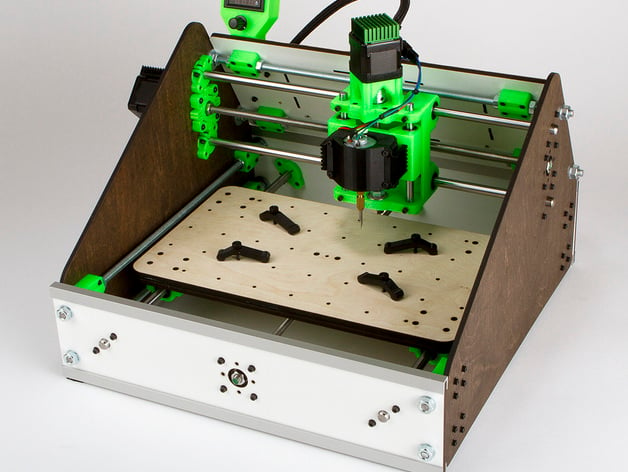
This is a great little desk top, CNC 3 axis mill re-worked from Instructables: http://www.instructables.com/id/3D-printed-CNC-mill/ Not much bigger than an All-In-One printer, this little mill can etch most materials, including etching the copper off of PCB's. It can also cut, drill, mill, most soft, and some medium density materials. While its not very fast, its amazing what it can do, especially considering how light on the pocketbook it is to build. And if you want it to do more,. upgrade the spindle motor, add some side stiffeners, and swap out the all thread for precision acme threaded rods. Not only that, but the design is fairly scale-able with out having to re-print parts, though you would have to re cut the laser cut parts, and get longer rods. Watch the mill etch this Hello World logo into acrylic: https://youtu.be/zjgG0tTBYeQ The square border around the Hello World Open Hardware logo I designed is 40x40mm, making it a great little first etch image for X, & Y movement calibration. The text, at its tallest ~4mm tall. The cutting bit used was a 25deg, 0.3mm flat tip engraving bit. This re-work is 100% backwards compatible with the original laser cut frame provided on the instructable, though a few of the small M3 hardware bits have changed in count & length. If you'd like a kit printed on the printers that the parts where designed on (~30 hours of printing) I now sell printed parts kits on eBay in various colors! Cherry Red - http://www.ebay.com/itm/252043471429 Navy Blue - http://www.ebay.com/itm/252052107810 Black - http://www.ebay.com/itm/252052101200 Neon Green - http://www.ebay.com/itm/252029615065 http://www.ebay.com/usr/myopen3d For more detail check out the instructable @ http://www.instructables.com/id/3D-printed-CNC-mill/ Instructions Update 7/5/2015 - Fixed slicing issues with Motor Stand Off stl Update 7/9/2015 - Added density to X carriage side walls to improve stiffness and durability. Update 7/20/2015 - Strengthened midsection of X 12mm Linear Bearing Sleeve (This is mostly for pre assembly strength, once assembled mod becomes a moot point). Update 7/20/2015 - Divided the motor mount into two different size options to accommodate different 550/560 motor shielding thicknesses. Update 8/2/2015 - Added material float clamp for PCB etching. Update 9/20/2015 - Replaced the two unique Motor Standoffs with one universal Motor Standoff. Also raised the access area a bit on the standoffs to allow for better tool access. Update 9/21/2015 - Added ridges inside of the 'ToolSlide' to help keep linear bearings locked in place after multiple hours of use. Update 11/9/2015 - Moved the Backlash Nut Holder holes on the X carriage off center to make them easier to access for maintenance. Enlarged the 12mm Rod Clamp holes to 12.2mm for easier assembly. All parts are designed to print successfully with a 0.4mm nozzle @ 0.28-0.3mm layer height. Over all expect ~ 28 hours of print time. PLA vrs ABS: both ABS and PLA have strengths and weaknesses, and both have temp and compression warp issues, in some cases ABS is even worse than PLA when it comes to compression warp. However what i have come to find true is a simple rule of thumb that so far has treated me very well on both CNC mills and 3d printers. Where heat is in direct contact, print with thick ABS, where structural stiffness is crucial, print in thick PLA, and if the part has neither of these challenges, print in lite, to medium density PLA. ABS Parts: 37mm SpindleMotorMount & Table Clips 4 Perimeters, 3 Top 3 Bottom Solid Layers, @ 40-50% honeycomb infill. Medium Density PLA Parts: 608zz Spring Bearing Block & Spindle Motor Control 2 Perimeters, 2 Top 2 Bottom Solid Layers, @ 35% honeycomb infill. (The spring bearing block can be done at 2 or 3 perimeters dependent on the flexibility of your PLA, you want the springs to be strong, but just a little flexible) All Other Parts. Thick PLA: 4 Perimeters, 3 Top 3 Bottom Solid Layers, @ 40-50% honeycomb infill. The number of times you need to print each file is appended to the file name, example: "_x3.stl" Linear rod holes are intentionally designed to be overly tight, and may need some light sanding, but don't over sand, you want those rods jammed in there nice and tight, because any wiggle whatsoever will degrade the accuracy of the CNC. The Z linear rods are held in using M3 melt in brass inserts available at mc master carr, these have been chosen for un-paralleled holding strength in plastic. but they do require a special soldering iron tip to install. Do not cut open the set screw hole directly to the rods, the set screw is designed to push the thin plastic wall (behind the set screw) into the rods, and not have the screw touch the linear rods themselves. All parts are designed to print without additional support structure, But I have used a few M3 nut slots that need support structure (already built into the parts) dug out before inserting the nut. this can be done easily with a micro flat head screwdriver, or an exact o and some needle nose pliers. For absolute X carriage rigidity, after fitting the parts, put some epoxy in between the X carriage and the two X 12mm Linear Bearing Sleeves, just a little dab in the corners will do. But do not glue the Backlash Nut Holder's in place, you may find you need to adjust them a micron or two to get the generic all thread to rotate smoothly (the biggest challenge of the build). Three 608zz Bearing block options are included, you will only need one set. If you choose to use my printed motor standoffs you will need to use either the "spring" or "solid" bearing blocks (spring if your all threads for linear motion aren't absolutely perfectly straight) otherwise, if you choose to build using the brass motor standoffs suggested on the instructable you will need to use the standard bearing blocks only. These parts are slightly different from the ones shared on Instructables: http://www.instructables.com/id/3D-printed-CNC-mill/ But the build is essentially the same
With this file you will be able to print 3D Printed & Laser Cut, Lil-CNC Mill ACv2 with your 3D printer. Click on the button and save the file on your computer to work, edit or customize your design. You can also find more 3D designs for printers on 3D Printed & Laser Cut, Lil-CNC Mill ACv2.