3D Printed & Lasercut Thermoforming Machine
thingiverse
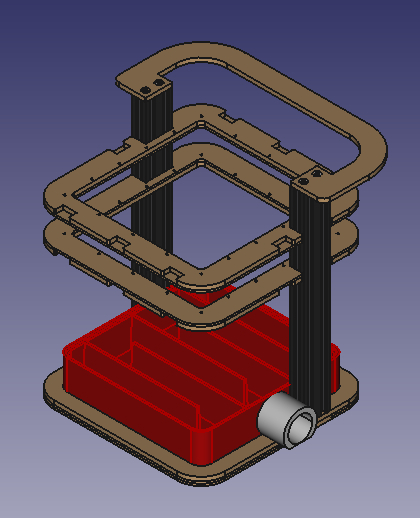
I was looking for a quick project to learn some FreeCAD, so when I saw the desktop thermoformer by MELKANO that was lacking some laser cut files and was supposed to be open source only to contain difficult-to-edit stl files, I figured this was a good place to start. The things you will find differently here are as follows: 1. You'll find the original 8 stl files, but renamed to make sense and in English (removed 2 of the carrier files as there were 2 of the tops and 2 of the bottoms and both models were the same when overlayed) 2. You'll find a zip containing .svg cut files for all the wood and/or acrylic components 3. You'll find a zip containing the FreeCAD files of all the components required for assembly AND a FreeCAD assembly of the thermoformer (I'm not adding 36X wood screws tho, so you can figure out where those go by process of elimination) 4. A lighter-weight vacuum chamber box for 3D printing (reduced plastic use by about 20%) 5. You'll find a purchased parts list below. 6. You'll find a list of required laser cut or machined parts below the purchased parts. 7. You'll find written assembly instructions below the laser cut parts list. Purchased parts: 2X 2040 Aluminum Extrusion. I used 300mm long pieces. Feel free to go +/- 50mm. This determines the height of your device. 4X M5 x 30mm Stainless Steel Flat Head Screws 4X M5 x 25mm Stainless Steel Flat Head Screws 6X M5 x 16mm Stainless Steel Flat Head Screws 6X M5 Hex nuts 36X #6 x 3/8" Lg. Wood Screws (to hold the Carrier top and bottom together) An M5 standard tap and some way to twist it if you don't already have one A 90 degree countersink for wood (not strictly required, but it will make everything look nice by making the screw heads flush) Laser Cut Parts: Base - Cut from 6mm / 1/4" wood Base Spacer - Cut from 6mm / 1/4" wood Top Frame - Cut from 6mm / 1/4" wood Orifice Plate - Cut from 3mm / 1/8" wood OR Acrylic 2X Carrier Bottom - Cut from 3mm / 1/8" wood 2X Carrier Top - Cut from 6mm / 1/4" wood Assembly Instructions: 1. Tap ALL of the round holes in the ends of the 2040 using an M5 tap, full-thread at least 25mm deep (1 inch deep). 2. Attach the Vacuum Chamber to the Base using the 6X M5 x 16mm screws and nuts. Nuts go on the inside of the chamber, flat heads go in from the bottom of the base part. 3. Stack the Base Spacer on top of the base and around the Vacuum Chamber. Ensure the holes for the 2040 screws line up. 4. Screw the 2040 vertically to the Base/Base Spacer stack using 4X M5 x 30mm screws 5. Attach the Top Frame to the top of the 2040 using 4X M5 x 25mm screws 6. Assemble 2 Carriers. Each carrier uses 1X Carrier Top, 1X Carrier Bottom, and 18X #6 wood screws.
With this file you will be able to print 3D Printed & Lasercut Thermoforming Machine with your 3D printer. Click on the button and save the file on your computer to work, edit or customize your design. You can also find more 3D designs for printers on 3D Printed & Lasercut Thermoforming Machine.