3D Printed Tool WristBand
thingiverse
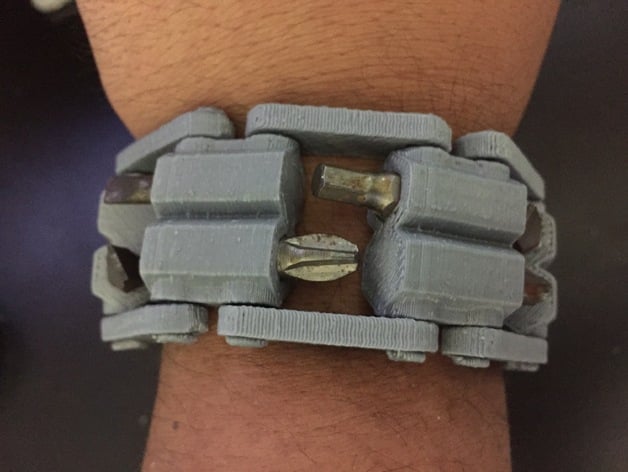
Because people don't know how to abide by creative licenses, give credit, not sell for profit, compete with me on etsy.. I'm deleting all my 3D models and stamping the ones that remain. unless thingiverse starts taking legal action or starts protecting designers. This seems like the only solution. Sorry guys Please do me a favor vote for me at this instructable contest http://www.instructables.com/id/3D-printed-Tool-WristBand-w-minimal-assembly/ 3D print an entire tool wristband in one or two print jobs. No screws or much assembly required. Save your self 200-500 dollars Instructions http://www.instructables.com/id/3D-printed-Tool-WristBand-w-minimal-assembly/ So i saw similar product on the market for 200 - 500 dollars on the internet. Not even sure is available for sale but i'm not sure if i want to drop that much money if i can make one myself. So i went to work on my computer, drafted some 3D files, 3D printed some prototypes. However, the initial prototype i printed required screws and some assembly. I could have gone to home depot and bought some screws but why should I? so maybe I could 3D print some screws and glue them in place. But it hit me.. I could 3d model the screws in place and i could 3D print the entire thing all at once. So i went back to the drawing board and 3d model the whole thing. I also placed each link in a manner that maximizes the way it prints. This method pretty much allows me to print the entire bracelet all at once. The only reason i don't print the second part of the clasp all at once because i want to print it sideways to increase strength in the direction i wanted. I think i used 50% infill or less to keep the print strong and in the lighter side. I reduced the support to the minimum but i think you can 3d print the entire thing without support but dont quote me on that. I picked the screw bits i wanted to use and had them ready for when the print comes out. So here is the trick.. You have to be there when the print finishes and it still warm. start putting the screw bits into place while it still warm and do it quick or you will have to use a heat gun This will be the easiest part but it will get a little complicated when you put the other half of the bits. Remove the bracelet from the print bed and one by one heat up the hole and insert the screw bit into place. Once you have all the screw bits into place 3D print the clasp.. and glue into place with the rest of the bracelet. if the clasp is a little too lose heat it up and squish it to make it tighter.
With this file you will be able to print 3D Printed Tool WristBand with your 3D printer. Click on the button and save the file on your computer to work, edit or customize your design. You can also find more 3D designs for printers on 3D Printed Tool WristBand.