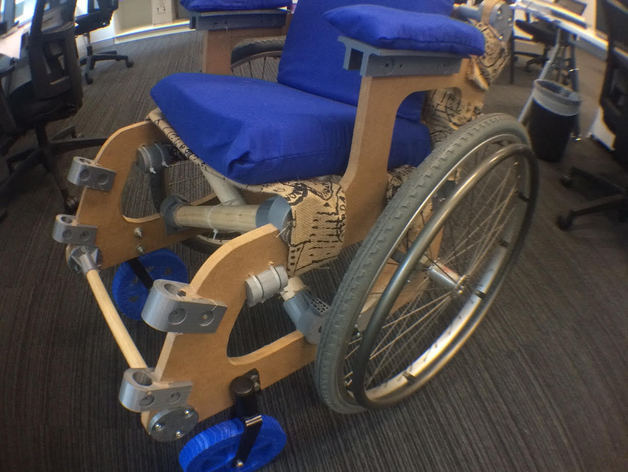
3D printed wheelchair. I call it the HU-GO
myminifactory
I decided to create this wheelchair because I have used one before due to my own illness, I was a Sydney 2000 Olympic volunteer and part of my job then was to help people that are a different kind of perfect move around the Olympic park.we even received training how to operate a wheelchair during the induction. I have been 3D printing many things and for many people over the last 3 years and I think is time I begin to design/make something for a noble cause. So, I thought I should pay it forward and create one that anyone in the world could make and assemble with a very common cheap parts. I visited my country of Birth Chile a few months ago and I saw first hand how 3D printed parts for different kind of perfect people could transform their lives but sadly they didnt know where to go to get their needs met or that it could be very cheap. I strongly Believe that everyone in the world deserves to be able to move about and a wheelchair should not be a luxury item for the few/well off. It should be a tool that anyone should have access to use. I would love for a school to take this up and make it into a formal design project. I see this project divided into 4 phases. Drawing/DesignWoodworkTextiles3D printing Textiles:The sawing of the cushions and armrests plus the support of these onto the wheelchair itself Woodwork:The frame, cutting the MDF from a template, sanding, painting, drilling holesLearning how to measure, cut holes with drill, use of jigsaw. 3D printingPrinting the bits and checking for tolerances. This is a lovely thing a friend does for a mate but it should not have to be this hard!! http://laughingsquid.com/chinese-student-piggybacks-his-disabled-friend-to-class-for-three-years-so-he-wouldnt-miss-out-on-his-education/ The material list will be like this: (will be adding more as I need it) -Plywood/MDF 16mm thick-roll of plastic (1 kilo exactly is what will be needed to print all the components!!)at the end I will rename each part so it has its weight in grams in case you are wondering if you have enough.-zip ties (to support not load bearing components instead of using nuts, bolts and washers which are heavier and more expensive ( I used these for the seat support beam ends)-rods 'broom sticks' of two sizes (50mm for cross bracing and 20mm for the others)-nuts and bolts (will specify how many, what type, size, lenght,etc)-paint (because the frame is kind of chunky a nice vibrant happy colour would be great (I will do version 1 in red because it will go faster)-2 old/new long 'socks' for the arm rests fabric for the seats (I was thinking flour bags) and or old tshitstools required -Jigsaw-drill (hand held or electric)-screwdriver-spanner (will specify size)-access to a 3D printer-access to needle and thread-pair of scissors and a bit of room to make it. (I live in a small apartment so my workshop was my balcony which I had to leave everytime my little dog needed to go to the toilet, he is shy and doesn't like to go when there are people watching), so a little more room would be best and a bench/table would be great to have too. finally, I dont like the term disabled so instead I replace it with "a different kind of perfect" which I got from here (its far nicer) http://themighty.com/2015/04/the-term-that-describes-my-daughter-better-than-special-needs-or-disabled/ note: I have started to put PDF's now.once I do the frame today, I will make a cad file of it in PDF and DWG and STL in one piece so that maybe someone with a laser cutter machine big enough can cut it automatically. also when the frame is done i will assemble it and begin to take photos of the real thing!!!! This project has taken a great amount of time, effort and resources to design and build.(As you know any prototype is expensive at first, I am happy to wear the costs)My purpose is to share it with the world for free, however a small contribution would be a huge help to continue its development.please go here and help me if you believe in this worthy cause.https://www.paypal.me/justonedollar My dream would be for this project to be copied by someone like IKEA and mass produce this flat packed and shipped wherever these might be needed as part of help that countries offer one another. Anyone with questions or help, done hesitate to send me a message and I will endeavour to reply ASAP.Also if anyone would like to donate a 3D printer for this cause don't hesitate to get in touch with me.It doesn't even need to be big or fancy, i can modify the wheelchair parts to fit their built area. you would be doing a great thing.
With this file you will be able to print 3D printed wheelchair. I call it the HU-GO with your 3D printer. Click on the button and save the file on your computer to work, edit or customize your design. You can also find more 3D designs for printers on 3D printed wheelchair. I call it the HU-GO.
