3D Printer audible bed leveling tool
thingiverse
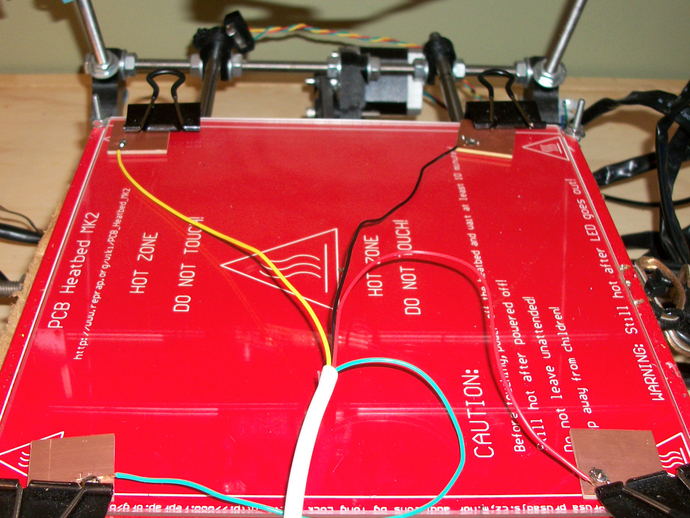
The Koehler audible bed leveling tool. Tired of painful exacting bed leveling? Try this for a quick painless method. All parts are available from your local radio shack for less than 15 dollars. Use with thing 97151 to get your bed just right. You will need: Piezo buzzer 3-20v pn 273-059 Gator clip (large enough to attach to your hotend) PCB (copper clad board) cut into four pieces 22 ga wire (8 -12 ft) 4.7k ohm resistor power source (9v battery or molex 4 pin for atx power supply connection. I prefer a 9v battery as some ATX power supplies will trip the breaker shutting down your power supply) power supply connector depending on your preference of power supply. I personally use small gator clips to allow multiple options for power sources. 4 bulldog clips (if you use a glass bed you already have the ones you need.) Instructions Cut PCB (copper clad board) into four 1â€x1†squares. Solder a length of wire (12â€) to the top of each PCB square. Combine all four wires together and attach to a fifth length of wire (2 – 5 ft). Solder piezo buzzer to opposite end of fifth wire. Solder second wire from piezo buzzer to power supply connector. Cut sixth wire to approximate length of first wire assembly. Attach gator clip to sixth wire. Solder 4.7k ohm resistor to opposite end of sixth wire. Solder opposite end of resistor to second power supply connector. Polarity matters here so test the connection by switching + and – for loudest buzzer sound first. You’ll know when you have it right. Attach power supply connector to your chosen power supply Test by touching gator clip to each PCB square. Attach gator clip to metal section of hotend. Using bulldog clips, Mount the four PCB squares to the corners of your heat bed. Make sure the PCBs sit flush to the heat bed. Very important!! Clean the bottom of your hotend tip with a cloth and acetone to remove all filament. Only the lowest part of the tip matters. Do not file or sand the tip of your hotend unless you want to alter it’s performance. Move your hotend and heatbed to center tip above first PCB square. Adjust your spring retaining nut until the buzzer sounds. Go corner to corner and adjust your leveling springs until your bed is right where you want it. It may take a few times around to get it just right. I find that using this technique gives me an accuracy of 0.004mm. As good as it gets for me in less than 5 min. I recommend doing this with your heatbed at temp. You would be surprised at the difference. Also remember to orient your glass the same way each time. Its all about the details. Enjoy the rest of your day printing rather than fighting your heatbed using mechanic methods.
With this file you will be able to print 3D Printer audible bed leveling tool with your 3D printer. Click on the button and save the file on your computer to work, edit or customize your design. You can also find more 3D designs for printers on 3D Printer audible bed leveling tool.
