3D Printer Enclosure PVC - Any Size, for plexiglass, wood, or combination panels
thingiverse
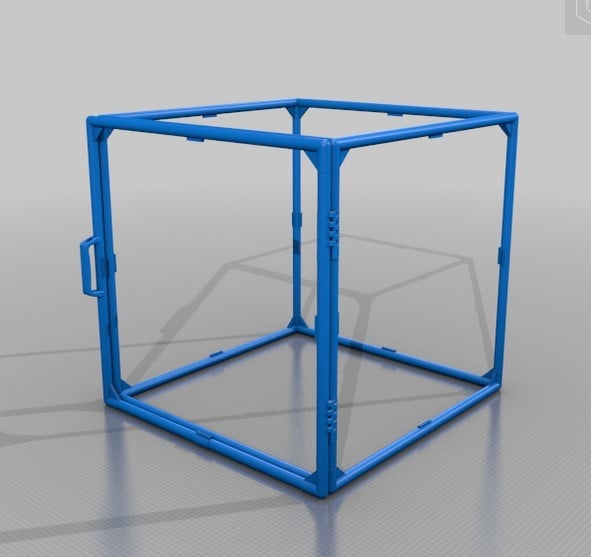
This customizable DIY kit consists of various printable joints and other common parts to make a relatively inexpensive printer (or other device) enclosure of almost any dimensions, using 1/2 inch US standard PVC pipe as its main frame members. These parts were based on my generic US 1/2 inch PVC connectors kit at: https://www.thingiverse.com/thing:4851014. The joints include two design options for its walls, and these can be mixed for some plexiglass walls and others of wood: 1) .1 inch retainer slots for .093 PLGA clear plastic panels, available at most US big box home improvement stores. Compatible Home Depot Plexiglass Panels: 18x24: https://www.homedepot.com/p/OPTIX-18-in-x-24-in-x-0-093-in-Clear-Acrylic-Sheet-Glass-Replacement-MC-05/202038047 30x36: https://www.homedepot.com/p/OPTIX-36-in-x-30-in-x-093-in-Acrylic-Sheet-MC-06/202038044. Cut in half for 2 @ 18x30 24x48: https://www.homedepot.com/p/OPTIX-24-in-x-48-in-x-093-in-Acrylic-Sheet-MC-13/202038048. Cut in half for 2 @ 24x24 36x48: https://www.homedepot.com/p/OPTIX-36-in-x-48-in-x-093-in-Acrylic-Sheet-MC-09/202038045. Cut in half for 2 @ 24x36 2) .125 inch wood cabinet paneling, generally only the back due to lighting limits of using wood panels for sides, but parts are provided for .125in other walls as well, if you are willing to sacrifice lighting or plan to install interior lights. With these .125" connectors, you could also mount cardboard on some walls instead of using wood panels, and/or stretch plastic sheeting around some or all of the other walls and door(s). In that case, you would probably also be able to eliminate all or most of the panel supports. Compatible .125 inch wood paneling: https://www.homedepot.com/p/Hampton-Bay-Hampton-0-125x34-5x23-25-in-Base-Cabinet-End-Panel-in-Unfinished-Beech-KASKB35-UF/302980492. I will be using some of this material for the back wall of my own prototype enclosure because I will be drinlling holes for power cord, and also for mounting a fan and possibly a filter system for printing ASA and ABS. Before anything else, start your planning based on your printer's size and the available and/or needed table space and height. For example, my largest printer sits on a 24 deep x 34 wide Habitat REStore repurposed kitchen cabinet, with lots of available height, and my printer, plus a little extra space at the top, needs a minimum height of 32" which I am going to increase to 36" to allow for in-cabinet filament spool storage. So allowing for 1" per corner for the PVC diameter, the maximum panel sizes are 22" x 34" (front and rear), and 32" x 34" (sides). The fixed back will get those full sizes. This enclosure will ave two doors for better access to the printer. Both front and one side will have inset doors, reducing each of their panel sizes by 1" more inch on each side. I want to hinge the side door to swing up and out of the way, and don't want the swing-up section to be more than 24" tall, that side will get two panels, one 22" x 30" for the inset door, and one 8" x 32" for a fixed section above the door. The front door will be one 22" x 34" panel, because it will swing to one side. For symmetry on both sides of the enclosure, I will mirror the non-door side with the door side, with one 24" x 32" fixed lower panel, and a 8" x 32" fixed upper panel. This planning tells me I should buy 2 @ 36" x 48" plexiglass panels plus 1 @ 36" x 24" .125" wood cabinet panel for the back. These will be cut as follows: 20x32 front door, 22x30 side door, (total 44), then 24x34 for the side without a door, and 2 @ 8x32 for small fixed panels at top of both sides (total 40). Because the final door frame dimensions may vary from plan by up to 1/4 inch due to hinges and gaps for proper door swing, their panels will be cut and assembled last, after the rest of the enclosure is completely assembled and the door frames also built and assembled. Other than doors, purchase and cut your plexiglass to size while your selected and required connectors are printing. For purpose of illustrating the possibilities for required parts selection, I am including two examples of completely assembled enclosures, one a basic 20x20x24 inch that should work for most basic smaller printers, and a larger one, 24w x 34d x 36h with 2 doors, which would be suitable for larger printers, like CR10 and Longer LK4/LK5 Pro, with room for a top mount spool holder for direct feed setups and for internal filament storage. You should be able design an enclosure with just about any combination of dimensions with the included stl files. The enclosures are intended to use 1/4" plywood or panel board for their roof and floor. Use of a sturdy roof is recommended if you intend to mount or store spools of filament on top. However, installing a floor at all is completely optional. If used, those would be attached to the top and bottom of the printed corners by pre-drilling and using standard 1" or 1-1/4" drywall screws. If you plan to use a direct feed from the top, and need a filament spool mount for this enclosure, or for any enclosure for that matter, see my US 1/2" PVC Framed Spool Holder kit at: https://www.thingiverse.com/thing:4878164. Updates: 2021-05-09: Moved door from inset to outside front of enclosure. Added photo (screen shot) of prototype enclosure. Major update to assembly instructions. 2021-05-11: Improved cylinder shapes from 20 to 120 sides for much better roundness and smoother finish. Larger file sizes but not much longer print times. Not all printers will be able to replicate this degree of roundness accurately. Reducing layer height to .1mm could help, but would also add significantly to print times. 2021-05-12: Added special corner connectors and panel supports for back wall of .125 (1/8") wood paneling, and updated parts lists accordingly if you want to use that option. 2021-05-23: Changed door handle print orientation for better print quality and fewer supports. 2021-05-25: Updated Summary and added links to HD plexiglass compatible with this kit. 2021-05-28: Added several additional parts for wood panels on sides as well as back. Rename some parts to more clearly show Plexiglass (pg) and Wood (wd) applicability. 2021-05-30: Added example of large enclosure with two inset doors. For viewing and assembly reference only! Not for printing! Updated Summary and other instructions and parts list for the two example enclosures (small and large) per parts that were renamed.
With this file you will be able to print 3D Printer Enclosure PVC - Any Size, for plexiglass, wood, or combination panels with your 3D printer. Click on the button and save the file on your computer to work, edit or customize your design. You can also find more 3D designs for printers on 3D Printer Enclosure PVC - Any Size, for plexiglass, wood, or combination panels.