3D Printer Enclosure Reach 3D
thingiverse
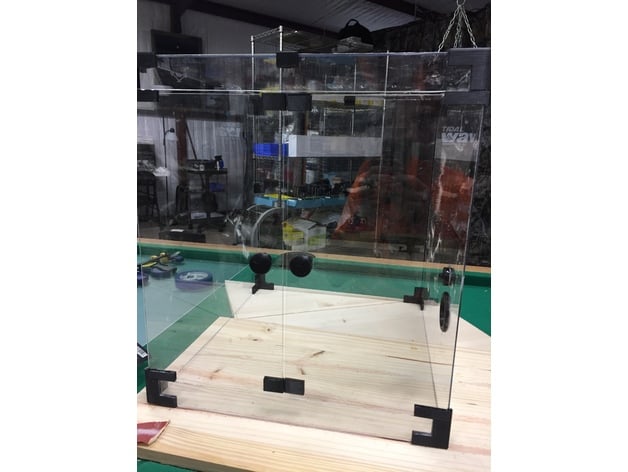
I needed an enclosure for my 3D printer and these 2 gentlemen had parts in their files that worked perfectly for this build so I do believe appropriate credit is due there. I designed additional files to complete my printer which is found here. Along with the files I used from elkayem's and schlem's projects. Print Settings Printer: Reach 3D Printer Rafts: Doesn't Matter Supports: Yes Resolution: 0.2 Infill: 20% Notes: Most everything you can print with 0.2mm layer height. However some of the more detailed pieces like my knob and 2" Port might want to use 0.1mm layer height to get the detail. Post-Printing Hardware Needed: A wooden board for Base. It does not matter what size board, as long as it meets your width and length requirements for your enclosure. I used a 1/2" finished plywood. Wood Screws #10x3/4 pack 2mm metal rod for door hinges. (Found at any crafts or hardware store) Plastic Weld Epoxy. Neodymium magnets 4x4mm x8 (For door latches and back plates) M5x10 x8 M5x20 x2 For knobs M5 washers 8-16 (1-2 per bolt per bracket to mount your Reach to the base.) M5 T-Nuts Rubber feet for the bottom of the board x6 (Optional, but on my build the screws came out the bottom a hair. The feet helped a lot. The pack came with 6) Printed Pieces: 2x Top Back Corners 2x Top Front Corners 4x Top Sides 2x Bottom Back Corners 2x Bottom Front Corners 2x Sides 4x Door Hinges 2x Left Door° 2x Right Door° 1x 2" Port and Ring 1x Swivel plug for Bowden Tube 1x Vent 8x Plexi Mounts for securing your enclosure to the wood base 4x Printer brackets to secure the Reach3D to the base. (If you use a different printer, you will need to design appropriate brackets for that printer. Or let it free stand.) 2x Knobs for doors (I designed the Triforce on these knobs. You can use whatever knob you like) 2x Back plates Even though I called these Left and Right Door, they are in fact both used on each door. E.g. the Left door uses Left Door on top and Right door on bottom and same for Right door where Right Door is on top and Left Door is on bottom. Assembly: The beauty about this project is, the size is variable. You print the same pieces out and you cut your plexiglass pieces to the lengths you need them and it assembles to that size. Once you have printed and gathered all your pieces you need, and cleaned out all support and all that good stuff. (I refer to the devilish Top Corners. As these were a bugger for me to clean out.) You will want to cut your base board and all your plexiglass pieces to size. Do not forget to cut the strips that go across the bottom and top fronts. Use a 2" hole saw for the 2" Port and also for the vent if you use it. Word of caution here. I did not design it so it has a lot of play in the hole so you will need to use extra glue. Or find a smaller hole saw that will fit it more appropriately. The 2" port will fit perfectly with the 2" hole saw. Use 1" hole saw for the swivel mount for the bowden pass thru. Drill hole for knobs. Make sure to take your time doing this and use masking tape on your cuts. Glue all pieces together. This is a time consuming process. I recommend gluing in stages and make sure all pieces fit perfectly. When you cut your 2mm rod down for your 4 hinges, Make sure you give enough to fully seat into the corners and still have the door hinges sit in the rods. I used a Dremel to cut my 4 rods and used a mallet to seat them into their corners. On the door latches it's important to glue the side with the hole towards the inside. Use a pair of channel locks or any press you like to press the magnets into each of the 4 holes Once you have everything glued with the enclosure upside down, this is a perfect time to glue the back plates. The magnets from the doors will help hold them in place. First press the magnets into the 4 holes on the back plates. These holes will also face away from the doors so make sure before you press the magnets in, that when you hold this back plate to the door, the magnets will attract and not repel each other. THIS IS IMPORTANT! Take your time here to make sure it's right. I made sure all magnets in the doors and back plates all faced the same direction for this. once you have your magnets in and ensure they attract each other, apply some glue to the top of the plates, the thicker portion away from the magnets, and attach it to the front strips. Making sure the magnets align with each other and apply pressure til it sets. Do this for the top and bottom. When you are ready to secure the enclosure and your printer to the board with the wood screws, I recommend you mark your holes and drill pilot holes. This will prevent cracking. Once everything is secured, don't forget to add your knobs. If you used mine, use a M5 Tap to tap the hole for the knob and feed the M5x20 through the hole in the plexi and secure it to the knob. Happy Printing. How I Designed This Designed in OnShape All pieces that I added to this project have been designed in OnShape.
With this file you will be able to print 3D Printer Enclosure Reach 3D with your 3D printer. Click on the button and save the file on your computer to work, edit or customize your design. You can also find more 3D designs for printers on 3D Printer Enclosure Reach 3D.