3d printer power timer
thingiverse
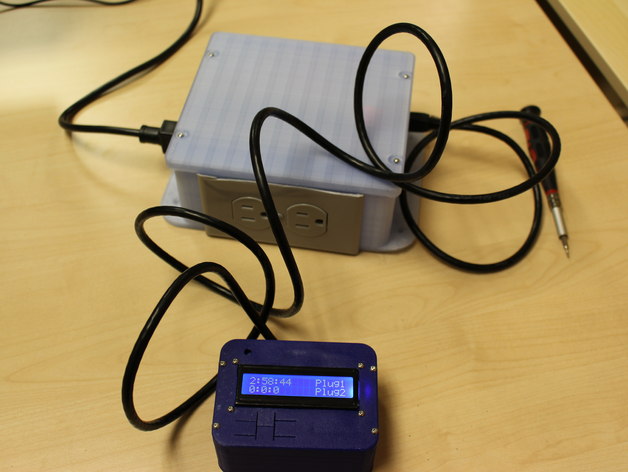
I needed a way to automatically shut off my 3D printers after they completed their jobs, so I could move on to other projects without having to constantly monitor them. To solve this issue, I designed an external control box that can interface with up to two printers at once. The external control box is built from this part:http://www.thingiverse.com/thing:667503 and serves as the brain of the operation, allowing me to set a specific time delay for shutting off my printers. This ensures they turn off after printing has finished, without needing any manual intervention. Instructions Before we begin, be extremely cautious when working with electrical components, especially line voltage, which can be hazardous if not handled properly. Always work on this project in the presence of someone else, in case anything goes awry. To get started, print out all the required parts: a 3D printed box, a relay retainer plate, a cover, a relay board http://www.amazon.com/gp/product/B00KTEN3TM/ref=oh_aui_detailpage_o03_s00, an inlet plug http://www.amazon.com/gp/product/B0050HH70E/ref=oh_aui_detailpage_o03_s01, a standard wall power outlet, a standard wall cover plate, a RJ45 jack http://www.amazon.com/Keystone-Cat5e-Network-Ethernet-Punchdown/dp/B00CJGJ1MG/ref=sr_1_32?s=electronics&ie=UTF8&qid=1423113450&sr=1-32&keywords=rj-45, network wire (which can be sourced from a discarded Ethernet cable), and 18-gauge or thicker wire for carrying electrical currents. Assemble the relay board in the box and connect it to the power switch. Then, remove the outlet receptacle's tabs by carefully breaking them off with a screwdriver. Make sure both legs of AC electricity flow through the relays to the switch, so that they turn on and off properly. Connect the RJ45 wires to the relay board. Build the LCD box and attach an Arduino device. Program it using the supplied Arduino sketch. Attach the RJ45 connector to the box and ensure it's securely in place. Finally, test everything out safely, away from flammable materials.
With this file you will be able to print 3d printer power timer with your 3D printer. Click on the button and save the file on your computer to work, edit or customize your design. You can also find more 3D designs for printers on 3d printer power timer.