3D Printer Shutdown Timer, Auto Off Switch
thingiverse
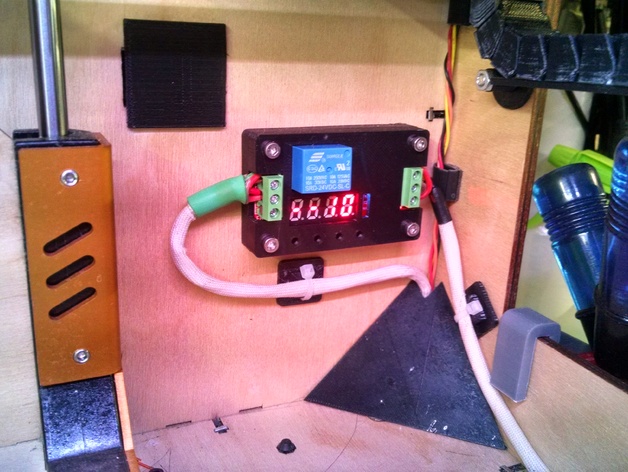
I wanted the ability of a simple addon module that could shut the printer off after its done doing a print BUT i also wanted it to wait for a while to allow the printer to cool down with the fans running before it gets shut off so i came up with this. Most of the time when i do a long multi-hour print i will start it before going to bed and let it crank away through the night, but the problem is i might not be up before its done doing a 6 hour print and i don't want it sitting idle for a couple hours or more after its done, or all day if i start a print before leaving the house. So here it is, Its a FRM01 Timer Relay Delay Module that i picked up off of eBay, i couldn't find them anywhere else online so i will link it here from the seller i bought mine from. http://www.ebay.com/itm/DC-5V-12V-24V-Multifunction-Self-lock-Relay-PLC-Cycle-Timer-Delay-Time-Module-/261610018926?pt=LH_DefaultDomain_0&var=&hash=item3ce92c186e If you source these anywhere else take note!!!! There is two versions of this module, one version only has 8 functions, the other version has 18 functions, you need the 18 function version and in 24v to use on most printers like the Makerbot, CTC, Flashforge, Wanhao, etc. You need the 18 function version to use function number 10. Set the module for Function 10, set your shut off delay, T1, for the cooling period you want, i set mine for 10 mins (600 seconds) as this allows plenty of cooling time but also enough time that if i get back after the print cycle is complete i can disable the timer and start another print, set T2 to zero seconds, and then your ready. The seller provided little or no instructions but i found a PDF of the instructions and i included it here. Now all you need is a microswitch, a regular power switch like the kind you can salvage from an old ATX power supply, and a little wiring. I used the dual switch mount from softwarebaer and i included that file as well. But here is the original. http://www.thingiverse.com/thing:536665 See the hookup diagrams for these modules online, it will explain it a lot better than i can in words but i will try my best to explain as well. Now for the Makerbot the wiring is a bit more in depth, but the other printers is really simple because they don't have the power switch integrated onto the mightyboard. For the Makerbot Rep 1 that i have i soldered a wire to the input side of the rear power switch for power and i soldered another wire to the ground trace on the mightyboard for ground to the relay module. For the other models of printers you can remove the positive from the 24v input plug on the mightyboard and loosen the ground and add your wire there and tighten it back up. You then take the 24v that went to the mightyboard and extend it or replace the wire from the power supply on the clones, or from the input side of the switch on the Makerbot and run that to the relay COM on the module, then install a jumper from the COM to the modules power input on the other end. The ground simply goes to the ground on the modules power input. Now this part is optional if you want to relocate your power switch from the back on the Makerbot's, the other printers have a switch on the back that actually supplies AC power to the 24v power supply mounted underneath. We are only switching the DC side here, so for those with one of the clones you will only be shutting off the 24v to the mightyboard and not shutting off the power supply, but basically the Makerbot has a power supply thats always on since its a big external adapter. If your not going to be using the printer for some time just reach around on the clones and flip off the AC power switch. To relocate the power switch using the two switch mount that i linked above run a wire from the modules NO relay terminal to one side of the switch, the other side goes back to the mightyboard. In the case of the Makerbot you need to solder that wire to the other side of the original switch on the board, for the other clones you just insert that wire into the power terminal block and tighten it down. That takes care of the power routing, now you need the triggering and the bypass/arm switch. For the triggering i used a microswitch, just one i had in the junk box but they are very common. I used a long arm switch that i had and designed a mount for it, which is included. Here is an example of the switch needed. http://www.ebay.com/itm/281124299886?_trksid=p2060778.m2749.l2649&ssPageName=STRK%3AMEBIDX%3AIT Its a TemCo CN0096 Two 20mm long 3mm screws and nylock nuts hold it in the mount. The mount on mine is just hot melt glued to the base and that holds it fine, but you could use double sided VHB mounting tape, or velcro, etc. The trigger switch and the bypass switch get wired between the +24v and the CH1 input terminal on the module. You need to connect one side of each switch to the +24v and the other side of each switch to the CH1 terminal. On the Microswitch it MUST be a Normally Closed switch or if its a single pole double throw make sure you connect the NC (normally connected) terminal of the switch to CH1. Most microswitches are a SPDT switch with both the NC and NO terminals but some aren't so be aware of this. Operation... To turn the printer on i flip both switches on, the power switch and the bypass/arm switch, the printer turns on. The bypass arm switch keeps power to the CH1 terminal which keeps the relay energized and the timer in standby, I start a print, once the bed raises and the print is going the microswitch has been allowed to switch on taking over the function of the bypass/arm switch, then if i want an auto off with delay for a long print i just flip the bypass/arm switch to OFF. This removes the bypass and now the microswitch is in control. When the print finishes the bed comes down and opens the microswitch, the timer module sees there is no voltage on CH1 and it starts counting down, in my case 600 seconds. After 600 seconds it opens the relay and the power is off to the mightyboard and the printer is off. To re-enable the printer all i have to do the next day is flip the bypass/arm switch back ON and the module turns on the relay and the printer is back on. The added power switch is inline with the relay output, so if something goes bad or i just want to turn it off manually i can flip that switch off as well while the relay is on. On the Makerbot the rear switch is left OFF, but you can always use it to bypass the entire timer circuit and added power switch if its ever needed. This all works great and i only wish i would have built this sooner!! Instructions Makerbot standard settings .2mm layer height, 75% infill, 230c, 110c on the bed, etc.
With this file you will be able to print 3D Printer Shutdown Timer, Auto Off Switch with your 3D printer. Click on the button and save the file on your computer to work, edit or customize your design. You can also find more 3D designs for printers on 3D Printer Shutdown Timer, Auto Off Switch.