3D Printer Table Organizer and Sellotape Holder
thingiverse
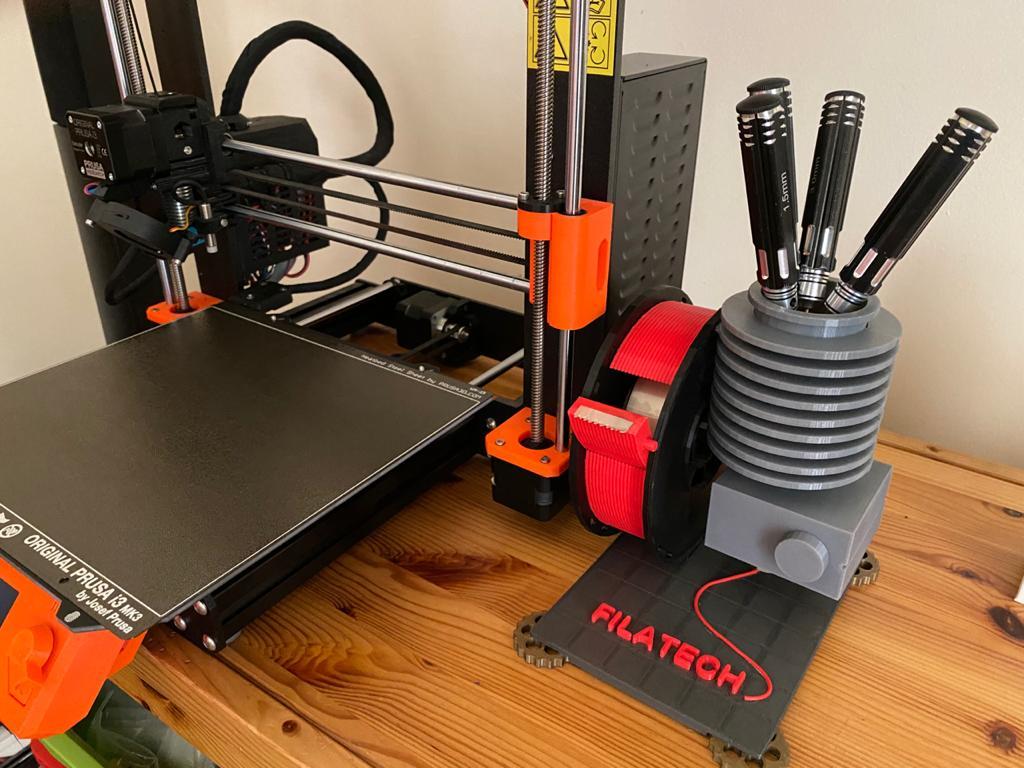
Hi Everyone; This is a table organizer and sellotape dispenser/holder for your 3D printer desk. You may use it to store your stationary or your 3D printer tools and spare nozzles. Overall dimensions are 140x180x170mm and it can hold a 25x66mm sellotape roll. This is project in progress and I didn't print it yet. What you need: 1. PLA Filament (my choice of colors is Black, Red, Gold, Silver, Dark Metallic Grey) 2. 8 pcs of disc type magnets 10x2 mm 3. CA Glue for assembling 4. A small steel spring (you can take it from an old retractable pen) 5. A piece of tin (like tuna can tin) for making the tape dispenser cutting blade). Note on Printing: Only Nozzle and Spool Barrel need support on build plate only, you can print the rest of the parts without support. https://youtu.be/x0tNgx_32j0 How to assemble: After Printing all the parts start assembling the 3 major parts of: Extruder, Spool and Bed as bellow: A) Extruder: 1. Snap in the fins into the extruder shaft, no glue is required, but you may glue them if you like. 2. Use CA and glue the extruder shaft to the hot end box and nozzle. glue the cylinder-like dummy heater piece behind the hotend box. 3. glue the parts of the hotend box drawer together. you can slid it into the hotend box. 4. Put the extruder aside for final general assembly. B) Spool: 1. Glue the fixed part of the dummy filament coil to the SpoolFlangeRight part using 4 disc type nipples as joints. 2. Glue the shaft of the moving part of the dummy filament coil (tape dispenser front) to the SpoolFlangeRight. 3. Slide the stop-pin into the hole in the middle of the tape dispenser front, back it with the spring and close the hole with disc-type plug. This stop pin is to lock the tape dispenser front into working position and stopping it from moving back. 4. Use the tin plate and cut a proper cutting blade according to the space which has been provided in the tape dispenser front. 5. Slide the assembled tape dispenser front on to its shaft. Dont glue it, it should move around the shaft. 6. Take the SpoolBarel and place it into the center on the SpoolFlangeRight. Dont glue it, it should rotate freely. 7. Glue four pcs of magnets into their places on dummy filament coil. 8. glue the other four pcs of magnets into their placse on SpoolFlangeLeft, watch the polarity to be matched with other side on the dummy filament coil. 9. Connect the SpoolFlangLeft with magnets and complete the Spool. C) Bed: 1. Glue the wheels into their places on the bottom of the bed. 2. Glue FILATECH letters into their places. 3. Take a proper length of 1.75mm (red color) filament and glue it into its groove on the bed. 4. Bed is Ready. D) General Assembly: 1. Align the Spool and Extruder together and fit them into their position on the bed, once the are aligned use CA and glue them. Don't glue the SpoolFlangeLeft, that part should be removable by magnets for loading the sellotape roll. It's ready now, you can keep your 3D printer tools like screw drivers in the shaft and your spare nozzles in the drawer. Please share your build. Your comments and likes will be highly appreciated. Happy printing.
With this file you will be able to print 3D Printer Table Organizer and Sellotape Holder with your 3D printer. Click on the button and save the file on your computer to work, edit or customize your design. You can also find more 3D designs for printers on 3D Printer Table Organizer and Sellotape Holder.