3D Text on a Breakaway Bar
thingiverse
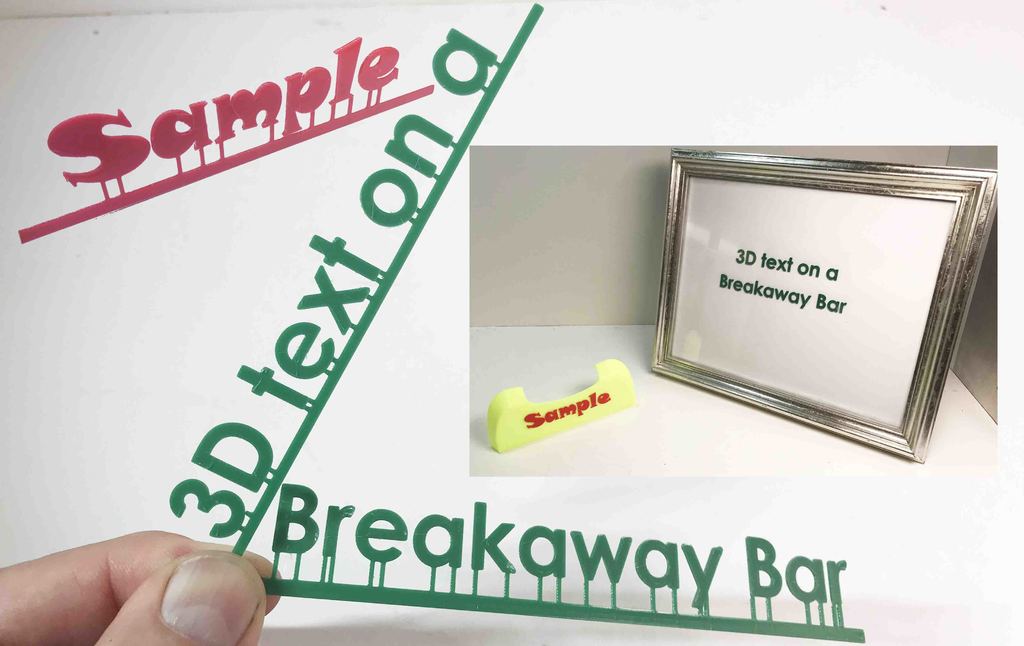
The objective here is to print a line of free standing 3D text on a breakaway bar that holds it in place as printed until installed. Ideally breakaway is the desire, but you need to use a blade to make a clean cut. I created a video to explain an early version of the program: https://youtu.be/Z7t0apyGVv4 <h2>Notes</h2> 1) Set your text, font size and bar length before doing your offsets. 2) Accents and parts of characters that are separate from the base of the character are free 3) floating and will need to be placed separately. <h2>Terms used:</h2> The bottom horizontal piece is referred to as the BAR. The components reaching up to the font are coded as STRING. If you want to import an STL object for sizing your text.. set stl_file_to_import to the file you want (using forward slashes). set import_sizing_stl to yes In the code you will need to locate if (import_sizing_stl == "yes"){ change the transpose and rotate to move your object under the text. <h2>Openscad Customizer</h2> In the video I demonstrate using Openscad Customizer. It is a really nice way to save multiple profiles w/o modifying the code. I have observed these items: 1) Sometimes you have a field that is a non-decimal… like 5 and will not let you enter 5.1. The simple fix is find that variable in the code on the left side and enter 5.1. It updates it in customizer immediately. 2) I demonstrate setting the offsets in the code on the left. Editing in customize works but is cumbersome when your offset list gets large. Every time you press F5 it resets your position to the end in the customizer field. What is important is that when you are done the customizer field contains the right values before you save the profile. You can still edit that field in the main code and it will update your customizer view. Remember to save your presets in customizer . 3)When you have a value in the lower letter offset… a feature I added after the video… and you then want that field to be blank, customizer will not let it be blank. A workaround is to just set it to equal the offset of a position in your main offset list… and it will be hidden. Even if it prints with no letter connection it won't matter. <h2>LINKS</h2> I reference a Prusa Slicer feature called ironing. This video talks about it https://www.youtube.com/watch?v=xa8jNJjowvI The complaint button https://www.instructables.com/Complaint-Button-II-Hammer-Time/ Openscad: https://openscad.org/ <h2>Version History:</h2> V1.1 Moved some bar variables into customizer that were not. V1.2 Added a separate low text line option for letters like p q y. This allows the low letter contact points to have the taper cut for a minimal touch point off the support string. <h2>Program Attributes:</h2> //Enter text to use in Single Line or First of Double Line text_first_line = "COMPLAINT BUTTON"; //font size used for first line and SINGLE line first_line_font_size = 13; //font to use. See fonts under SCAD HELP and FONT LIST. I usually insert from that list and then copy what I want. font_name_to_use = "Century Gothic:style=Bold"; //Length of the Bar. Should be longer than font and shorter than your bed. You can always cut it down. bar_length = 174; //If you already setup your text connectors and then after you change the bar_length... all your positions will shift by 50% of your length delta in length. This will allow you to adjust it back w/o having to retype the numbers. offset_adjustment = 0; //height of the bar... height off the print surface bar_height = .8; //bar thickness... the bar thickness top to bottom as the letters go. bar_thick = 1.0; //Not all font letters end at the same spot, this will adjust your string closer to so you can touch all the letters bar_adjust_Closer = .75; //Height of the font you are printing font_extrude_thickness = 1.0; //height of the attach string... height off the print surface string_hgt = .8; //The thickness of final jump (bridge) connecting to the font, we want at least one or two print layers after the angel cut. String_hgt - this will be the distance of the jump off the plate. string_jump_conn_hgt = .5; //string thickness string_thick = .8; //total length of piece going from bar to font string_dist_to_font = 1.8; //this is the length of the thin end that will jump to the font string_jump_length = 1.5; //FIX IT Arrow Font size .. for my initial project arrow_font_size = 9.5; // If you need to import an STL to size your font import_sizing_stl = "no"; //[yes, no] // Full path to STL to import stl_file_to_import = "G:/3d/Complaint_Button_2/Base.stl"; //First Line offsets for connectors. Must start with [ and end with ] first_line_offsets = [8,11,22,25,32,45, 48.5, 50, 59, 63, 66 , 76, 79 , 80.1 ,85, 92, 98.2, 100, 110, 113, 122, 125, 132.0, 133.5, 139.5, 140.9, 149.5, 153, 161,169]; //This the distance from the Bar to the bottom of low letters like P, q, y string_distance_to_LOW_font = 1.5; //This is the offsets for LOW lines to hit the bottom of letters like P, q, y Separate by comma. Must start with [ and end with ]. [] is None. low_line_offsets = [ ];
With this file you will be able to print 3D Text on a Breakaway Bar with your 3D printer. Click on the button and save the file on your computer to work, edit or customize your design. You can also find more 3D designs for printers on 3D Text on a Breakaway Bar.